How To Process A RAW File Quickly And Easily In Adobe Camera RAW
 by
James Trent
by
James Trent

You probably hear the question a lot: “RAW or JPEG?“. No matter which side you’re on, or if you have a side, you know that there are advantages to each.
One of the biggest advantages for JPEGs is the fact that they’re easy to share – they require minimal processing after you’ve taken the shot. Today, I’m going to show you a way to process RAW files that rivals JPEGs for speed and ease.
Meet Adobe Camera RAW. Built into Photoshop, Camera RAW (or ACR as it’s commonly called) is one of the biggest arguments for shooting RAW. People used to say, “RAW files take too much work“, or “They’re too hard to process“. ACR eliminates those problems.
The beauty of ACR lies in its ability to powerfully process and edit RAW files within a streamlined, efficient workflow. It’s one of my favorite photography tools (it’s very similar to its big brother Lightroom, but it comes free with Photoshop). In this article, I’m going to walk you through the workflow of processing a RAW file in ACR. I recommend following along so you can get a feel for what I’m showing you.
Basic Requirements
First, you’ll need a RAW file. When taking photos, make sure you’re in RAW mode in your camera. Once you have an image you like in RAW format, open it up in Photoshop.
As long as you have a full version of Photoshop, it should work fine. Camera RAW is included in every CS version of Photoshop, from 1 to 6, and in the latest Photoshop CC version. However, older versions only support older Camera RAW versions, so the newer your Photoshop, the better. If you have a new camera, you need to make sure you have a recent version of Camera RAW to make sure it will support your images.
Getting Started
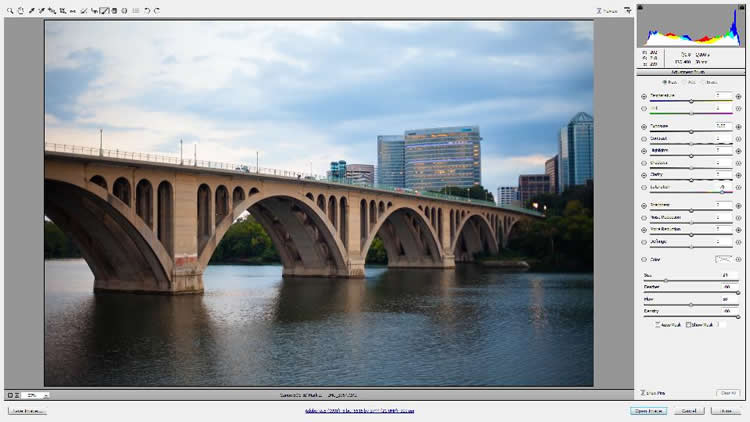
I’ll use an image of a bridge I took in Washington DC. Once you’ve opened the file, you should see a box like this:
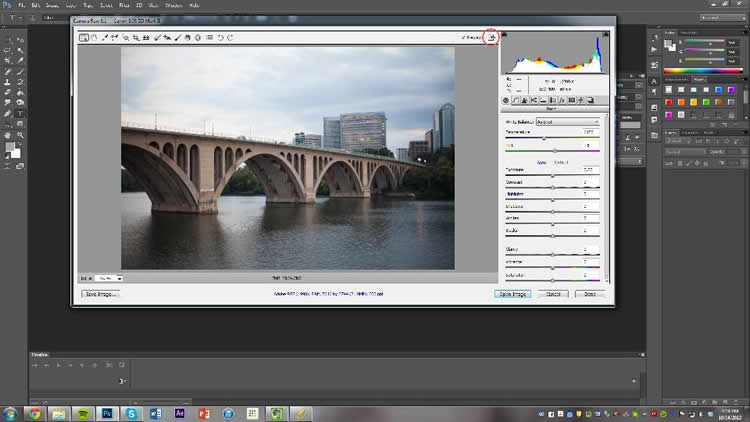
Welcome to Camera RAW
This sleek little program contains everything you need to process a RAW file. Let’s get started. Click the Full Screen button, circled above, to make Camera RAW full screen (the same button also exits full screen).

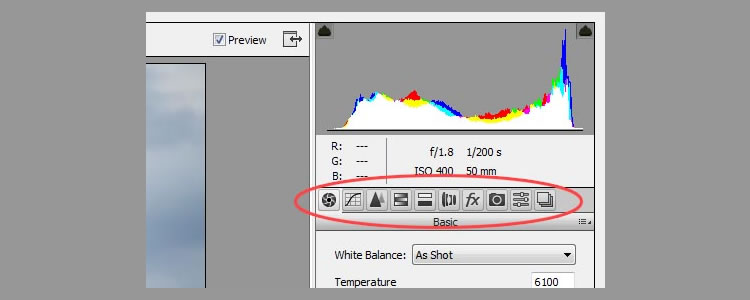
Notice the layout of the window. In the top left corner is the tool palette, which contains all the different Camera RAW tools. The zoom tool (Z) is selected by default. In the top right is the histogram, and directly below that is the image metadata (exposure and lens info).
Now look below the image info, and you’ll see a row of icons. These are different groups of settings. The first one is the one you see by default, called “Basic” – it’s the one with the sliders controlling exposure, contrast, saturation, etc…
Try clicking on another icon – they bring up different setting groups. The groups, from left to right, are Basic, Tone Curve, Detail, HSL / Grayscale, Split Toning, Lens Corrections, Effects, Camera Calibration, Presets, and Snapshots. These all let you do different things. If you don’t understand them, it’s fine – we won’t use most of them in this tutorial. The ones I like and use the most are Basic, Tone Curve, Detail, and Effects.
Let’s start with some basic adjustments. Go back to the Basic group. The first set of controls is white balance. With RAW files, you can change the white balance however you like – which means you don’t have to get it right in-camera.
This is a big advantage to shooting RAW instead of JPEG. Try moving the white balance slider left and right, and notice what it does to the image. You can also select a white balance preset from the dropdown menu above the slider. Double-click the pointer on the slider to go back to original white balance.
Anyway, I think the image has fine white balance to begin with, so we’ll leave it where it is. The next group of controls deals with exposure. The top slider, labeled Exposure, controls the exposure of the image. If you didn’t get the exposure right in-camera, you can adjust it here. Keep in mind that the more you adjust the exposure, the lower quality the image will be. You’ll be fine staying within a stop or two of the original image. Increase the exposure too much and you’ll start to see digital noise (grain).
Note: the Exposure slider is different from the Brightness slider common with many JPEG editors. RAW Exposure controls are much more powerful and high-quality than Brightness ones. Camera RAW does have a Brightness slider, but I just use Exposure.
Again, this image has good exposure, so we’ll keep it at zero.
The next slider is called Contrast. This image does need some more contrast, but I like using the Tone Curve setting for that. I’ll show you how in just a second.
You’ll see other sliders here, and you can experiment with what they do. I want to jump straight to the two sliders at the bottom: Vibrance and Saturation. These are two of my most-used controls.
They are very similar, but have different uses. Saturation is a universal control for making the colors more, well, saturated. It’s a useful control when used sparingly, and it can be overdone. Vibrance is kind of like a smart-saturation tool. It also makes colors more saturated and vibrant, but it’s very forgiving with skin tones, meaning it’s a much better option for photos with people in them.
In this image, we’ll use a combination of both. In my image, I like Saturation in the 30s to give the bridge and the building lights a nice warm glow, and Vibrance in the 20s to add some color to the sky and water. Experiment with different combinations and pick what you like best for your image.
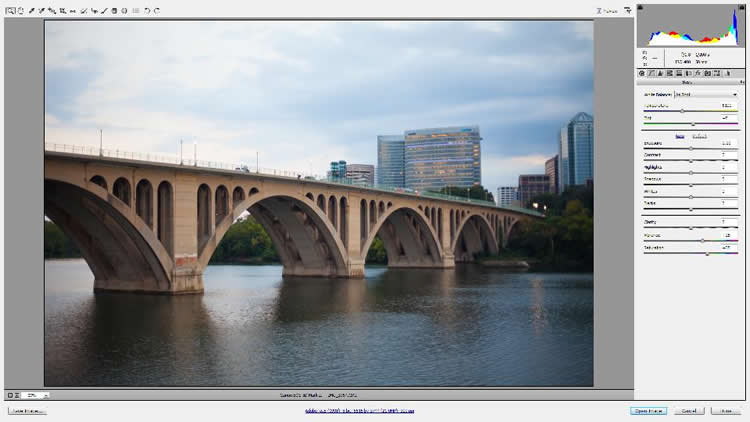
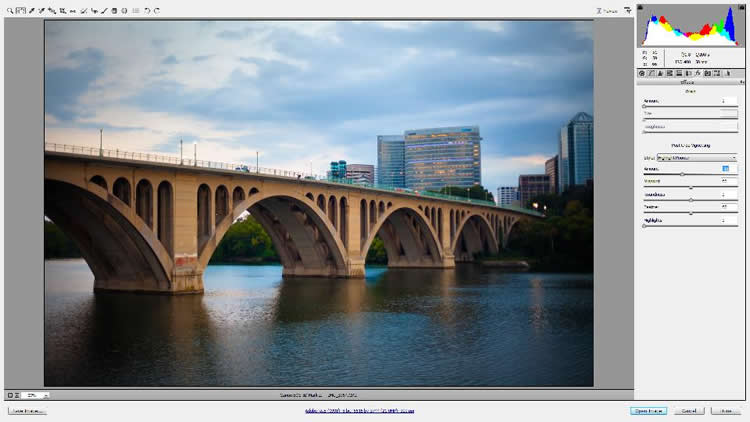
I see that the sky is a little blown out, so I’m going to go up to the Highlights slider. This slider controls the brighter areas of the image. I use this feature a lot to bring down areas that are overexposed. Note that this is not effective if the area is completely blown out and white – you need data to begin with if you want to edit that data.
I’m going to move the Highlights slider left to -75 or so. This gives me more color and detail in that area of the sky that was blown out:
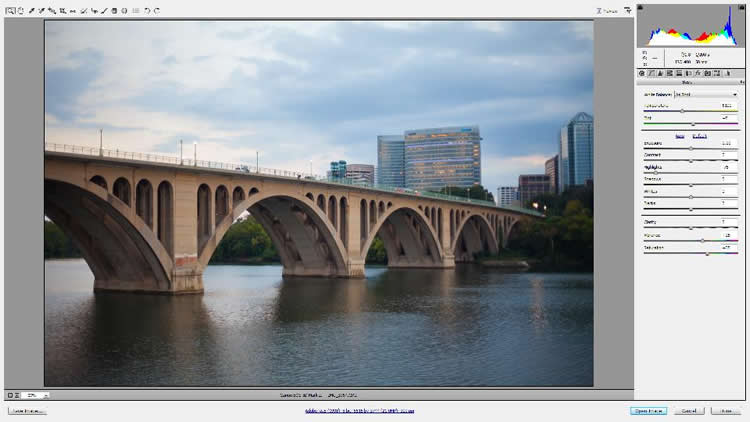
Now let’s move to the next group, Tone Curve. This will let us adjust the tone curve of the image. Click the second icon under the image info to bring up the Tone Curve settings. Make sure Parametric mode is selected.
This is where we add contrast to the image. This method is more precise than the Contrast slider and allows us to make more minor adjustments however we like. It consists of two steps: increasing highlights and decreasing shadows. So you’ll simply drag the highlights slider a little to the right, and the shadows slider left. Don’t do too much, but there should be a noticeable difference in contrast. For my image, I have my highlights at about +35 and shadows around -25. Like before, play around and see what works for your image.

Now we have the core changes done. After using ACR a lot, I’ve noticed that I do similar things to almost every image. I’ll always boost saturation or vibrance a little (depending on the image), and I’ll always add contrast using the tone curve.
Next, we’re going to add saturation to the bridge alone. One very powerful part of ACR is the Local Adjustments feature. This lets you apply an adjustment only to certain areas of the image. For this image, we’re going to use the Adjustment Brush (K). Click the Adjustment Brush icon in the tools palette or press K to select this tool.
Locate the Saturation slider and press the “+” button next to it. Each time you press it, the value should go up +25. For this image, I like how +75 looks, so I’ll press the “+” three times.
Now hover your cursor over the image. It should turn into two circles with a “+” in the middle. Hold down the right mouse button and drag the cursor – notice how the circles get bigger or smaller. This is how you change the brush size. The inner circle represents where 100% of the change will be applied, and it fades out to 0% at the outer circle. You can adjust the feathering options below the sliders on the right. For this image, I used a brush size of 25 for the bridge and set my feather at 100.
Hover the mouse over where you want to brush with saturation, and hold down the left mouse button to brush the area. In my case, I brushed the reflection in the water too so it matched the bridge. This gives the whole image a nice warm feel.

I still think the sky is a little bright on the left side of the image, so I’m going to hit the “-” button next to the Exposure slider. Note how this not only makes exposure -.50, but it clears the saturation level so you don’t accidentally make the sky really blue.
Now I just brush the sky where I want to make it darker. This reveals some of that hidden detail of the smaller clouds.
Note: Camera RAW creates a new local adjustment for each setting you change. See the little white or green targets on the image? Click on one to select it (green if selected) and edit that adjustment you made. If you want to go back and edit the saturation change we made at first, click on the target that’s on the bridge. (It will show where you brushed when you hover over the target).

Note that you can brush many other effects – exposure, highlights, clarity, sharpness, and more. I’ve just used two, but there are many more options.
We’re almost done – one more cool effect. Press “H” to go back to the Hand tool.
We’re going to add a vignette to the image. Vignetting is one of my favorite effects – some people are bigger fans of it than others. It does give a nice final touch to some images. Click the “fx” icon to bring up the Effects panel. The second group of sliders is called “Post Crop Vignetting” – that’s what we want. Drag the “Amount” slider to the left, somewhere around -30. Move it around and notice what it does to the image. You can choose a vignette and then double-click the pointer on the slider to reset to 0 (or press Ctrl+Z), so you can compare the image with and without the vignette. I’m going to settle with a -18 vignette on this image.
And we’re done!
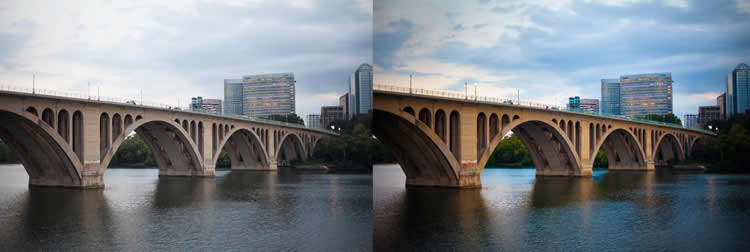
Before and after:
One cool thing about ACR is that you can save settings and use them on multiple images. If you have 10 images that are very similar, you can edit one of them and apply your settings to the rest of them – even local adjustments. One way to do this is the sync feature. You must have multiple images open to use that one. There’s another ACR feature called Presets that actually allows you to save your settings and use them in any editing session. Simply click the second-from-right icon to bring up Presets, click the button on the right, and click Save Settings. When you open another image in the future, go here and click Load Settings, and all of your changes will be applied to that image(s) as well.

Have you begun to see the power of Adobe Camera RAW? The more you use it, the more you’ll learn to do with it. These are some of the features I use the most, but I’ve only scratched the surface on what you can do with ACR.
This is a great alternative to shooting JPEG, because you can get so much more out of your images. If you take a little time to learn how to use it well, you’ll be able to do a whole lot of image editing in very little time.
About the Author: James Trent
James Trent is an artist, entrepreneur, and photography lover. He runs Canon Lens Reviews, doing video reviews of popular Canon lenses. Want to see his work? Check out his website at JamesTrent.net.