5 Great HDR Landscape Photography Tips
 by
Sam Neumann
by
Sam Neumann

If you’re a serious landscape photographer, chances are you’ve at least experimented with High Dynamic Range photography. In recent years, HDR has become a go-to technique for amateur and professionals alike because of the unique and stunning images it can produce.
In this post, we’ll go through some tips and techniques to help you harness the considerable power of HDR photography. And if you’re already shooting HDR, we’ll help you take it to the next level.
HDR: A Quick Overview
In a nutshell, High Dynamic Range Imaging is a process that involves taking multiple exposures of the same image and blending them together. Generally the photographer will take at least three exposures; one properly exposed, one overexposed, and one underexposed. Then, these are merged in post-production software that picks out certain elements of each to create one final image.
The benefit of this technique is it provides a much greater “dynamic range” (hence the name) of light and color than a single exposure alone. The overall goal is to make the image as close as possible to what the human eye actually sees; our eyes are fantastically equipped to handle a huge range of light, and thus are able to make out extreme lights and darks in the same scene.
Camera sensors – even the high-end, high-dollar sensors – simply cannot replicate this dynamic range, so we are often left with either underexposed shadows or blown out highlights, and are forced to choose one part of the image to expose properly.
With HDR, this problem is (nearly) solved; while exactly replicating what the human eye sees is an uphill battle, we can get very close. A properly processed HDR photo can include a full light spectrum, with perfectly exposed shadows, highlights, and of course midtones. The result? A whole new gamut of options available, and the potential to create some truly great images.
This particular post isn’t intended to be a step-by-step, beginner’s introduction to HDR photography. Instead, it’s meant as a collection of tips and tricks to help you improve your photos, and best utilize the high dynamic range tools at your disposal. We’ll assume the reader has at least a basic knowledge of DSLR photography and camera functions, as well as an understanding of the HDR process.
So here are some tips to help you in your HDR journey.
Use a Tripod
While a tripod isn’t absolutely, completely, 100%, totally necessary, it will make your life a whole lot easier and will most likely give you a better final image. I’ve taken numerous handheld HDR images, but my best are always those in which I had my camera secured with a tripod.
The reason, of course, is that you’re combining three (or more) images of the same scene, and you want them to be as close to identical as possible. When there are inconsistencies in the features (often caused by a slight camera move), it can create ghosting or blurry spots. And while most HDR software has tools to compensate for shifts, nothing is as good as getting it right the first time.
Plus, if you need to use a shutter speed slower than 1/60 – as you often will, especially for the overexposed image – the original image can get blurred as well, and fixing simple camera shake in post-production is nearly impossible. Using a tripod will give you a clean set of identical images no matter what shutter speed you use.
Experiment with Settings
Your post-processing tool of choice probably has a selection of presets from which to choose. While these can be helpful starting points, you’re nowhere near reaching the full potential of the image if you simply select a preset and are done. The true power lies in the fine tuning of settings.
The great part is you don’t even really need to know what you’re doing. One of the most effective – albeit slightly less efficient – methods is to over-apply a setting and then bring it back until it’s at a reasonable level. Basically, you’re jacking the slider way up to get an idea of the effect it has, and then scaling it down until it looks good. For example, in Photomatix, pull the color saturation up high, let the image update, and then take the slider down near 30%. This gives you a visual preview of both options and lets you decide which you like better, then allows you to fine tune to get it to the perfect place.

Strength, gamma, luminosity – these are also powerful settings that have a drastic effect on your image. Don’t risk just leaving them at the default level; instead, experiment with their values and find the sweet spot for that particular image. Remember: no two images are exactly the same, so to get the best results you need to fine tune your HDR settings for each one.
Less is More
We all know how it is in the beginning; you’re excited about the potential of HDR, and you want to create awesome images right off the bat. This leads to a tendency for many of us to overdo it a little bit (or a lot a bit), and ruin what could be a perfectly good image.
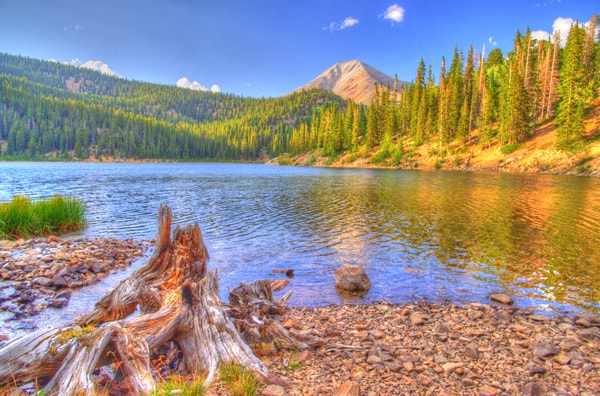
The photo above is a prime example of overdoing it. Oversaturated and overprocessed, it screams amateur. Sure, the effect is powerful and the image grabs your attention, but the end result is a busy, distracting photo that just isn’t very nice to look at.
The thing about HDR is that while it has incredible power, subtle is often the better way to go. Most times, it’s best to keep the sliders closer to the middle than the edges, and focus on accentuating one or two key features. Think of it this way: instead of trying to create a big, mind-blowing mural of color, instead look for ways to simply make the original photo better. Usually this will end up in a more agreeable product.
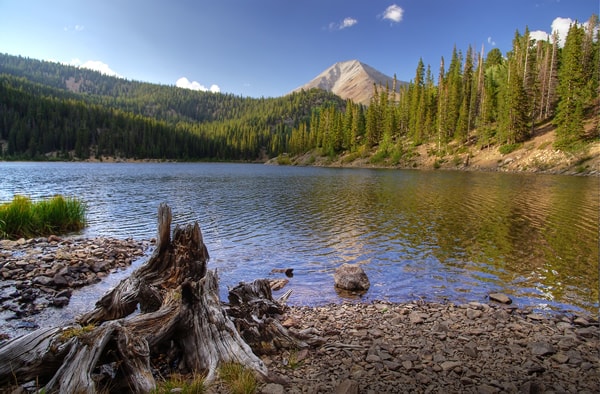
Now take a look at the above image and compare it with the previous one. Isn’t that better? It’s the exact same set of exposures, just processed with much more conservative settings. This particular photo is on the more muted end – it doesn’t even necessarily look like HDR. But the idea behind the process is to get a good balance of highs and lows, not to scream “I shoot HDR!”
Point Up
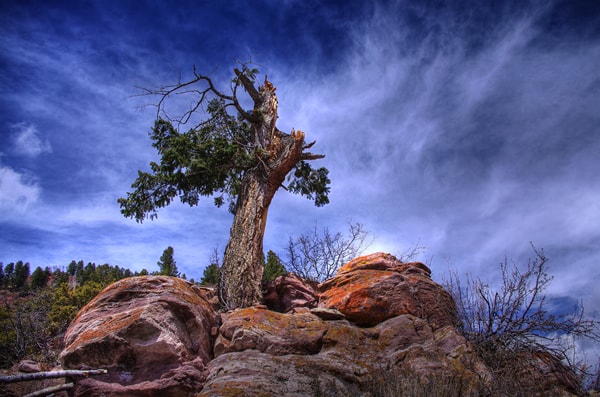
It’s one of the most commonly overlooked perspectives in landscape photography, but shooting the sky can create some tremendous photos, especially with HDR. Many amateur photographers look for perfect blue skies on sunny days, and while they certainly have their place, cloudless skies can make some of the most boring photos. Instead, look for action.
Be it a menacing thunderstorm or just a whispy trail of clouds, the awesome patterns in the sky are only accentuated by HDR processing. Use them to your advantage.
Blend with the Original
Sometimes no matter how you process a photo, it just won’t look completely right. Some parts might be too intense, or you might have an especially noisy sky (a common issue with HDR). One great way to make a problematic HDR image look more realistic is to blend it in some way with one of the original exposures (most often the properly exposed photo).
Bring both files into Photoshop or Lightroom and align the images on top of one another (Photoshop has a good auto-align function). Make sure they’re perfectly matched up, and then experiment with blending modes – often the combination of the two images will give you a better final product. You can also isolate and mask out specific problem areas in the HDR image – such as noisy or grey skies – and replace it with the same area from the cleaner original exposure.
These are just a few suggestions to help you get a great final image. The best way to improve, of course, is to just practice. Shoot a lot, process a lot, and make note of what works and what doesn’t. Practice makes perfect, and if you keep these tips in mind, before long you’ll be creating fantastic HDR photos.
About the Author: Sam Neumann
Sam Neumann is a freelance writer, photographer, and author living in Boulder, Colorado. You can find his photos, writing projects, and way too much other information on his website at SamNeumann.com.