How I Shot This: Violinist
 by
Jo Plumridge
by
Jo Plumridge

Although I cover a lot of photographic genres, my main interest has always been portraiture. I’ve always enjoyed the challenge of getting the best possible shot of people – even when they insist that they never take a good photo!
I do a lot of corporate headshots; so always enjoy it when I get the chance to do more creative portraits, such as the photo I’m going to talk about today.
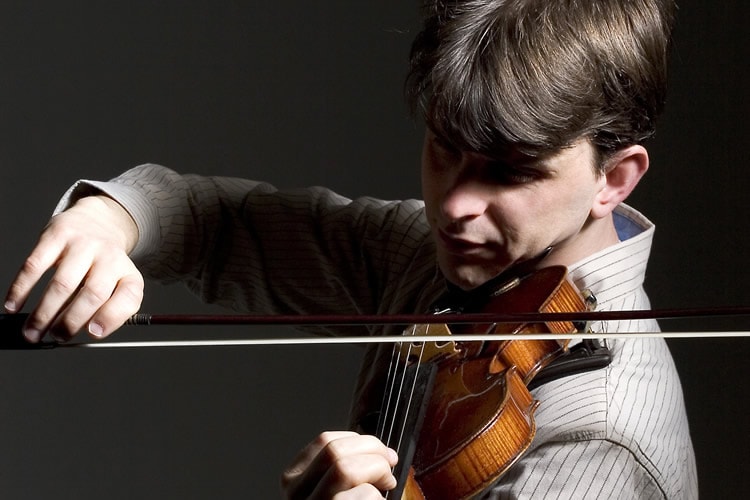
This is a photograph from a shoot that took place around 8 years ago, but it’s still one of my favourite shots. The client became a good friend of mine and I’ve photographed him and his various musical companions many times over the years.
Craig is a professional violinist and pianist who came to me wanting images to illustrate his website. Much of the website had already been built and the images needed to fit in with the existing theme. We shot a variety of shots on the white cove in the studio, but he wanted some more ‘moody’ shots in addition.
Shooting For Mood & Intensity
The violin is a glorious instrument to look at. Its burnished wood finish is very attractive and I really wanted to focus on this in the photos. I did take some shots where Craig made eye contact, but quickly decided that these lacked intensity. The shot works because it shows the relationship between musician and instrument, and how complete this is.
The overall feel of the shot is, hopefully, quite moody and intense, with only the violin and areas of the subject showing in the light.
Setting Up The Shoot
Despite its atmospheric feel, this shot actually involved very simple lighting. The trick in this shot is with the accessories used to create the feel and shadow. At the time, I was shooting with the then new Canon 5D (I use the 5D Mk III now and really rate the range) and for this shot, I used a fixed Canon EF 50mm f1.4 USM lens.
Settings were ISO 100 (I rarely shoot at anything else in the studio), 1/125th shutter speed and f13 aperture. White balance was set on custom with a grey card reading (using fixed studio lights allows for very precise white balance readings).
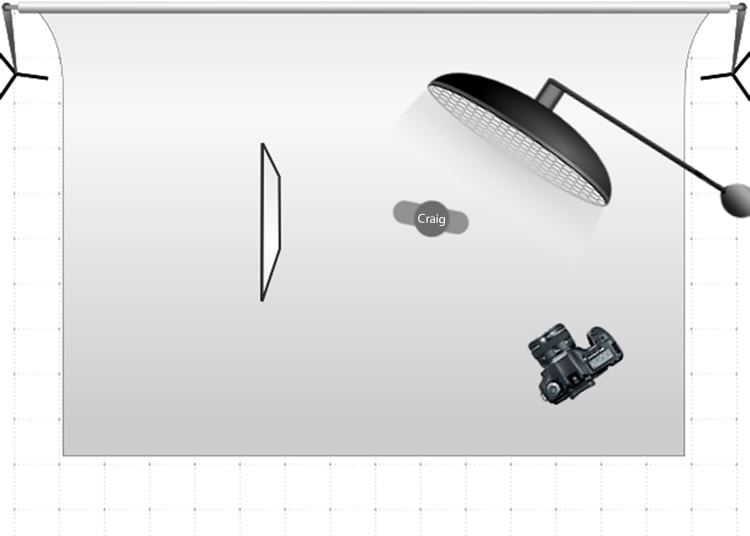
The actual lighting was provided by only one Elinchrom 500 joule head fitted with a square 60×60 honeycomb grid, attached to a boom stand. The light was angled down at around 30 degrees, hitting the top of the head and illuminating the violin and hand with the spill from it.
A white polystyrene board was set up to the left of the subject to help bounce light back towards him. The final, and in fact most important accessory was a ladder! I shot this photo standing at the top of an eight-foot ladder, so that I could get the angle I wanted – shooting down onto Craig.
All other lighting in the studio was turned off, so that the place was in darkness and the Elinchrom studio light was set on three-quarters power. This may seem high, but honeycomb grids of the size I was using dim the light significantly.
Here is how the shoot was setup:
I am a big believer in not over-egging the pudding when it comes to lighting. To me, studio lighting should produce almost naturalistic results – natural light and natural shadows. That’s not to say that there aren’t some fantastic overly lit shots out there, it’s just that my style and work suits a more natural look.
And whilst this shot may seem simple in terms of only using one light, it’s knowing which accessories and angles to use that adds the complexity. To be a good portrait photographer, you need to have a rapport with your subjects in order to get the best out of them and to produce shots where they are engaged. That, combined with precise lighting, is what makes a memorable shot. I hope you enjoyed this post, please let me know what you think.
About the Author: Jo Plumridge
Jo Plumridge is a UK based photographer, writer and lecturer. She specializes in portrait, corporate and travel photography, and writes photography, travel and comedy pieces for magazines, websites and books. You can see some of her work at her website, or follow her on Twitter.