You may already know that Ryan Brenizer [1] is a successful wedding photographer based in New York City. But, did you know he came up with a technique of using a lens with a focal length of 50mm or more to capture really beautiful photographs. How? We’ll talk about that later.
The technique was dubbed as the Brenizer Method [2] by photographers who saw his pictures and who wanted to learn the technique used behind the startlingly beautiful photographs.
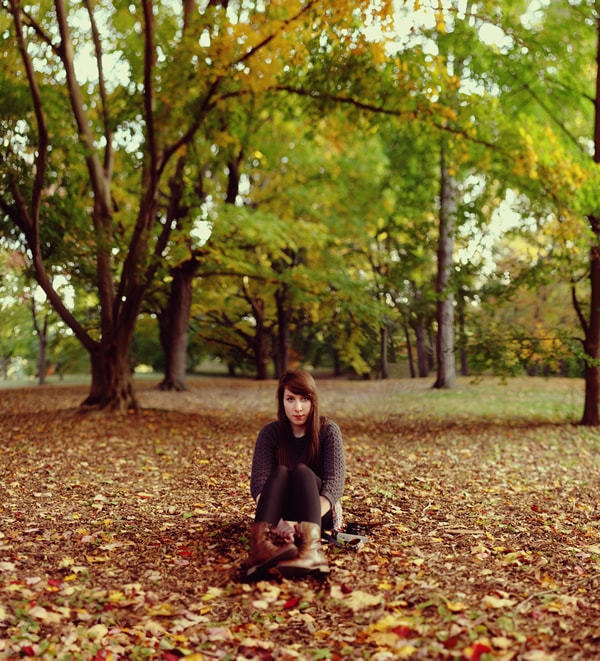
photograph by Joe St.Pierre
The Brenizer Method may be worth learning because it allows you to take photographs with a shallow depth of field. What does this mean? Think about photos with really crisp and focused subjects and really hazy backgrounds. The effect is ethereal, magical, dreamy and unusual, but nevertheless really beautiful.
Photographs with a depth of field that shallow is simply not possible when you are using a 50mm lens (even at f1.2). You may need a more expensive and much faster lens to achieve the effect.
With a 50 mm lens, you would also not be able to get a very wide angle when you take a shot, so much of what you get is a close up of the subject because you really cannot fit too many elements in there.
How does the Brenizer Method work?
The Brenizer Method allows you to do away with the need for more expensive lens. Simply put, you would need to take several shots of your subject and the background. Typically, you will want to capture more of the background than you would with a 50mm lens.
Then you would load all of these photos into your computer and stitch them up into a panorama. If you have a good software (hint: Photoshop), this part is actually very simple since it will be the computer that will take care of most of the work trying to overlap the different photographs at the right parts so that you could have a single gigantic photo.
How to do the Brenizer Method
1. You would need a camera that allows you to configure the settings manually. You would also need a tripod and, of course, the computer and software where you would do the stitching.
2. You would need to make sure that every photo you take is pretty much the same. First, meter the subject, and set the shutter speed and aperture. You should never change these settings until you are done shooting everything for that photo.
- Set your aperture to the smallest number possible on your camera, this will give you fuzzy backgrounds because the lens is wide open.
- Use JPEG rather than RAW. The smaller the file size of your individual shots, the better and faster it will take your software to do the stitching. Plus, you have to remember that you will be stitching everything together, so if you use several photos with really big file sizes, your resulting panorama would be very, very, very big.
- Do not use automatic white balance for your shots. AWB might change the white balance between your pictures, and it will look very bad when these pictures are stitched together. Always set your own custom white balance before you shoot.
3. Do not just blindly shoot photos. One of the mistakes that people make when they first learn to shoot using the Brenizer Method is that they just take the photos without thought of what they want to achieve in the final shot.
You could avoid this by framing your shot so that you would know what your finished photograph would look like. If you have a Polaroid, take a picture of your background. Cut a rectangle out of a cardboard and place the cardboard over your Polaroid.
You must take note of the things that are in the corners so that you would be able to get these elements in the preliminary photos. Remember that you would be doing a panorama, so it is important that you are able to include overlapping elements into the shots.
4. Taking the photos.
- Take a photo of your subject in focus first.
- After you get the subject right, it is time to shoot the background.
Be sure to keep your camera at the same spot. Then shoot the background starting from the top row, going from left to right. Then go down a little bit and shoot the next row of your background. Repeat until you have taken your whole background.
Remember those corners that you took note of with the cardboard over your Polaroid? This is where they come handy.
How much overlap do you need? It may be the computer doing the work, but make it easier for it to stitch your photos accurately by overlapping your images by 30% at least.
Also, remember that loading too many photographs to be stitched could increase the chances that there would be more faults with the resulting panorama. Do not feel pressured to take hundreds of photographs when you are just starting out. You can still get startling Brenizer photos with only 6, 8 or 10 photos stitched together.
5. Once you have the photos, you can load these into Photoshop. Click on File and then click Automate and then choose Photomerge. Photoshop will take care of stitching the photographs you have.
If you notice that there are some vignetting with your photos, take these out first. Remember that shooting with your lens open wide could result in vignettes appearing in your photo. Take out these vignettes first before you put it on Photomerge.
If you do not have Photoshop, look for another panorama stitcher program that could do the hard work for you. You can check out Hugin [3], which is an open source program.
6. Cut and crop the resulting stitch photograph as you deem fit.
The Brenizer Method is an advanced photograph technique that you will want to master. It allows you to do more with your lens without having to go out and buy faster and expensive lenses. It would take a lot of practice but it will be well worth it!