I disagree with photography instructors who think that everyone should learn to shoot in manual mode. While I agree you should understand how to manually adjust your camera’s settings, I disagree with its value as a learning tool.
It makes photography frustrating and confusing instead of fun. Not only that but it ignores manual adjustments that have actual practical value in day to day shooting situations.
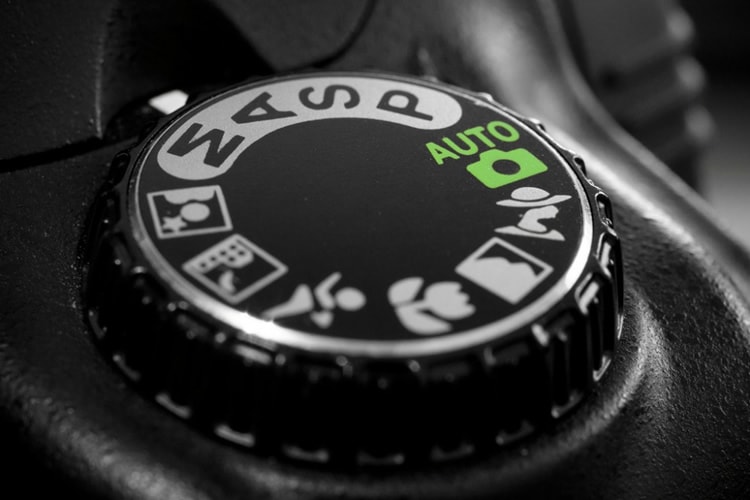
photo by Alex Banakas [1]
How you use your camera will depend greatly on what type of shooting you do. A landscape [2] photographer will have different priorities than a photojournalist [3] or wedding [4] photographer. Product, food [5] and fashion [6] photography will all have their own demands for lighting, lenses and will all involve a slightly different shooting style.
When you shoot long enough you’ll start to develop your own style and learn the tweaks and tricks to take better pictures. Many of those tweaks will be some kind of adjustment to your camera, but which settings and how you change them will depend on the type of photography you’re doing and your style of shooting.
For the type of shooting I do, there are six settings I need to know by heart.
Shooting Modes
Specifically the dial on the top of your camera. Whether you have a mechanism that locks that dial or not, you need to know every setting on it by heart. Without looking at my 7D I know that all the way to the left is Full Auto, then Creative Assist, Program Mode, Shutter Priority, Aperture Priority, Manual, Bulb and then C1, C2 and C3 all the way to the right.
There are good reasons to know those modes by heart. If you don’t have a lock on the dial, then it could get bumped in your bag and you not realize it. Even if you have a lock are you sure you didn’t change the mode the last time you were taking pictures?
You can always check your LCD screen, but if you’re looking down you could be missing shots. Better to keep your head up and know where to stop without looking.
Burst Mode
Burst mode is another one of those things you need in a hurry when you need it. When you need it is when you’re taking group shots and candids when people are coming together quickly in small groups.
Burst mode, where your camera fires off several shots in quick succession, helps insure there will be at least one shot where everyone has their eyes open. Sports photography [7] is another type of shooting where Burst Mode comes in handy, especially for sports that move fast.
Exposure Compensation
Sure you could do the same thing by flipping over to Shutter or Aperture Priority and tweaking the shutter speed or aperture, but why? You can use Exposure Compensation to achieve the same desired result without guessing at any of the other settings.
When you want to change the Depth of Field in a shot, that’s when you use Aperture Priority and when you need to freeze fast action or blur the motion of the waves is when to use Shutter Priority.
But to knock off a half-stop quickly, just use Exposure Compensation. It’s faster and lets that expensive computer inside your camera do the heavy lifting.
LCD Brightness
This might seem like an odd one to suggest until you’re setting up for a night shot, thumb the power switch and have your night vision suddenly blasted by a glowing LCD that swamps the darkness because you had it cranked up for working in daylight.
Even with the darker menus you can’t see anything working in near darkness when the LCD is on. I know that the LCD brightness adjustment is the wrench with the two dots in the main menu just in case I forget to set it ahead of time.
Manual ISO Adjustment
This is another adjustment that most often seems to crop up in difficult shooting situations when you can’t see.
Those are the very same shooting situations in difficult lighting that most confuse your camera’s computer, which will try for optimum overall exposure even when you’re shooting Christmas lights. Unless you want your Christmas light shots to come out at a bazillion ISO, learn where the adjustment is in the dark.
Back Button Focus
This is one of those programming tricks people should be learning in basic photography class instead of fumbling through all manual shooting.
Modern AF systems are lightyears ahead of the early models, but they still get confused and count on you for highlighting the subject. In some rare situations, when the AF gets confused, you can push the shutter button and nothing happens while the AF tries to figure out where to focus. That’s always a visceral moment.
Back Button AF relieves that by letting you program one of the buttons on the back of the camera to tell your AF to do its thing instead of it automatically kicking in as you depress the shutter button. That way, wherever the focus is set when you hit the button, the shutter will fire. In my experience I’d rather have a less than perfect shot than none at all. When you’re working at f/16 and f/22 on a sunny day Depth Of Field isn’t really an issue anyway, so why risk missing a shot?
When you’re on a paying job is not the time to practice quickly changing camera settings. The time to practice is before you get to paying work. It’s a little like touch typing, once you get the hang of it you’ll get faster and peek less often. To get there you have to practice until the setting changes are automatic.