5 Great Tips for Successful Food Photography

An art form in its own right, food is often hailed as the “Universal Language.” It transcends verbal and cultural barriers to exist in a realm of its own, bringing people together by meeting one of our most basic needs; hunger.
Food photography is an ever growing niche of commercially-inspired still life. It’s no longer just for the cookbooks. In this digital age of Instagram, Pinterest, and blogging, sharing photos of our culinary adventures has become almost a prerequisite to digging in.
DSLRs are a relatively common household item, even for the non-professional, and spirited home cooks everywhere are taking to photography to showcase their good work. Before you start shooting, familiarize yourself with a few timeless pointers that will make your photos look good enough to eat.
Utilize Natural, Ambient Light
A fundamental rule to any and all photography is that lighting is everything. Soft, organic light is comforting and appealing, emphasizing the natural freshness of ingredients in a true-to-life representation. Determine what quality of light you’d like to achieve in order to convey a certain mood or theme around the dish.
Leave it bright to invoke a delicate, airy sweetness, or keep it dim and shadowy for a rustic sense of elegance. Set your white balance accordingly, and shoot in RAW to tweak any necessary adjustments in post-processing.
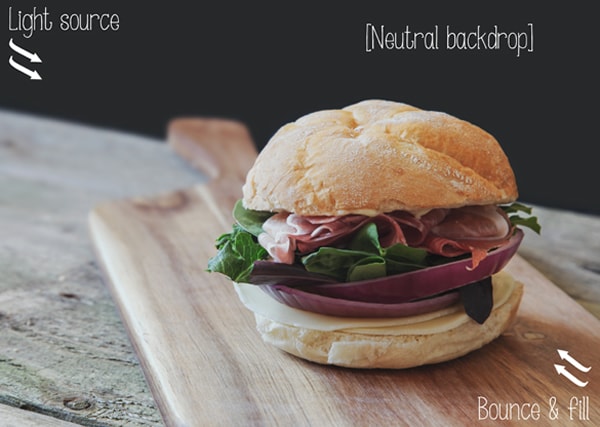
A neutral backdrop will help direct the focus to the food, so use blacks, off-whites, and dusty earth tones to your advantage.
Study the way light enters your home (or studio) throughout different times of day, selecting a convenient spot near a window to set up. A personal preference I share with many other food photographers is to light from the side of or behind the subject matter. If the sun is too harsh, soften it with a translucent white sheet or tracing paper fixed to the window. Bounce light in from the opposite side of the window to fill any shadows.
A collapsible reflector is a great tool to have on hand to cover all of your light direction. They’re relatively inexpensive, versatile (many with gold, silver, black, and diffuser panels), and take up minimal space in storage. If you don’t have a reflector on hand, a simple, plain white piece of foam board with do the trick.
Tell the Story
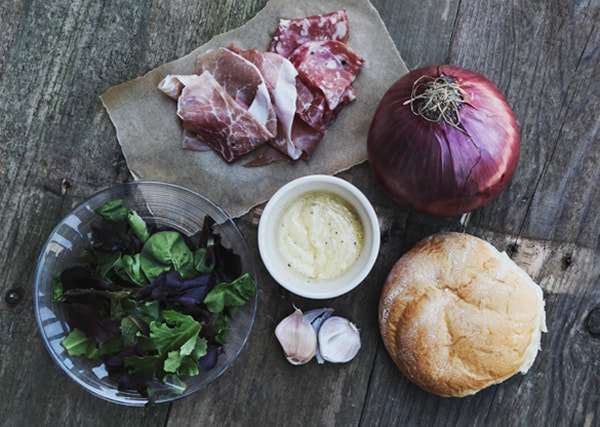
The finished product is beautiful, but how did it get that way? A couple shots of the end result are nice, but don’t forget to also document the process.
When professionals work with chefs, they often include shots of the raw ingredients and mise en place, or spices and seasonings lined up for use. So much of food preparation is a ritualistic practice steeped in tradition. Showcasing this can be a very effective method of storytelling, even from your home kitchen.
Choosing a Lens
When photographing a person, the goal is to select a lens that flatters their features. Photographing food is a similar process. A wide-angle will dramatically distort the perspective, and most telephotos don’t allow you the workable distance needed to shoot something at close range. Food photographers instead love a fast, razor-sharp medium telephoto to get the job done.
The beloved “nifty” 50mm offers a perspective close to how the human eye views its surroundings naturally. While a prime will be a smaller lens body and generally a tad sharper, a standard zoom in this range works just as well. A wide maximum aperture of at least 2.8 ensures speed, which is key for capturing sharp details and working quickly with the extremes in temperature (hot or cold).
Equally as important, it gives you the leeway to really use shallow depth of field creatively. Soft background blur at a wide aperture reinforces the food as the focal point, and gives final images polished, professional appeal. For the finer details, a dedicated macro is second to none.
Color and Composition
Certainly not all food is bright and vibrant, but if you can help it, get some color variation on the plate. It excites the viewer, and inspires them to buy or make whatever it is you’re showing them.
Contrast and texture give a realistic sense of dimension, so clear, sharp image quality is important. A reliable tripod will help stabilize the camera and free up your hands when you need to make adjustments to your subject matter. Playing with composition can take some practice, so don’t be afraid to move around, reposition, and shoot from a variation of angles. Eventually, you’ll learn what works and what doesn’t. An all-encompassing overhead shot is perfect for showing patterns and repetition of shape, while an eye-level viewpoint makes individual pieces look larger and more prominent.
Observe the way grouped items fall or sit together naturally rather than stacked rigidly against each other. A stiff, obviously staged layout detracts greatly from the finished image.
Props
Try to bear in mind that props (dishes, flatware, glasses, etc.) are never meant to be the focal point. An overabundance can easily clutter a composition, so remember to choose relevant, complementary pieces. Flea markets, craft stores, and consignment shops are all great places to scout for inexpensive items.
If you intend to eat the food after shooting, clean all containers sufficiently and ensure they’ve been deemed food safe. Salvaged lumber and furniture can also add a touch of rustic ambience to a photo. Just be cautious that all loose fragments, bugs, and rusty nails or staples have been safely discarded. Lastly, consider picking up a soft paintbrush or pair of tweezers to gently remove any unwanted crumbs from your workspace.
About the Author: Amanda Bellucco
 Amanda freelances full-time as a photographer, artist, and writer in her native Upstate New York. She specializes in shooting food, product, and various types of traditional and creative portraiture. You can check out her work on her website, or follow her on Google+.