9 Tips For Shooting Great Photos At Night

Think about a time when you go out to view the city lights from a certain vantage point and you get wowed by the view.
You take out your camera and try to capture the beauty of the city at night, only to come up with a photo with nothing more than pins of light or worse, blurry images. Or maybe you come up with a photo that is too dark you cannot see details.
The truth is, shooting at night can be a pain. But it is not impossible to get strikingly beautiful photos when it is already dark. Just follow these tips:
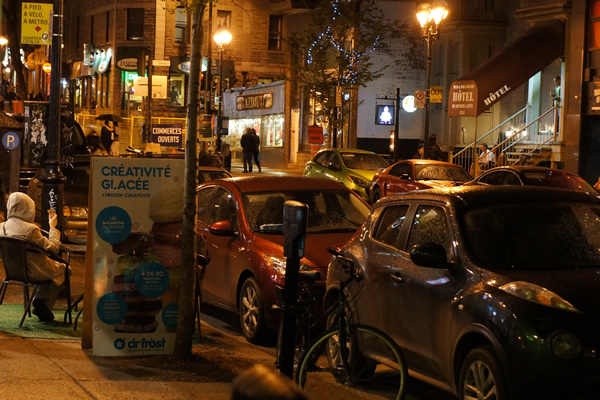
St-Denis Street, Montreal – photo by Jon Phillips – 55mm f5.6 hand-held at 1/20
1. Shoot in manual mode.
Always use the manual mode when you shoot photos at night. This would allow you to set your ISO, shutter speed and aperture. Use the smallest f-number that is available to you and choose a relatively long shutter speed to allow you to capture the lights. Alternately, you can opt for a higher ISO number.
If ISO, shutter speed and aperture, still confuses you then maybe this will help:
ISO is an indicator of how sensitive your camera is to light. This means that your camera is twice as sensitive to light at ISO 800 as when it is set at ISO 400. It would seem like if you need to shoot photos at night, all you have to do is opt for a higher ISO, such as ISO 1600 or ISO 3200, right?
Wrong. Because a higher ISO usually produces a grainy photo, with a lot of noise, so you would need to print your photographs on a high quality paper to ensure that it would look good.
Shutter speed or exposure is an indicator of how long your shutter will be open to collect light. So 1:5 means 1/5 of a second while 1:4 is a quarter of a second. Because you are dealing with fractions, that means the larger the number, the shorter your shutter will be open to allow more light in. That is if your first number is 1. As a rule, go for exposures that are faster than 1:15 because more than this, you would probably get blurry photographs at night.
F-stops pertain to aperture, which allows various amounts of light to be captured by your camera. Remember those old James Bond films where you have a small dot that eventually opens up to reveal the movie’s title sequence? That is your aperture. You can set your aperture to the lowest number you have.
Play with these settings and find out which result is the best night photo for you.
2. Use a tripod to make sure that your camera is very steady when you shoot at night or in the dark.
Also, you might want to use the self-timer to set off the shot so that you do not move the camera as you push the click button. If you do not have a tripod, it would still be possible to get good photographs in dark conditions. You would need to learn how to hold the camera very still, and instead of a 10-second or a 5-second self-timer, set your camera to shoot continuously. You would be getting a lot of photos that you can process later on. Remember that these would largely be blurry, but you are sure to have some good photos in there.
3. Turn off your anti-shake option or your image stabilization mechanism when you are using a tripod.
These will try to counter any motion or shaking from your camera. If you are using a tripod, your anti-shake mechanisms will actually cause your shots to be blurred.
4. Always adjust your shutter speed after each shot until you get the best results.
If you find your photo too dark, you might want to use a slower shutter speed. Conversely, if you have a picture that is too bright, then go for a faster shutter speed.
5. If you are having problems with focus, then turn off auto-focus and focus on the lights manually.
Some cameras may have some inherent problems when it comes to focusing in low light conditions.
6. If you are shooting a subject at night, then consider using flash.
Most night time photography involves cityscapes and the lights. But if you need to shoot a subject such as a model or people in the foreground, you might get better photos if you use an external flash. Be sure that your subject stays perfectly still because you would need to shoot with a long exposure.
7. Include motion in your photographs.
If you want to add more drama to your photos, try to include motion in your photographs. Using long exposure, you can shoot trails of light that would make your photos much more beautiful.
8. Plan your shots.
Taking great photos may require some planning on your part. For example, night photos often come out better when you take pictures at dusk. This is a time when it is easier to capture the colors without trying too hard. Also, you would need to know what settings to use so be sure to experiment a lot before taking your shots. If it is not possible for you to schedule your shoot at dawn or if you cannot go back to the place, then be sure to take lots of photos. The principle is that the more photos you take, the more choices you are going to have and the better your chances of landing a prize-winning shot.
9. Beware of overexposure.
Be sure to adjust your settings so that your photos look like it was shot a night, instead of being overexposed and looking like it was shot in daylight.
Keeping these tips in mind, you are on your way to taking perfect night photos that looks like you yourself are looking at it. If you are new to photography and you forget all of these, then here’s a cheat tip: set your camera on long exposures and be sure to keep a very steady hand while shooting continuously. This will help you improve on the quality of your night photos tremendously!
Also remember that to get great night photos, you might want to invest in a tripod or even a remote controller or self-timer.
With these tips, we wish you a happy night time photo shoot!
About the Author: Michael Gabriel
 Michael Gabriel L. Sumastre is an experienced writer who loves to take pictures of the countryside as well as aerial photographs. He maintains his professional writing portfolio at TheFinestWriter, and you can visit his photography portfolio at Sumastre Photography. Michael was hired by Booking.com to photograph 10 of the most beautiful beaches in Palawan, Philippines.