Infrared Photography Made Easy With A Digital Camera

In the past, infrared photography was difficult due to technological limits. In this type of photography, the image sensor or film that’s utilized is sensitive to the infrared light. Due to this special consideration, there was a lot of hassle involved.
For instance, you had to deal with black-and-white processing, special film handling, and the inability to see your results until the entire roll was exposed and the photos were printed. Thankfully, today, all this has changed as digital photography has made taking infrared pictures a lot easier.
picture by Mark Taylor
Infrared Is All About Ambience
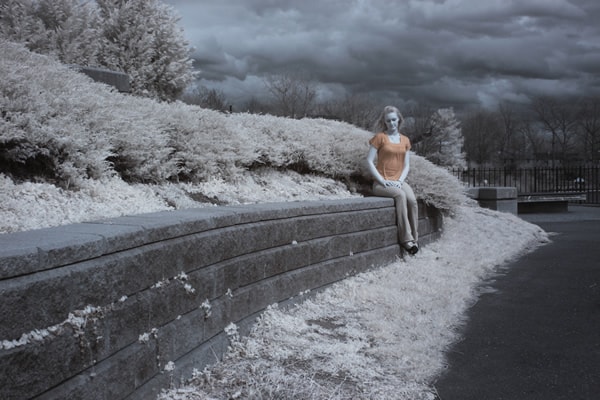
To the untrained eye, monochrome photos in infrared might appear exactly like regular black and white pictures. However, keep your eye on the photo a bit longer, and you’ll start to see unique effects pop out. For example, objects that are normally bright in visible light (such as the sky) appear darker in infrared, and some objects that usually appear darker (such as green foliage) actually get a bright glow. The end result is simply an unforgettable feeling from looking at such a photo because it’s both eerie and unique.
What to Photograph in Infrared?
Infrared enthusiasts generally believe that the most effective and pleasing subjects to shoot are simply sunny outdoor landscapes. Particular objects to include in the shot are mundane things like water, grass, fluffy clouds and foliage. Sunlight in the evening and morning features more infrared than during midday, so target those times of the day for your shots.
Of course, in photography, the only rule is that no rule is set in stone. Images shot under a cloudy sky may also turn out nice in infrared, as could bright-walled buildings against a dark sky. Play around with various scenes and times of the day, and have fun experimenting.
Picking the Right Digital Camera
Getting the right digital camera is one of the keys to success with infrared photography, but how do you know which to pick? This is made tricky by the fact that digital cameras feature special, infrared light-blocking filters on their sensors. Ask any infrared photography enthusiast today, and he’ll likely tell you that most new digital cameras don’t accommodate infrared photography very well.
That has to do with the fact that camera makers want the infrared stopped before it gets to the camera’s sensor. This is in marked contrast to the earliest digital cameras on the market, which let in quite a good amount of infrared light. One of the most revered such cameras was the Olympus C-2020Z. To have an effective digital camera for infrared today, you’ll have to make some adjustments.
There Are Three Choices
This is not to say that you won’t get amazing infrared results with today’s digital cameras, though. On the contrary, today’s digital cameras can be excellent for infrared photography. You just have to remove the infrared light-blocking filter on their sensors, purchase a digital camera without such a filter, or use an infrared filter on the lens.
Some digital cameras like the Sigma SD14 make it easy to remove the infrared light-blocking filter. All it takes is removing the lens to get at the filter behind it and then pushing said filter up to release it. The Sigma SD14 is exemplary in this regard because many other cameras require professional conversions to remove the filter.
You can also purchase a digital camera with no infrared light-blocking filter at all. However, such a camera can be quite pricy and somewhat hard to find. Two examples are the Fuji IS-1 and the Fuji IS Pro, both of which have been on the market for a few years already.
Your third option is to use an infrared filter to prohibit all visible light from entering your digital camera’s sensor. This should give you the best infrared photography results (assuming you don’t spend for a very expensive digital camera with no infrared light-blocking filter). Most of the time, you can easily attach this filter to the lens, but if you have a digital compact model, you may require a lens adapter tube.
Setting Your Exposure
Now that you have an idea of what style of digital camera to use, you’re all set to take some pictures. Simply put, you should expect to deal with relatively long exposures. Look at it this way: On average, an infrared filter together with your digital camera’s infrared light-blocking filter is going to allow just 0.1 percent of any incoming light. For instance, a brighter scene that needs 1/500 s at F/8 with visible light is going to take at least 1 s longer at F/4. This is true of most digital cameras.
How to Focus Properly
If you’ve got a non-SLR digital camera, you’re in luck since the autofocus is set, via contrast detection, in the image sensor plane. Your camera’s circuitry is going to correctly determine when the image is in focus. With an SLR, the autofocus is controlled by a group of dedicated sensors, which are as far away from the lens as the imager is, behind some mirrors. You may run into a bit of inaccuracy with an SLR because the imager and the autofocus sensors are each getting a little bit of a different version of infrared light (keep in mind the presence of the infrared light-blocking filter on the imager). If you experience trouble focusing, attempt to utilize wider zoom settings and consider taking pictures in aperture priority of approximately F/8.
What to Do in Post-Processing
Okay, so you’ve configured your camera, succeeded at focusing it properly, and now you want to make your pictures look the best they can. You’ll notice that your infrared shots will routinely show either a sharp purple-red or red tint. If you take a lot of infrared pictures with Olympus cameras, you no doubt know this already. So what to do? Just translate your infrared images to gray scale (black and white monochrome). Using a good post-processing program, you can usually achieve this simply by desaturating the image.
Think About Adding Some Color
Your final infrared pictures don’t have to be black and white offerings, although some photography enthusiasts love the purity of monochrome. If you’re a bit more experimental, think about using the color information in your image files to come up with infrared pictures that are really out of this world. The most straightforward way to do this would be to divide the picture into separate RGB components, alter each one individually, and then finally recombine them. You could end up with some absolutely mesmerizing and memorable images like a purple or yellow sky sitting on top of an icy-blue lake with a mirrored reflection.
Infrared photography is used widely in fields like astronomy, forensic science and aerial photography, but photography enthusiasts shouldn’t care about these restrictive labels. Photography’s all about experimenting until you have a wondrous effect, so have as much fun as you want with infrared.
While infrared photography does pose a small challenge because you’ll never really know how the picture will turn out, that’s half the fun of this interesting niche of photography.
About the Author: Marc Schenker
 Marc is a copywriter and content marketer who covered photography. These days, he runs The Glorious Company, a content marketing agency.