Just How Much Photoshop Is Too Much?
 by
Johnny Dunn
by
Johnny Dunn

Modern photography is an entirely different world from photography before the days of software and personal computers. The countless hours spent in the black void known as the darkroom are now spent behind the glowing glare of a computer screen.
Software like Photoshop, Picasa, Lightroom and Aperture accommodate myriads of editing and polishing options that no darkroom in the world is able to touch. This is where much of the power of digital photography lies; film has a unique aesthetic essence and quality that today’s digital photographs cannot yet reach, but it’s limited to a certain extent of sharpness, and to a certain extent of editing in the darkroom. Now, with today’s technology, post-production is equally as important as previsualization and the process of taking the photograph itself.
It should be noted that for journalistic purposes and photographs, photo editing is an extremely delicate, and limited, process. Some edits are considered unacceptable and unethical, and many a photographer’s career and good name has been sullied due to going too far in photo editing. In these cases, what’s accepted in post-production should be discussed with your editor, but for the most part, what’s achievable in the darkroom is also acceptable in software.
But what about photographs that aren’t going in the newspapers and such? Just how much editing is too much? At what point do your edited photos become deceptive and untrue? You don’t want people to have the immediate gut reaction of “this was photoshopped!” to your pictures (unless that’s what you do), but post-production and editing is a necessity to keep up with today’s incredibly sharp and clear digital photos.
A nearly endless number of effects and editing options, which is what many competitive photo editing softwares offer nowadays, can definitely hamper the post-production process. The following effects and adjustments listed will greatly enhance the quality of your pictures without ruining their integrity.
For the purposes of clarity and conciseness in this article, the processes and options discussed will be constrained only to Photoshop, as Photoshop’s arguably the most popular and powerful photo editing software available today. Many of the options and effects discussed, however, are just as achievable in most other programs on the market. These adjustments, for best results, should be followed in this general timeline and order:
1. Cropping
Cropping is definitely one of the “iffiest” tools in your editing arsenal. You should always try and capture everything you want in your picture in the viewfinder, and nothing more, thereby making cropping totally unnecessary. Not only will your photos be in their original size and resolution as intended, but no one will have to wonder what’s missing, and what you left out, in the picture.
But, in many cases, there might just happen to be an obstruction or object disrupting the picture visually, even if it’s just the tip of your finger at the edge of the picture. Cropping should only, and always, be used in these cases. It’s much better to take away part of a picture than to have that part distract the viewer from what you really want them to be looking at. Sometimes, you might notice a beautiful and truthful moment, but it’s only confined to a small portion of the photograph. In this case, it may be smart to crop everything around that part and to zoom in on it.

Before taking this picture, I adjusted all my exposure settings accordingly. However, the brightly-lit sun and time of day still made for an overexposed right side of my picture.
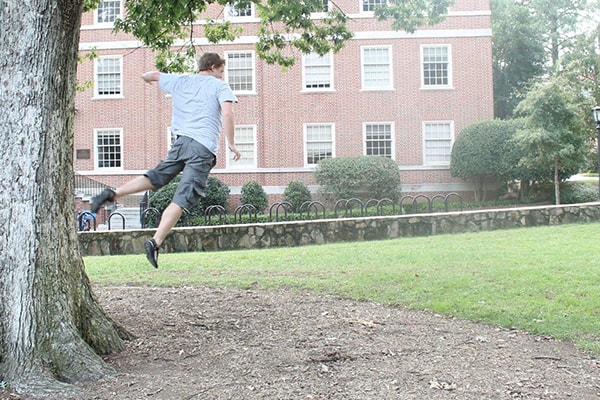
By cropping it, the action and main content of the picture is still shown, but reducing the overexposed portions.
2. Sharpness
Sharpness is everything in digital pictures. If your photo isn’t sharp, it’s not a good picture, regardless of how redeemable everything else may be. There are exceptions, but only in artistic cases, but these are very, very few. Less than perfectly sharp but still quality photos are mostly accomplished through analog and retro cameras, not through today’s hi-tech, digital equipment.
You can, however, sharpen a blurry photograph digitally to make it acceptable, or to give already-sharp photos even more focus and clarity.
For the best sharpening results, go into Photoshop, select ‘Filter’ from the toolbar, and scroll down to ‘Sharpen,’ and then select ‘Smart Sharpen.’ For best results in digital photographs, select the option to remove ‘Lens Blur.’ The higher number of pixels selected for ‘Radius’ and higher percentage selected for ‘Amount,’ the sharper the picture.
This tool will always sharpen a photo without fail, but too much of ‘Amount’ or ‘Radius’ will be counterproductive and make the photo look worse instead. What you want to do is to find and reach the point of ‘Amount’ and ‘Radius’ before the photo starts to look worse to your eyes, so you want to look very carefully, make good use of zooming options, and be working on a decent monitor in a well-lit room.
What the sharpening tool does is essentially make the edges of the photographed objects look more defined and distinct. The end result is definitely a sharper, more clear picture, but too much definition and boldness of course will greatly lower the quality of your picture. You needn’t worry about controversy when sharpening your pictures; it’s not at all deceiving or ambiguous, and will only make your photos look better.

Sharpening, when done right, is a fairly subtle effect with a noticeable difference in quality.
3. Brightness / Contrast
Thankfully, this next edit can be achieved with just two clicks. On the Toolbar, go to ‘Image,’ then scroll to ‘Adjustments,’ and ‘Brightness / Contrast’ will be at the very top. Click it, and click ‘Auto.’ The software does a very solid job automatically adjusting the brightness and contrast, but you should definitely tweak it until you’re satisfied yourself.
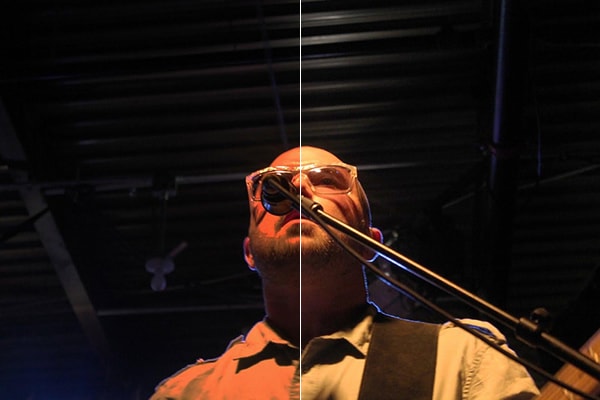
How adjusting ‘Brightness / Contrast’ can fix a photo taken in dark, underlit conditions.
4. Levels
The very next editing option is located right below the last. Go to ‘Image,’ then to ‘Adjustments’ again, and under the previously-used ‘Brightness / Contrast’ will be ‘Levels.’ This option, like the sharpening option, is very reliant on your own eyes. You can use the ‘Auto’ option and still usually achieve a better picture, but your own adjustments will allow you to reach much nicer and visually appealing results.
For the most part, moving the middle pointer to the right (So it reaches a number greater than 1.00) will really bring out the most important (usually the mid-range) colors of the picture. This pointer is generally the one you want to adjust the most, if your picture is already well-exposed. Moving the rightmost pointer to the left will bring out the lighter colors of the picture, and moving the leftmost pointer to the right will bring out the darker colors. This allows you to fix many exposure problems or highlight certain colors to give your photo a unique visual aesthetic.
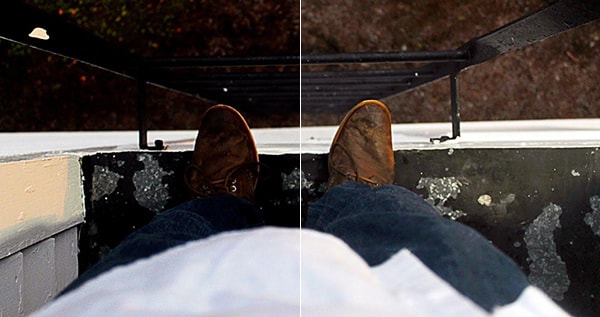
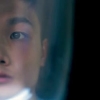
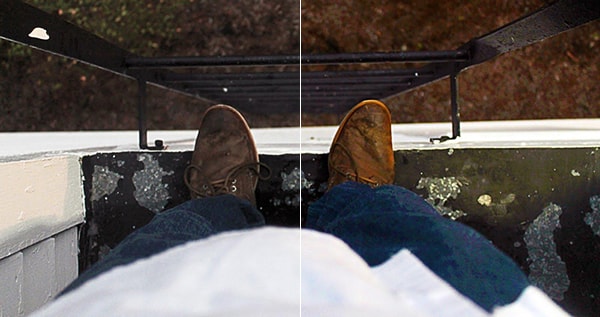
I took this photo with a rooftop blocking most of the sunlight from reaching my camera. By moving the middle and rightmost pointers to the left (making the darker parts a little lighter) and keeping the leftmost pointer the same (it’s already dark enough!), I fixed the exposure problems and the photo becomes much more visible.
5. Saturation / Vibrance
Saturation and Vibrance are a few of the easiest tools to making your pictures look better. Saturation and vibrance brings out the intensity of the colors in your pictures, adding much more sharpness and vividness.
Go to ‘Image,’ then to ‘Adjustments’, and scroll down to find ‘Vibrance.’ For best results, try increasing the saturation gradually (but not too much, or your photos will become oversaturated and look just plain ridiculous) until you’re satisfied with the way the colors are brought out. Then, adjust the vibrancy (you can be much more generous with increasing the vibrancy than with saturation) and watch your photos come to life.
Increasing the vibrancy of a photo often makes it look better, but saturation is a much more delicate balance to find. In many cases, decreasing the saturation by a small margin allows you to increase the vibrancy exponentially more without oversaturating the picture.
Of course, decreasing vibrance and saturation has its merits as well. This adjustment can give your photos a gritty, grunge-looking effect.
Increasing the vibrancy and saturation can make your photos ‘pop’ and bring dark, gritty-looking pictures to life.
Conclusion
There are countless more effects and editing options achievable in Photoshop, from filters to color balance to tone adjustments. For the most part though, the options listed above will be more than enough to correct and enhance your photos to visual perfection, without you having to feel any remorse or get any criticism for editing your pictures too much. The adjustments listed above (except cropping) are generally pretty accepted and performed even by journalistic standards, though once again, discussing the post-production process with your editor can save you and your career a lot of heartache and trouble.
By limiting yourself to only a select arsenal of editing tools, you won’t have to feel that Instagram-esque guilt trip of adding what are possibly pointless and unnecessary instant filters and effects. Save the retro and vintage pictures for the retro and vintage cameras. This is for your portfolio and professional career, not Facebook or Pinterest.
About the Author: Johnny Dunn
Johnny Dunn is a freelance writer located in NYC, and is also currently working at the advertising and design agency Breakneck Imaging as a residential photographer and copywriter.