The Trials and Errors of HDR Photography

I recently came across a photographer that specializes in High Dynamic Range (HDR) photography. Up to this point I had seen similar photographs where the detail was spectacular and the colors just popped, but had no idea how it was achieved. At a guess, I assumed there was some magical filter out there that performed these photo miracles or a Photoshop trick that no one had let me in on. To my disappointment, it turned out to be more of the latter.
After a brief conversation with this photographer about his technique, he was nice enough to explain the process of HDR photography. It was a pleasant surprise to find out that these beautifully detailed captures could be achieved with very little work. The best part of all was I didn’t need any further equipment than what I had on hand: a Nikon D3200, density filter (optional), and standard tripod.
The HDR process is a fairly simple concept
The technique is ideal for scenes that have both bright and dark areas. Many disappointing photographs have resulted from the camera not fully capturing what the human eye can see. Taking a series of photographs at different exposures allows a camera to get all the details that would normally be lost by just a single shot. Armed with this new found knowledge, I couldn’t wait to try it out.
Most DSLR cameras have an aperture priority mode that makes it easier to set up rapid firing of shots at different exposure levels. On most cameras the aperture mode is represented by the letter A. Almost all of the HDR tutorials I reviewed suggested setting the ISO to the lowest setting to reduce the amount of noise. I’ve found it really depends on what subject matter is and how you want the final product to look. When photographing older barns I like a little grain in the image.
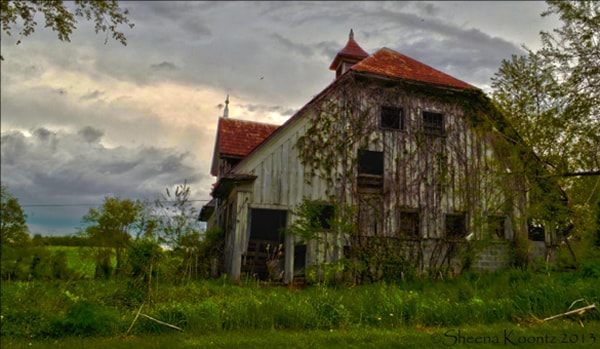
My Sunday afternoons are often spent driving on old country roads, looking for decaying barns or anything that catches my eye. I gathered up my gear and went out in search of my first HDR capture. Luckily, I stumbled across a beautiful old building with green vines crawling up the sides. I set up the tripod and switched to aperture priority mode. I took three shots starting with overexposure at +3, the underexposure at -3, and the third shot at 0. These three pictures gave the same scene, but captured different aspects that would have been missed with a single shot. The screen shot below shows each image at varies exposure levels.
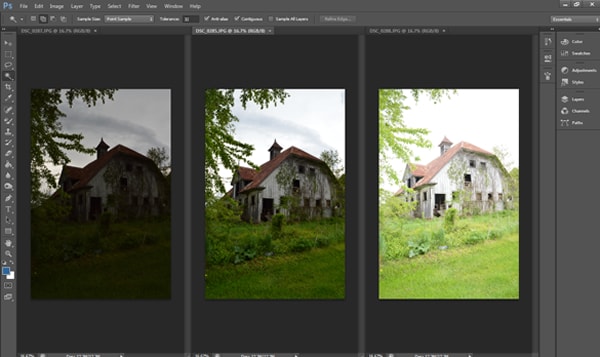
An important tip here is keep the tripod steady and keep each shot exactly the same. Depending on the subject matter, some movement can’t be helped, but the main subject matter should stay in the same place. You can’t control the wind blowing the grass and leaves around, but most programs will have an option to remove ghost that will fix this issue.
Once you have successfully obtained at least three frames of the HDR images desired, you are ready to load them into a software program for editing.
This is where the HDR process can get tricky. It’s very easy to over edit an HDR image. Adobe Bridge gives you several slider bars to play around with. The best path here is to play around until you get an image that you’re happy with. Each HDR image is going to be unique and unfortunately there is not a standard series of settings that will work for all images.
There are a few easy mistakes that occur when an image has been over processed that you need to watch out for. HDR tends to bring out the best and the worst of any image. The most common issues are usually in the sky. Blowouts, graininess, and halos are signs that the image has been over processed. I will raise my hand here because I am guilty of almost all of them. Each one of these issues can usually be repaired with the right tools.
Grainy skies are not a lost cause. Some images look good with a little grain, but when it doesn’t fit the image there are ways to reduce the amount or remove it altogether. Photoshop has a filter that can reduce noise. Sometimes the issue can also be fixed by dialling down the saturation. Shooting the image in RAW instead of JPG can also give more wiggle room for repairs.
Halos are another nasty sky problem that bother some photographers more than others. Halos are most often seen where the sky line meets land. This happens when the gamma and smoothness features have been over used. Try gradually cranking down these settings until the sky line is less harsh.
Blowouts are those horrible bright spots that do nothing for the image. This is an issue caused by over exposure. One the biggest problems I run into is blowouts located in the sky behind trees. These can be especially tricky to fix. You can use the Magic Wand Tool to select all bright areas and reduce the offset to bring back some of the color and textures to the sky.
Recommended Apps and Softwares
There are a variety of programs available that support HDR photography. Adobe Photoshop is probably the most commonly used, but also one of the most expensive. If you are unable to obtain Photoshop, no worries, there are much cheaper alternatives. The following are some of the HDR Photoshop alternative programs out there:
- FDR Basic Tool – Free (Supports both Windows and Mac)
- Picturenaut – Free (Windows only)
- Photomatix – $39 – $99 (Supports both Windows and Mac)
- EasyHDR – $39.00 (Windows only)
- HDR Darkroom – $59.00 (Supports both Windows and Mac)
HDR photography has opened up a whole new world of mind blowing images. In my opinion every photographer should experiment at least once with an HDR image.
About the Author: Sheena Koontz
 Sheena is a jack of all trades freelancer who dabbles in photography, writing, editing, and web design. She specializes in abandoned, landscape, and travel photography. She currently resides in Bristol, VA with her hubby and two kids. You can follow her on Facebook or check out her website here.