Capturing the Local Flavor Through Food Photography

Food photography is not as easy as it looks. It’s more than just making food look pretty. Food photography is all about sending a message; the message that the food on the table wants to be eaten. It’s a little similar to fashion photography in the sense that you need to do some styling before clicking away.
It would be great to photograph food using a DSLR camera, but we all know that food photos abound in social media, particularly on Instagram and Facebook. Anyone can prep their smartphones for food photography; there are countless apps on Apple App Store and Google Play Store that can be used to make food photos look good.
The difference, of course, is that if you use a DSLR camera for food photography, you are able to capture more and do more than just adjust the lighting or contrast and add some filters. Then again, it is important to note that you don’t need to have the most advanced DSLR camera; what you need is a genuine understanding of what needs to be done to capture food in its truest and most appealing form.
Capturing the Local Flavor of Food
So, as you can see, capturing food and creating images of it in the most inviting manner can be quite difficult. A more challenging concept, however, is when you need to take photos of food and capture their local flavor.
The term local refers to something that is located, living, or found in a particular town, area, or city. It can also mean something that is located or found nearby. Local food, therefore, can mean two things: food that is fresh and purchased from local sources; or food that identifies or defines a particular place or community.
As it is with photography, there are tips you can follow to help you come up with good local food photos. Familiarizing and following these tips will help you create food photos that talk, photos that evoke emotions and invite viewers to want to taste the dishes.
First off, you need to be familiar with the kind of food you are photographing. You don’t need to be an expert, but you do need to know what makes it an interesting choice. How was it made? What were the ingredients used? Is it as delicious as it sounds? Why it became part of the place’s culture? Talk to the chef or the restaurant owner. Get to know what makes their food special. Try to talk to some diners, too, so you’ll get an idea of what they think about the food. Better yet, taste the food before you shoot.
Additionally, you need to know what local flavors are in it. This is one of the elements that you need to capture in your photos. Capturing the local flavors per se is not really possible, but you can find ways to make your photos deliver them. You need to find ways to visualize these flavors. Again, talking to the chef or the restaurant owner is the best thing to do.
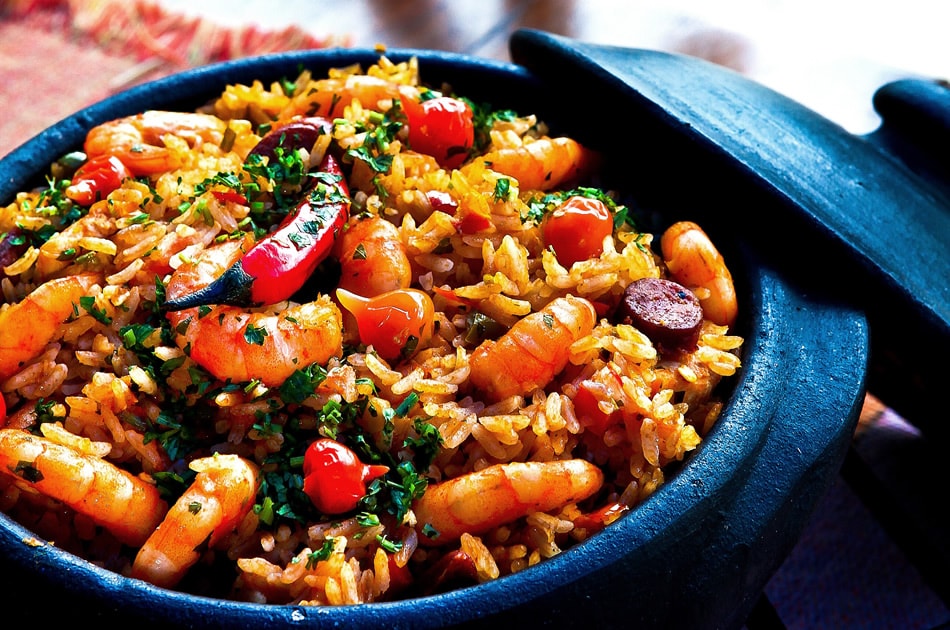
One way of showing the flavors of local food is to include local ingredients in your photos. For example, when taking a photo of Mexican food like Burritos, aside from showing the finished product, add some rice, beans, meat, and cheese in the picture. You can even sprinkle some flour (used for making the tortilla) all over the set up.
Another good idea would be to set up the shoot in a local site instead of the usual inside-the-restaurant setting. This is something similar to what Bobby Chinn, chef and host of Discovery Network’s World Café: Asia and Bobby Chinn Cooks Asia, does. Bobby’s style is to go out and discover culinary delights in the streets of whatever Asian country he is in. And then he cooks in one particular place of that country (like a local park) and he uses local ingredients in cooking his version of the food. This can be done in photography, too. All you need to do is find a good local venue for the shoot, bring some local ingredients, make sure the food is well prepared, and then use the place as the background.
Capturing the local food flavor in your photos is like framing a scene and giving its location a particular character.
Finally, do not be afraid to veer away from the finished product. Look at the scene from a different angle. For example, you can go up to the restaurant’s second floor (considering there’s one) and take a photo of the table from that position. This will allow you to take an interesting perspective or angle of the food prepared.
General Tips and Tricks
Aside from the above-mentioned tips, there are also general reminders that you need to keep in mind when shooting local food. Food photography is very visual. You have to create an image or images that do not only look good, but are also inviting. The pictures should play on the senses of the viewer.
-
Lighting
When you talk about creating good images, you need to consider the lighting. For food photography, the most important thing to remember when it comes to lighting is to use natural light. If natural light won’t capture the effect you’re looking for, use an external flash (the built-in flash in your camera is a big NO NO!), a reflector and/or several bounce cards.
Use indirect lighting, the kind that you get when the sun is up and there is a shady area somewhere. Do not rely on indoor lighting, like fluorescent and bulb lights, because this will give your photos a different glow and color. The dishes won’t look natural.
Look for an area or space that has some natural bright light coming from a window or an open door; or perhaps from a crack on the wall. The best table to get when you’re doing food photography is the one that’s beside or next to the window. If the restaurant or place has an outdoor dining area, go for it and shoot there. Even with an outcast sky, an outdoor food photo shoot can create natural and beautiful images. Important reminder: do not place and style food in or under direct sunlight.
To bring out the local flavors in your photo, go out and explore your location. Shoot outside and use natural lighting.
-
Food Styling
Follow the rule of thirds in photography, which means you do not have to position the subject at the center or in the middle of the photo. Thus, the ideal thing to do is position the food to either side of the frame. If your subject or image is off-center, your photograph will create a sense of direction and will come out as more dynamic.
Show some local flavor by scattering some local ingredients in the frame. Like the Burritos example given earlier; position the finished product on either the left or right side, and then scatter the ingredients (rice, meat, cheese, beans, etc.) at the center. Don’t be afraid to experiment.
Apart from all these tips, it is essential for you to find time to research about the food, the place, the people, and whatever else there is that you need to know about. And, as is the usual for photographers who take their craft seriously, practice, practice and practice!
About the Author: Michael Gabriel
 Michael Gabriel L. Sumastre is an experienced writer who loves to take pictures of the countryside as well as aerial photographs. He maintains his professional writing portfolio at TheFinestWriter, and you can visit his photography portfolio at Sumastre Photography. Michael was hired by Booking.com to photograph 10 of the most beautiful beaches in Palawan, Philippines.