How To Dodge & Burn In Lightroom Classic Like The Pros
 by
Adam Welch
by
Adam Welch

The printing and development work performed in the darkroom is sometimes viewed as low-tech or at the very least, not as advanced as today’s digital processing software. Nothing could be farther from the truth.
Many, if not all of our modern digital processing techniques can trace their origin back to the dark, smelly, and sometimes dangerous confines of photographic darkrooms. The development of negatives and the printing of photographs required as much expertise as the camera work which was required to make the exposure. There were variables upon variables stacked inside a huge box of chemical fickleness.
Everything had to be just right in order to achieve a desired printed result. The printing of images involved the use of projectors and lenses and photo-sensitive papers. The photographer could control contrast, highlights, and shadows within the print by using very subtle techniques. One of these techniques was dodging & burning.
Burning & dodging is one of the simplest yet powerful ways a photographer can control printing in the darkroom. It involved the selective reduction or intensification of the light used to print a photograph. This is extremely useful because it let’s the photographer control different areas within the same print separately.
- Burning a print meant that more light was exposed to an area which made it darker and higher in contrast.
- Dodging by contrast (get it?) meant that less light was exposed to the print which resulted in lighter and less contrasted areas of the photo.
These local (specific area) adjustments were all done literally by hand. The photographer would use an opaque object (such as a piece of cardboard) to control how much light was allowed to interact with the print. Today, dodging and burning has become much more easy in our modern digital darkrooms. The same principles of reduction and intensification still apply but the entire process is now quicker and more importantly, reversible.
In this tutorial, you will learn just how easy it is to take more creative control of your images through dodging and burning in Adobe Lightroom. It’s a powerful (and fun) way to build stronger images through local adjustments of specific areas of your photos. Let’s get started!
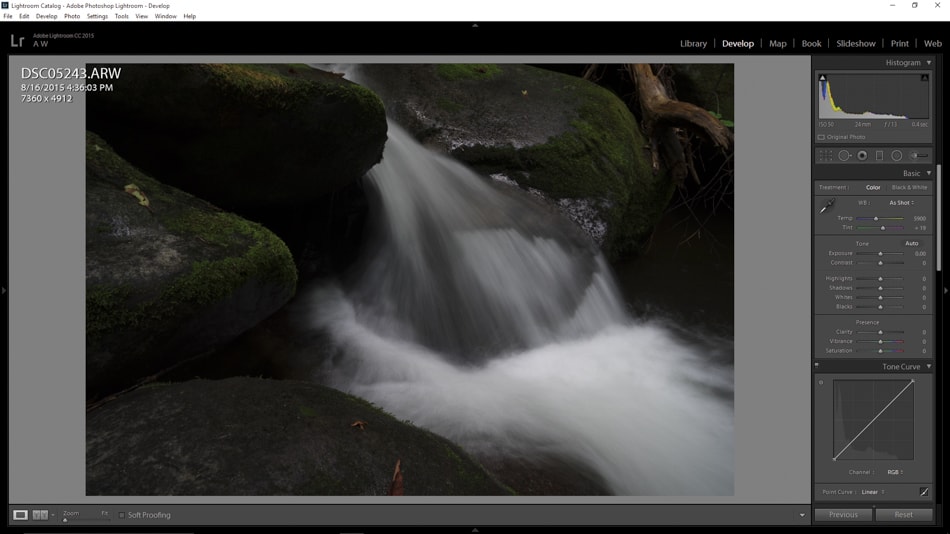
First let’s start with an original RAW image file.
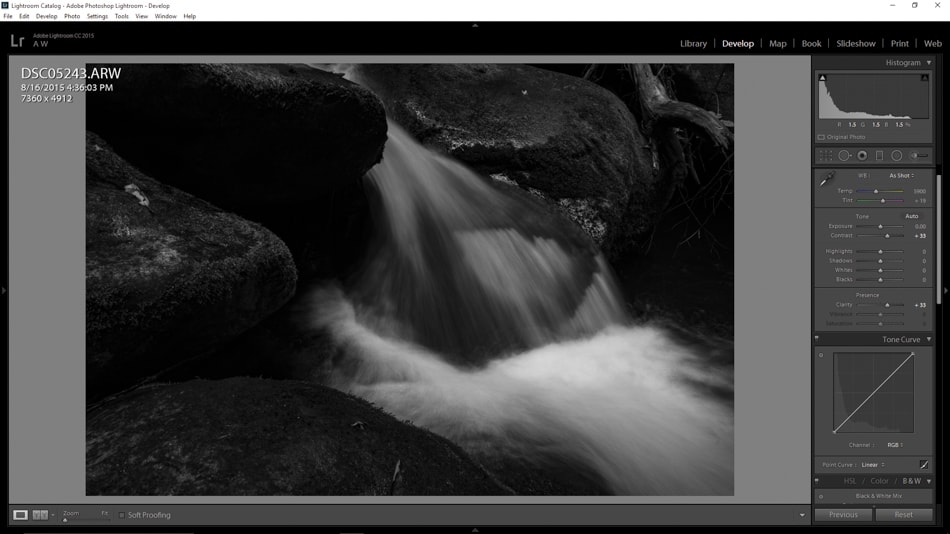
I first make some global (effects the entire image) contrast, clarity, and sharpness adjustments. It’s always a good idea to do any global adjustments prior to dodging and burning. I also converted the image to black and white in keeping with spirit of the old darkrooms and monochromatic printing.
Notice how the blacks look darker and the entire image has more contrast and clarity.
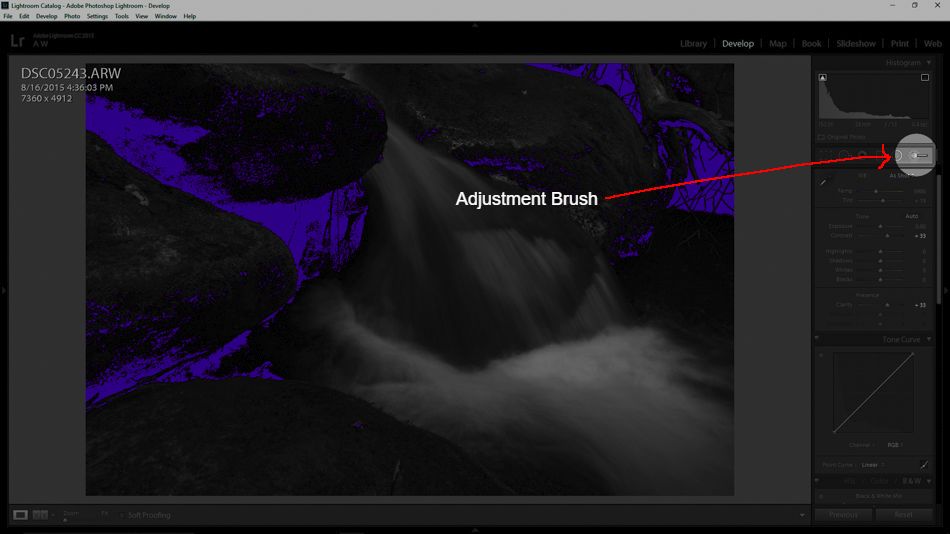
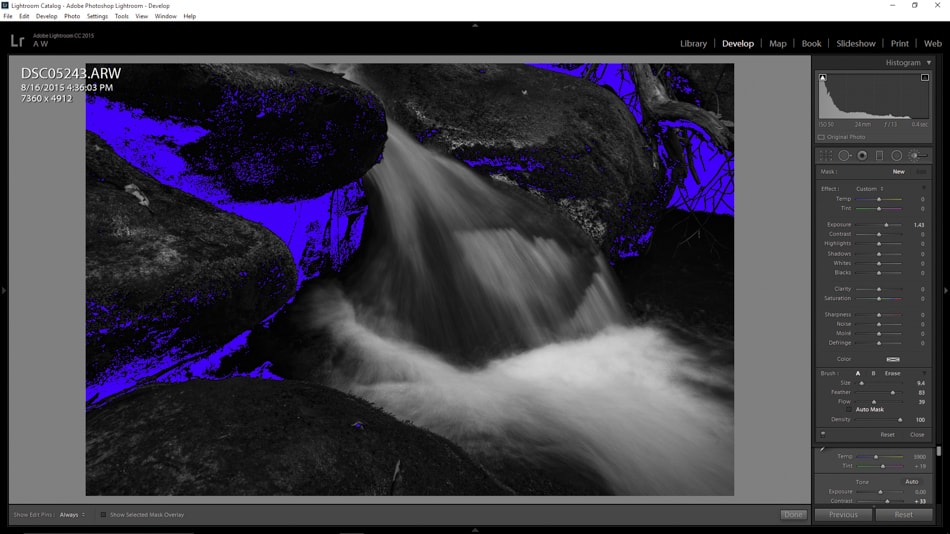
The photo has lots of shadows in the rocks and strong highlights within the frothing water. Any global adjustments I make in order to bring out the details within the shadows will undoubtedly blow out the details within the highlights. Lightroom gives a great way to know just where we stand as far as exposure clipping (lost detail in highlights and shadows) is concerned.
If you use the keyboard shortcut “j” you will immediately see where there is no detail in the image. Overly dense shadows will appear in blue. Overly bright highlights will appear in red. Note: The keyboard function is the same in both Windows and Mac versions of Lightroom.

Now that we can clearly see what areas of the photo require attention it’s time to move onto the fun stuff of actual dodging and burning!
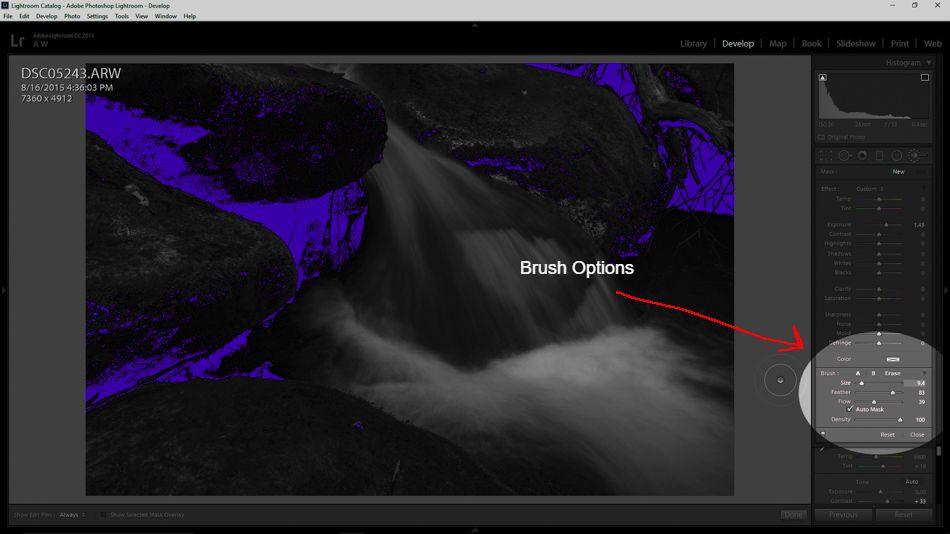
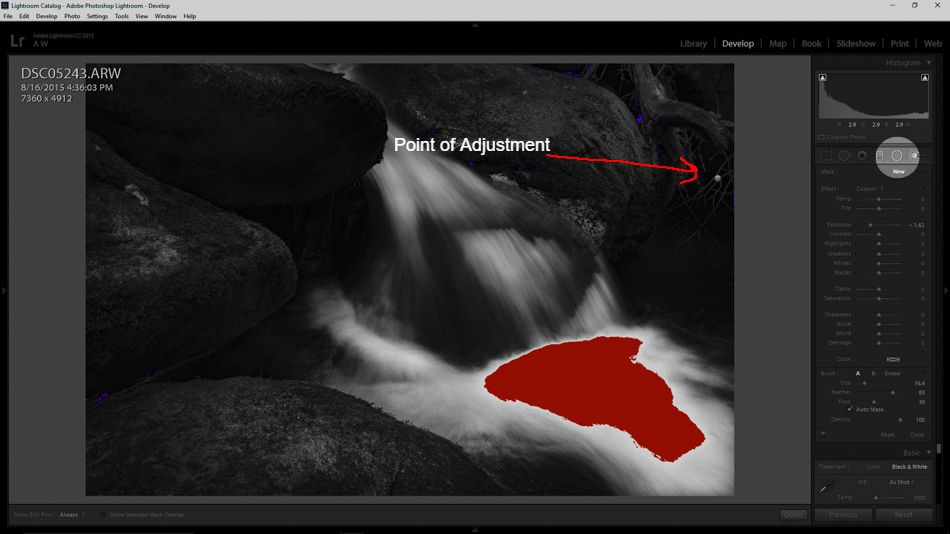
The tool we will use will be the local adjustment brush tool. Consider the brush our “piece of cardboard”. We will use it to adjust how much we dodge or burn the image. Click on this tool in order to begin.
Next, we need to make sure our adjustment brush fits the task at hand. After you select the tool, you will notice that you now have some options. You are able to adjust the: size of the brush, feather (the border around the brush), flow (how quickly the adjustment is applied), and density (intensity). The “auto mask” option simply means that the software will automatically look for similar pixels and help make the blending more uniform. I always leave this box checked and the density also set to 100. I then set my size and feathering depending on the area I want to adjust.
Since I want to lighten the shadows (dodge) I increase my exposure slider. It can be useful to increase your shadow or black slider as well but this is ultimately dependent on the degree of adjustment desired.
With our brush set and ready to go we can now begin the actual dodging. I find it helps to start with the center of the area I am adjusting and then work my outward in even, circular motions. As you dodge, you will see the blue areas disappear as detail is regained.
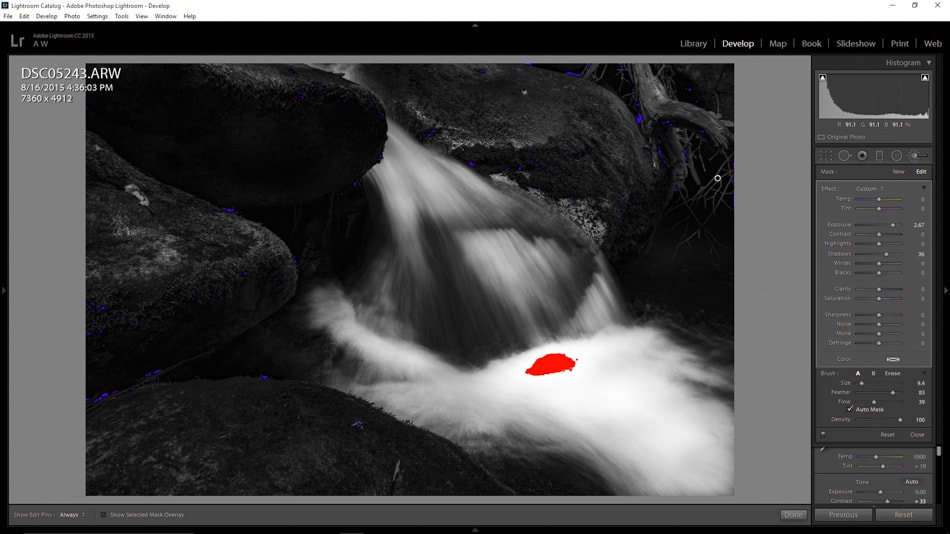
Take your time and don’t worry about making a mistake. You will need some practice in order to get a feel for the brush. Once I’ve brought the shadows back to an acceptable level I decide to lighten the highlights within the water using the same dodge tool.
Uh oh… I dodged just a little too much. The area in red means that I have now lost detail in the highlights.
Fear not. I can fix this using some simple burning. Here’s how it’s done. At the very top of our adjustment brush option panel, we can see an option for “new”. Click on this to create a new adjustment brush. This time, though, the adjustment will be for burning the image and not dodging.
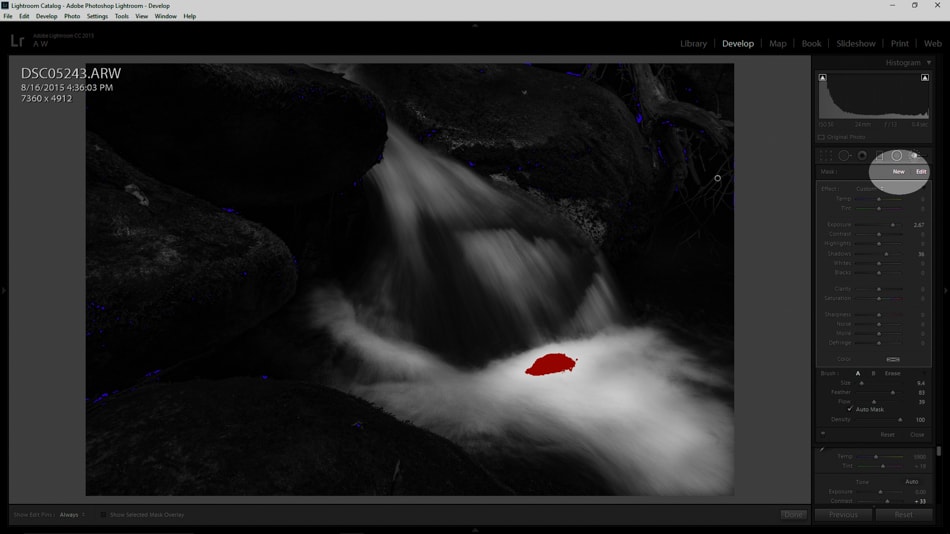
In this case, I leave all of the brush sizing options, feathering, ect. the same. All I have to do is make sure the brush will darken the image. To do this, decrease your exposure slider. Just as with dodging, other adjustments can be changed to increase the effect of the burn (such as decreasing highlights). Again, take your time and adjust each slider to achieve the best look for your particular image.
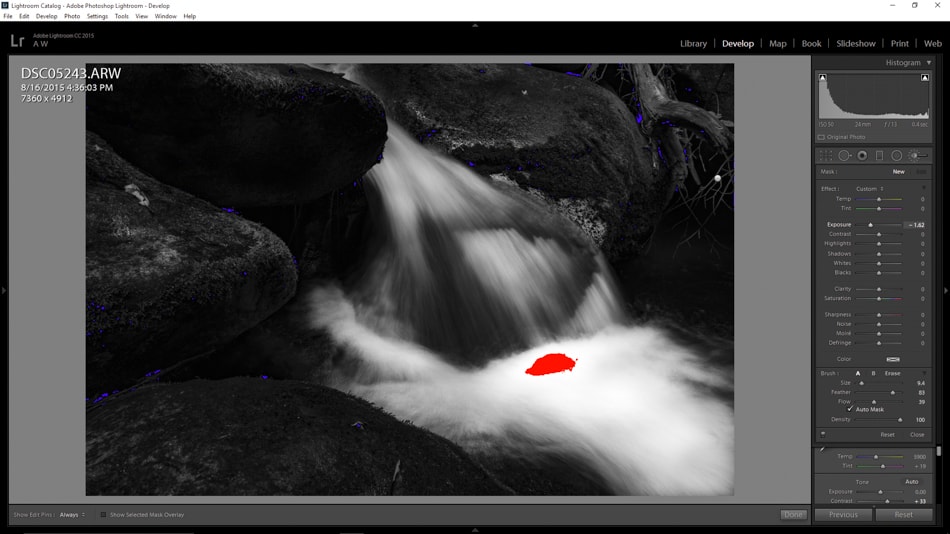
Here we see the result of the burning. No more red which means I have successfully recovered detail from the highlights. Click “done” to return to the develop module.

Thus far I have used dodge and burn to process selective parts of this photo differently but I’m still not totally happy with the finished result. I decide to break protocol and perform a few additional global adjustments before I can feel satisfied with the image.
I add a little more overall clarity… a little increase in the whites… and what happens? I completely blow out the highlights in the water.
If you perform a global adjustment which interferes with your previous dodge and burn you can quite fix the mistake. Simply click on the adjustment brush tool once more. This will again open up the familiar brush options panel. It will also show you something else. Look carefully and you will notice small dots have appeared on your image. Each one of these dots or “pins” represents a previous point where a local adjustment has been made. All I have to do now is click on a pin, double check that it is programmed with the correct adjustments, and then dodge or burn just like I did at the beginning.
Remember though, when you reuse a pin from a previous adjustment, any changes in the adjustment sliders will be applied to the previous adjustments as well as your new ones.
After I bring the highlights back down with a little more burning, I click “done” to bring me back to the develop module.
And viola! Here we see the original color RAW file compared to the finished photo.
The adjustments performed by dodging and burning made it possible to balance the image and maintain detail in both the shadows and the highlights. This flexibility in my processing could not have been achieved through globally adjusting the entire image.
Simple. Easy. Powerful.
As you can imagine, dodging and burning in Lightroom Classic will work wonders for your photographs. It allows you to adjust only those parts of an image which you feel need to be adjusted. It should also give you an underlying sense of pride to know that you are using hard learned techniques from the days of the darkroom on your present day images.
Granted, these techniques have evolved but they reap virtually the same benefits as they did for photographic giants such as Adams or Weston or White.
About the Author: Adam Welch
Adam is an author, adventurer, photographer and a jolly co-founder of Contrastly. You can usually find him on some distant trail making photographs, in his darkroom or at his computer writing and planning his next project. Follow his work over at his
website , Facebook, Instagram and YouTube .