Essential Techniques to Improve Your Time-Lapse Photography
 by
Imran Zahid
by
Imran Zahid

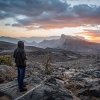
Time-lapse photography is an art form that enable us to see everyday events in a completely unique way.
Regardless of whether it’s a quick moving mist, day to night change or a building development over the span of a year in only 30 seconds – it’s always stunning to witness something in a way that we can’t do normally.
Different ways of shooting time-lapses
Time-lapses can be shot in various ways, each with their own pros and cons. But, knowledge of each way is imperative to make the most of all the options accessible to you. Three primary methods for shooting time-lapse videos are:
- Mobile phone: many smart phones have a time-lapse feature that makes it easy to capture great time-lapses while on the go.
- Video: shooting a video for a long time and then ramping up its speed in post can be used to create a time-lapse effect.
- Series of photos: using a DSLR camera to shoot high quality photographs at a regular interval and then creating a motion video at a certain frame rate.
By far, the best way to create a convincing time-lapse – as far as quality, resolution, desired frame rate and dynamic range is concerned – is by using a DSLR camera. You can’t accurately control each one of these variables on a mobile phone or video camera. This article primarily deals with each one of the parameters while shooting time-lapse using individual pictures from a DSLR.
Why DSLRs are best for time-lapses
Here are few reasons why creating time-lapses from a series of photographs is better compared to other options.
1. Motion Blur
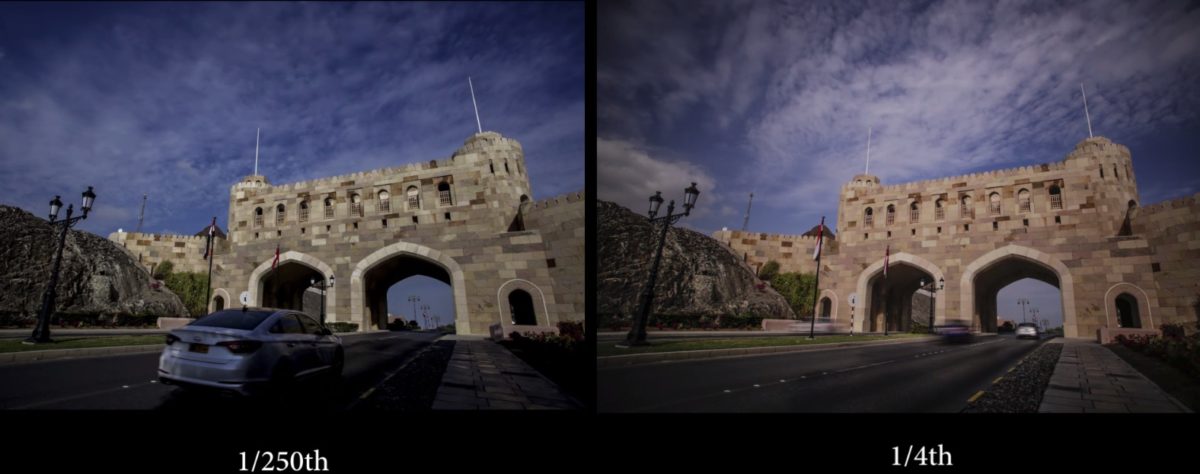
The single most important factor that can help take your time-lapse video to the next level is actually the shutter speed at which your camera is capturing frames. Normally when you are making videos you need to set the shutter speed twice as fast as your frame rate. In other words, if you are shooting at 30fps, your shutter speed should be 1/60th of a second to make the motion feel natural in the overall timeline.
With a DSLR (or mirrorless), you can simply reduce the shutter as low as 1/10th of a second or even a couple of seconds in between shots, and adjust the exposure with a ND filter or via your camera settings.
One you have the footage, just render your video at whatever frame rate you want and you will have smooth motion blur in your time-lapse that accentuates the sense of motion.
In the example below, the default shutter speed of my video camera is 1/250th of a second based on overall exposure. I switched to a DSLR with a somewhat similar focal length. I used a 10 stop ND filter which made it possible to reduce the shutter speed to 1/4th of a second.
2. Dynamic Range
The vast majority of video options won’t enable you to shoot your video in RAW. By using a DSLR, you can easily take a series of RAW photos, adjust basic settings in a software like Lightroom, sync those adjustments across all your frames and you will have a broad dynamic range in your final clip.
Usually during the course of time-lapse recording, the light changes drastically (e.g., day to night transitions), substantial cloud development and so on. So, having the option to recover all these details from shadow areas is always handy.
3. Resolution and Details
Most video options don’t provide you 4k resolution that you can ramp up in post. But even entry level DSLRs have a resolution greater than 8.3MP, which will effectively give you images with resolution greater than 3840 × 2160 pixels (4k resolution).
So, why do you want more pixels? The obvious reason is that you will have more detail in your frames. You can introduce fake/digital zoom and pan effects in 1080 footage and still maintain full HD quality. Not everyone can afford expensive sliders and other pro-level hardware to add variety in their time-lapses. It can really spice up your resulting time-lapse video on a budget.
Recommended Settings for Shooting Time-Lapse
Let’s start with some of the basic settings that actually make a key difference in creating professional quality time-lapses.
1. Interval
The interval between two frames normally depends on the subject whose movement you want to capture. Whether it’s a rising or setting sun, moving cars, people walking or floating clouds, etc… essentially, if you want to speed up a very slow moving subject then you need to make the interval longer. But make sure that the distance covered by the object between two frames is very small otherwise the resulting video will look a bit choppy.
If you are not sure what interval you should use then you can always shoot at smaller intervals and delete in-between shots later if you want longer intervals. Remember that batteries die, and memory cards can run out of space, so understanding intervals is important.
In the example below, the interval for the first video is 4 seconds and the second video is 8 seconds. You’ll notice how fast or slow the resulting time-lapse is based on those setting. I actually shot this whole sequence with a 4 second interval and in order to increase speed, I deleted intermediate frames.
If you are not short of time, battery life, or storage space, then shoot for double duration with the shortest interval setting and you will have more creative freedom in post.
2. Shutter Speed
As we already discussed above, a slow shutter speed can really accentuate the sense of motion in time-lapses. So, you might need to blur out your moving objects a little in your frames in order to get smooth movement. Anything between 1/30th and 1/2 a second can give you good results depending upon how fast your subject is moving.
A variable ND filter can really comes in handy as it allows you to go for extremely slow shutter speeds even in the middle of the day when the sun is bright.
But, slow shutter speed might not work well with every subject. A subject that is moving really slow won’t get blurred even with a very slow shutter speed. If you are capturing fast moving traffic, people and other similar subjects, then go for a slow shutter speed.
3. Aperture or ISO
Not all time-lapse videos are shot in consistent lighting conditions. Sometimes the clouds and shadows can change quite drastically, shooting the rising or setting sun, or the famous “day to night transition” are some examples of situations where completely manual settings won’t necessarily work well. You need to be in some kind of semi automatic mode if your lighting conditions are changing too frequently.
If you are shooting time-lapses with a camera with good ISO performance like a full-frame DSLR or say the Sony a7s, then you can simply go full manual and set your ISO setting to auto. As the exposure decreases, every other setting will be the same except that the camera will bump your ISO to capture proper exposure. Make sure you set a reasonable max ISO in your camera settings.
If you’re shooting with a camera equipped with a smaller sensor, then shutter or aperture priority modes are the only options you are left with. Keep in mind that in these semi-automatic modes, your depth of field and motion blur will change during the course of your time-lapse as the exposure changes.
In the example below, I used auto ISO in order to adjust for decreasing light.
Software and Applications for assembling time-lapses
There are a myriad of software programs available in the market that you can use to convert your series of images into a time-lapse video. Some are free and some are premium/paid products.
- LRtime-lapse plugin for Adobe Lightroom: Probably the most powerful time-lapse software available. It’s a bit intimidating at first, but as you follow along, it’s very logical and powerful. It lets you make 12-15sec time-lapses (400 images) with the free version. You need to use it alongside Adobe Lightroom.
- Adobe Premiere: You can simply select your series of images and it will convert them into a nice time-lapse clip which you can export later.
- FFMPEG: It’s a command line tool to convert your series of images into a motion video. Not everyone is comfortable in using the command line tool, but it is open source/free, and tons of options are available.
- Time-lapse Tool: A powerful time-lapse tool with quite a lot of options.
- SkyStudio PRO: A small programs that is comparatively easier to use.
There are a lot of different programs available out there. However, the ones listed above are those I had an opportunity to work with.
Required Equipment
Here are some things you will most definitely need when you set out to shoot a time-lapse.
- A tripod: a tripod, and a very sturdy one, is required to shoot time-lapses. Even the slightest movement in a single image out of 100s of images can create a flicker which you would need to remove in post.
- Intervalometer: Some kind of intervalometer is required. An intervalometer is a software/hardware device that automatically takes a set amount of pictures at a set interval of time. Who wants to click the shutter manually hundreds of times anyway? It helps eliminate camera shake as well. Many new cameras have built-in intervalometers. If you are a Canon user, you can download Magic Lantern. It has an intervalometer.
Music
Music can really transform a time-lapse and turn it into something epic. Even though most time-lapses feature fast moving motion, that doesn’t mean you need to go for a fast or upbeat track every time. Thoroughly think about the mood and message you want to convey in your time-lapse and use a track that matches that mood. Here are a few sites where you can find great music and tracks for your time-lapse videos.
Final time-lapse
Below is my final time-lapse video (in 1080p at 24fps) that I created following the steps and tips outlined in this very article:
Bonus: Quick Tips
- Don’t try to focus on too many different types of movement. The shutter speed will be suitable for one subject, but may be choppy for another. Try to simplify your time-lapse video.
- Shoot all in manual all the time and only go for semi automatic if the exposure and light changes dramatically. Manual settings will give you more consistent results.
- Don’t use foreground subjects that are moving fast like plants, etc. After you’ve increased the speed of your time-lapse, those subjects will move too fast and become a distraction.
- If you are shooting certain subject for the first time and you’re not really sure what interval to use, it is usually best to use one that is faster than you need rather than slower. You can always speed up too many frames in post, but you can’t go back to create missing frames out of thin air.
- If the exposure is not changing drastically, you can shoot in JPG to save space and time. It might allow you to shoot more frames and shoot longer, giving you more creative freedom when selecting the speed of your final clip.
- Capture something that moves slowly so that its time-lapse will look unique.
- Frame your composition a little wider so that you can introduce a bit of zooming or panning to create variety in your shots. Also, it will help you to stabilize your shots digitally in post. Remember to always keep motion subtle so that the resulting time-lapse looks realistic.
Now what you are waiting for? Grab your camera out and start time-lapsing 😄
About the Author: Imran Zahid
Imran Zahid is a self-taught, part-time photographer. It's his lifetime passion and he really enjoys documenting human life in street, documentary and environmental portrait forms. Check out his Instagram Portfolio or his Blog - The Shades Photography to see more of his work. You can contact him at im.zahid@hotmail.com