How to Shoot Amazing Photos in Low Light
 by
Cat DiStasio
by
Cat DiStasio

Digital cameras make it pretty easy to take amazing photographs in full daylight without much skill or expertise. However, lighting conditions are not always so ideal, and taking great photographs in low light settings can be a big challenge.
What makes for low light conditions? Nighttime photography is the obvious example, but it’s far from the only dark setting in which you may want to shoot. We all encounter a variety of low light settings almost everyday: an intimate candlelit dinner at your favorite restaurant, a dim evening at home with the family, a party with “mood lighting”, or a pre-dawn walk in the park. All of these settings share one thing in common. There is a lot less light, and it makes us worry about how to get good photographs.
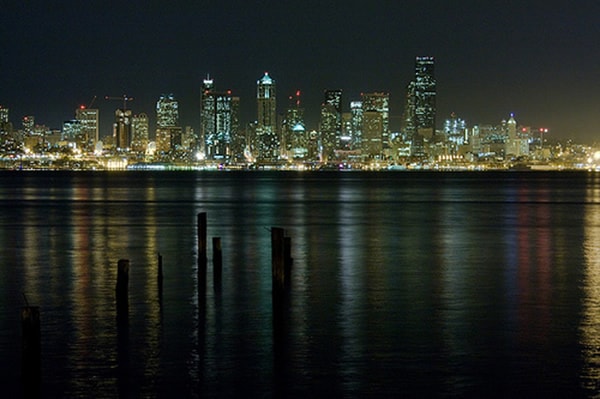
Incredible low light photography doesn’t require fancy equipment.
If you’ve tried shooting in low light using the same techniques you do for daylight shooting, you’ve likely encountered some pretty undesirable results. Your shots may be blurry or simply too dark, because the tricks that produce stellar daytime photos don’t work for low light conditions.
Luckily, with the right know-how and a few tricks up your sleeve, you can harness the small amount of light available, and make it work for you.
I recommend practicing your low light techniques before venturing off to a shoot that really matters to you. You can create your own low light environment at home by turning off your overhead lights and using a dim lamp or some candles. Practice by shooting inanimate objects to keep things simple.

Still life may seem boring, but it can help you learn how to harness the light.
Using a higher ISO setting is the easiest way to shoot in low light conditions, since that setting controls the sensitivity of light falling on your sensor. Higher ISO means higher sensitivity, or more light perceived by the camera. Experiment with your camera’s “ISO Auto” setting or crank it up manually and take some test shots to see what kind of difference it can make.
Of course, shooting at a higher ISO setting may introduce some noise to your photos. If your camera has a Noise Reduction (NR) setting, you’ll want to turn that on. Sometimes, the resulting noise is not very noticeable. If it is, you may consider sharpening the photos in post-production. Chances are, even a little bit of noise, your photos will look a lot better than they would have otherwise.
In low light, a longer exposure time is often needed, even when shooting at a high ISO setting. Since these longer exposures create opportunities for camera shake, you’ll want to use a tripod or other method of steadying your camera, like propping it on a table or a shelf. This is essential when the light is very low, or when it is concentrated to one area, like a small lamp off camera or a moonbeam filtering in through a window. I also highly recommend using a delay timer or remote trigger for maximum results, so that your hands are completely off the camera while the shutter is open.

Using flash in low light conditions can create glare and “flatten out” your photos.
You may be tempted to use a flash in a dark room in order to shed some more light on your subject, but I say no way. Using any kind of flash, even if you send it behind you, can wash out all your lovely shadows and glowy lights. Aiming a flash at your subject will also flatten out your images, and you want to keep as much depth as possible. Instead, turn your flash off and look for other ways to maximize the light at your disposal. If possible, position your subject in or right next to the available light, whether it’s the glow of a candle or moonlight filtering through the trees. You’ll thank me in the end.
If your light conditions are extremely low, you may want to use a flashlight to assist in preparing for the shot. Why? By lighting up your subject with a flashlight prior to shooting, you can use your camera’s autofocus settings to focus the lens while you line up the shot and adjust your other settings. If there is not enough light, your autofocus may not be able to locate your subject, and you’ll end up with a photo that is not only dark, but also blurry. This technique is especially helpful when shooting subjects that are backlit.

Even a backlit subject in low light can turn out looking fantastic.
Whether homemade or storebought, a light reflector can help you maximize the light and put it where you need it. Use sparingly, however, lest you end up with photographs full of spotlights. Sometimes, a simple piece of cardboard covered in foil (shiny side out) or a handheld mirror can help tremendously.
If you’re looking for an excuse to buy some new equipment, consider adding a faster lens to your collection for low light photography. Prices for prime lenses with a low f-stop (f1.8 or lower) range from $80 and up, but even the least expensive of those lenses will make your low light photography so much easier. Look for a lens with image stabilization built-in to sweeten the pot. With a fast lens, you can shoot in aperture priority mode and allow your camera to do some of the work for you.
I’m kind of a purist, and I get a funny feeling in my guts when I think about making major edits to a photo in post-production, especially when it comes to light fill. I find that most photos that are filled in post end up looking washed out or overexposed, and the end result is an image that is far lesser quality than the original dark shot. I’d rather see a really fantastically composed dark shot than an over-processed artificially filled shot any day. Although opinions on this subject vary widely, only you can decide what approach is best for you and your photography.

This photo was taken in pre-dawn natural light with no lamps or flash.
Armed with this knowledge, I hope you’ll feel more confident in experimenting with the wide world of low light photography. Whether you’re shooting for a client or for yourself, be sure to take your time, think about light in new ways, and don’t be afraid to take lots of shots!
About the Author: Cat DiStasio
Cat is a freelance writer, editor, marketing consultant, and personal chef. As a budding photographer, she chronicles her adventures in the kitchen on her blog, The Verdant Life. Also check out her writing portfolio. Cat lives in Columbus, Ohio. You can also find her on Google+.