Light Painting 101- Tips and Tricks to Selectively Illuminate With Light

For a photography niche that not everyone’s heard of or is even familiar with, light painting has some serious longevity, having been around for approximately 100 years already.
Light painting is a method characterized by exposures that were created by either moving your camera or a light source that’s manipulated by your hands. Additionally, light painting can refer to images that are lit from beyond the frame via hand-held sources of light.
This method is very clever because the light is utilized to illuminate just select portions of the subject by adjusting the position of the light source. We also get the term “light painting” from the version of this technique where light is shined right into the lens of the camera, thus enabling the photographer to “paint” a picture.
Not everything works well with light painting. Some tricks and tips stand out from the rest with regard to getting the most eye-catching results possible. The next time you’re feeling ambitious with photography, give these light-painting approaches a try.
Be sure to pre-focus your camera with autofocus and then change it to manual focus to securely lock in your focus prior to shooting. Use the time-value TV mode on the mode dial of your camera or the “S” mode if you have a non-Canon camera. Then, scroll the camera’s shutter speed to the length of time you estimate it’ll take for you to complete your light-painting session. Simpler light drawings normally take around 10 seconds while more complicated ones can go 30 seconds or longer. Use either an ISO of 200 or 400. See which works best!
Super-Simple Light Drawings
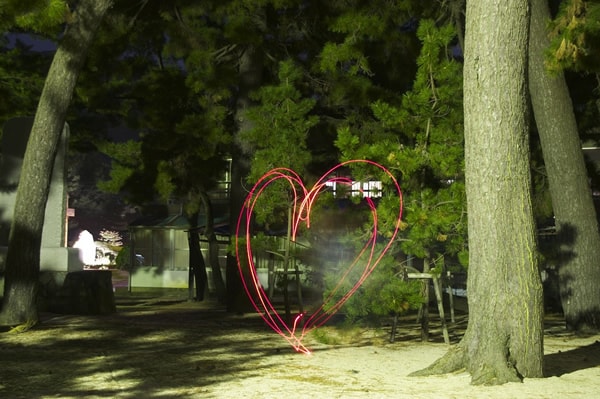
photo by Stephen Wheeler
If you’ve never tried light painting before, you start with the most basic methods and then work your way up to more challenging techniques. Think of this trick as just drawing mid-air images with a glowing source of light, like a sparkler or torch.
Be cautious when using a torch since pointing the light’s beam into the camera lens will flood the image with excessive light and blind your scene, which you don’t want. When using a torch, be sure to tape a nearly transparent plastic cap on the end of the torch. Something as cheap and easy as a deodorant can lid will work.
Something extremely neat is the use of your smartphone—yes, your smartphone!—for basic light drawings. Just download a torch app that makes your LCD screen glow any color you can think of. While taking the shot, it’s advised that you turn the light on and off to get the creative effect of discontinuous lines in your drawing.
Light Orbs: Circular Motions for Cool Effects

photo by Ekkehard Streit
These are not ghosts; these are the wonderfully imaginative product of light painting! You’ll need some practice to perfect making light orbs, but it’s well worth it. Start by finding some LED lights that will serve as your evenly glowing source of light.
Here’s the fundamental premise: Just connect your LED light to a length of string that’s approximately 3 feet long. Turn the light on, and begin to whirl said light around in a circle, building momentum as you go. At the same time, and more slowly, move yourself around in a circle, making certain that your orb’s base (read: spinning circle) constantly sweeps over the exact same position on the ground.
In other words, you’re moving around the outside of the point while looking inward at it, repeatedly whirling the light in front of you. It’ll greatly improve things if you mark this point on the ground with a small rock or something suitable.
Those more advanced—or just ambitious—will want to tie many lights to the string at various distances. This will allow you to create spheres inside of spheres, thereby producing differently colored cores and the like.
Fire Wheels: Gorgeous Effects Meet Greater Technique
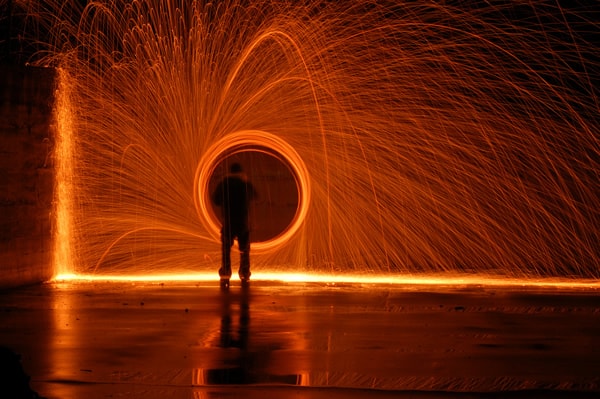
photo by Mark Drouin
This sounds dangerous, but it’s not at all and looks very, very cool. Once you know how it’s done, you’ll marvel at how easy it is to replicate.
Simply put, creating fire-wheel light drawings involves attaching some steel wool to a length of string, lighting it and then whirling it around, just as you did with the orbs. Steel wool burns really well: The secret lies in its metal fibers. They’re so fine that whirling them around continuously makes a lot of air (read: oxygen) come in contact with them.
This results in the steel wool oxidizing and burning quickly, which creates so much heat that it ends up melting into small pieces of vibrantly burning molten metal. As you swing the string, the momentum hurls this burning metal in a mesmerizing arc, which looks impressive in a picture.
The key to this more sophisticated approach is to really throw yourself into whirling the string for all you’re worth; this is what’ll get the fire going. Begin by making the steel wool smolder with either a lighter or match.
Safety is a top priority during this more complicated light-painting method. Don a hat and some sunglasses, yet expect to get some small burn or char holes in your clothing. During this fire-wheel technique, you may want to wear clothes that you don’t really care that much about anymore! Finally, don’t attempt this technique close to anything that’s flammable or that can be damaged by small chunks of molten metal.
For extra fastening strength, it’s advisable to actually tie a stationary clip on your string and then let the clip grasp the steel wool tightly. Otherwise, if you just tie the steel wool onto the string, chances are greater that the string will simply burn through, which can uncontrollably fling your burning clump in places you don’t want.
Taking Photography to Further Aesthetic Heights
What’s so spectacular about light painting is that it demonstrates how far you can take photography. With this method, you’re going well beyond just taking pictures and hoping that they turn out “nice!” You’re learning all about motion effects, the incorporation of light sources and timing to get just the perfect shot and results. You’re also learning how to fine-tune your camera’s focus and settings just for this awesome technique.
If this seems a little bit daunting for you, just give it a try, nonetheless. You’ll grow as photographer, both artistically and knowledgeably, and you can scratch another to-do off of your bucket list! You may be surprised how easily you take to this method and end up enjoying it! Then, you’ll be creating fire wheels and light orbs with no problems.
Have you ever dabbled in light painting before? If so, have you tried any of the tips and tricks outlined above? Even if you haven’t, chime in and tell us all about how you feel about light painting!
About the Author: Marc Schenker
 Marc is a copywriter and content marketer who covered photography. These days, he runs The Glorious Company, a content marketing agency.