Vintage Cameras & Tips For Shooting Film
 by
Johnny Dunn
by
Johnny Dunn

Invisible images are recorded on small sheets of plastic coated in crystals of silver halide salts when you press the shutter of a camera with film in it. Chemical processes are then applied to this film, which can get fairly complicated if you’re developing the film with your own hands, that render the images visible.
Accidentally expose a roll of film to light, even if it’s only for a split second, and the whole roll of pictures can be ruined, and you would never even have known how they would’ve turned out.
Film photography lies in an entirely different world than digital photography. There is no convenience of the storage card or a nice, colorful screen on the camera to preview your pictures on. Most film rolls can record only 24 or 36 images, while a single memory card can hold hundreds or thousands at a time.
With film, you have to finish an entire roll first before you’re able to change film types, whereas ISO in digital cameras, like everything else, is virtualized, and can be adjusted with the touch of a button. Any digital photographer that makes the switch to film will tell you how much harder, and more tedious it is to see results (but it can be so rewarding too).
A Rewarding Experience
The seemingly inconvenient drawbacks you’ll encounter in analog photography, however, can become the driving force behind a creative mechanism that’s not feasible in digital photography.
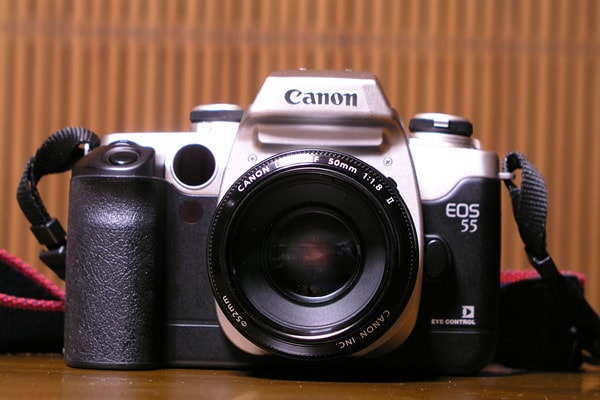
photo by Yuya Tamai
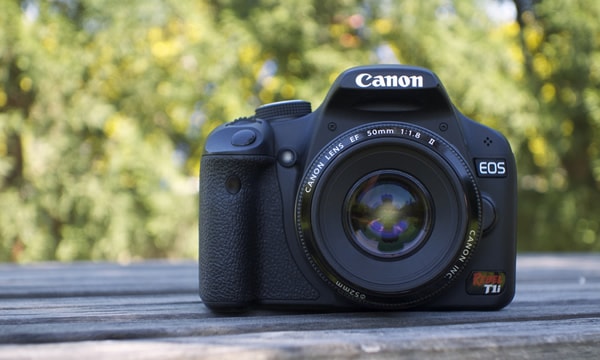
photo by Maxime Raphael
Above is a visual comparison of a film SLR model from Canon (Top), and one of its digital counterparts (Below).
The limiting aspects of film forces you to completely slow down your workflow and processes. Add on top of that development times and costs, and it can become rather difficult for the very casual photographer to continue pursuing analog ambitions after the initial waves of nostalgia and retro reminiscence pass.
Technical Process
But because the technical process in taking a photo (Adjusting aperture, shutter speed, etc) is the same, your skill development in film photography will transfer over to digital photography.
Aesthetic and design rules, for the most part, are consistent as well. Some things, like sharpness and depth-of-field, do require different techniques or at least different thinking in analog photography, but for the most part, you would practice shooting with a vintage film camera the same way you would with a DSLR.
Film and digital photography are like two separate art forms capable of creating the same piece or image, just using different instruments with their own distinct styles.
Digital pictures emphasize sharpness, clarity, and other aspects of technical perfection whereas film photos are judged more for their fundamental aesthetics and candor. This is the reason why analog photography, why the fifty year old cameras, films, and processes of the past are able to remain just as relevant as the latest digital cameras coming out on the market today.
Digital photography focuses on and standardizes different qualities than the vintage film cameras from way back when, and so, even though the mechanical and technical processes of taking a picture is the same in both mediums, analog photography is just different.
A Striking Difference
A very striking difference, for example, is that image noise in digital photography, even if it’s just barely noticeable amount, is essentially unacceptable and can ruin an otherwise great photo.
Noise is the digital equivalent of film grain. Image grain or noise can be defined as random variation of brightness and other color qualities, and is very obvious and ugly after an extent.
In film photography, a certain amount of grain or is not only expected, especially given the decades of wear and tear vintage cameras have suffered, but they can be used to give off desirable aesthetic effects. A grainy digital photo has flaws and needs to be fixed in post-production, but a grainy film photo has character and inherent value through the noise.
What Makes a Good Photograph
Essentially, a good digital photograph must be superbly sharp, unless the subject captured is an exceedingly rare moment or event, in which case, a little bit of blurriness and grain is accepted because the content makes up for the technical faults.
On the other hand, with film photos, sharpness is still a desirable quality, but too much sharpness will actually be counter-beneficial. At a certain point, an extremely sharp film photograph tends to look more like a digital image, and so, the film picture will thus be visually and aesthetically compared to similar digital pictures.
But because digital and film are two different mediums and comprise different standards, a film photo judged by digital standards, and vice-versa, will not succeed in fully connecting with the viewers.
The Qualities Of Film
Sharpness aside, lots of the flaws and disagreeable qualities in digital photography could be considered attractive qualities in film. You can do wonders with contrast sheets and filters in the darkroom, but there’s no need for the endless polishing, sharpening, and editing with a mouse in Photoshop.
Film photos, in terms of technical quality, are held to much lower standards than digital photographs, and post-production should be done much differently in one than in the other. Sharpening and polishing a film photo with a digital toolkit and digital standards can end up with very averse results for the final picture, and so Photoshopping a film photo to death is highly unrecommended. As said above, a film photo with Photoshop and other digital post-production qualities will inevitably draw comparisons with an actual digital image, defeating the purpose of film by removing what makes analog different and replacing it with a beguiling sense of mimicry and deception.
Keeping these differences in mind, when shooting film, you need to focus a lot more on pre-visualizing the photo in your head, as well as accurately adjusting the mechanisms of the camera in accordance with your environment and circumstances.
You won’t be able to fix your mistakes and faults with Photoshop; the darkroom has much less functionality than software. In essence, you have to slow down your processes when shooting in analog because you can’t afford to make careless errors in adjusting or focusing. Shooting film means you not only will not know how your images turn out until post-production, but you’ll have a very limited supply of shots for every subject.
If it’s truly a spectacular image, you may want to shoot the same picture several times in case your first few shots are out-of-focus or blurred, but choosing to retake an image six different times (Which is a fairly modest number of shots in digital photography) means spending a quarter of your roll of film on just one image! Slowing down your shooting process and ensuring everything’s in its right place will allow you to conserve your limited shots.
Exposure problems are perhaps the most common technical mistakes next to out-of-focus images. The most important thing you can rely on in film photography is your light meter. Many analog camera models won’t need batteries to be able to record images because everything’s mechanical except the built-in light meter. So, always make sure you have fresh batteries, and make sure you know how to read your light meter.
Most light meters are as simple as a red minus showing up in the viewfinder for underexposure, a red plus for overexposure, and a green circle when everything’s just right. And remember, overexposing is an easier fix in the darkroom than shooting an underexposed picture; you can increase contrast, apply filter sheets, and do other things to darken a picture, but there’s no way to make underexposures and shades of black visible in the darkroom. But the only way to truly get away from exposure issues in film is to prevent them from occurring in the first place.
And, a separate, more advanced and accurate light meter is definitely a purchase worthy of the cost and physical burden, as a camera’s built-in light meter isn’t always going to be entirely reliable.
About the Author: Johnny Dunn
Johnny Dunn is a freelance writer located in NYC, and is also currently working at the advertising and design agency Breakneck Imaging as a residential photographer and copywriter.