8 Crucial Things You Need to Know About Capturing Catchlights

Photography is an art that constantly grows. Just when you think you’ve covered everything you need to know about it, something new comes up. A new technique, tips & tricks, and a couple of upgraded equipment.
While it is not entirely new, a catchlight is not something that all photographers (especially if you’re starting out) are familiar with. Many, however, have long learned the advantage of using catchlights to capture more effective images.

photo by Russell Johnson
What is a Catchlight?
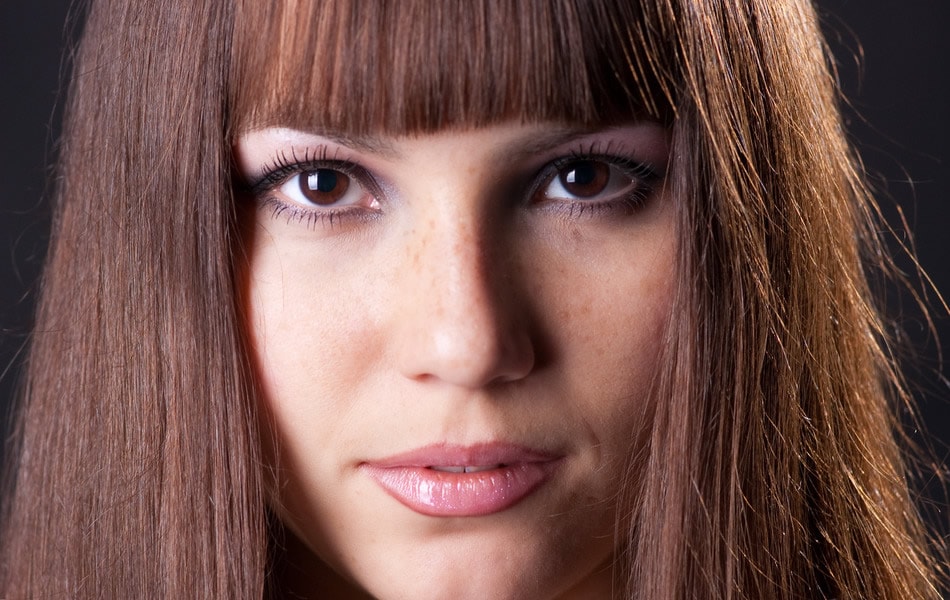
A catchlight is best defined as the light or glimmer that reflects in the eyes of a subject. It is a reflection off the surface of the subject’s eye. Basically, this reflection comes from an external light source. Photographers who use catchlights know their importance in creating dimension and depth, and in adding life to a portrait.
After all, as they say, “the eyes are the windows of one’s soul”.
The size and shape of catchlight vary since light sources, which it is dependent on, differ. The light source’s distance from the subject also affects the size and shape of the catchlight. Thus, if your reflector is large, it will also produce a large catchlight. If you use your electronic flash, which is usually small and handy, it will produce a small catchlight.
While a photographer cannot control a catchlight, you can apply some techniques like proper positioning in relation to lighting.
How to Capture a Catchlight
Positioning catchlights in the right angle is the best strategy for capturing them well.

photo by Daniel Zedda
You can use the clock to determine the best way to position catchlights. Think of your subject’s eye as a clock and visualize the hour hand sitting at the 10 o’clock or 12 o’clock mark. This, many say, will give you the best catchlight there is. Some often place the light source above the head of their subjects. There is no set rule, though, as photographers normally adjust according to their personal preference. This has, however, worked for many.
Below are 8 tips you can use to capture catchlights effectively.
- The first and most commonly followed tip is to make sure that your subject is facing the light source, particularly his or her eyes. If you are shooting indoors, position your subject in a spot or area facing a window or open door. To create good shadows, position him or her at a 45° angle from the window. Avoid making your subject turn his or her back to the light source, though, as this will put more shadows on your subject’s face and relegate the catchlight to the background. Always make your subject face the light if you want a total catchlight that’s sure to light up the whole image.
- Avoid making your subject move around just so you can find the catchlight. Do the first tip instead. Your subject does not carry the light source. You have to find it.
- If you need to shoot outside, find an open shaded area and set up your shoot there. Look for the light source and then determine what item or object can act as its filter. It can be a walkway or a building, or a garage door, or a fence. The clouds or the snow can also serve as filters. Even when you need to put your subject under a shade, make sure that he or she is facing the light.
- A reflector is very important because it is what helps make the light bounce into the eyes of your subject. Thus, you need to use one, especially when shooting outside. There are photographers who are also careful about the color of shirt they wear when capturing catchlights, as the colors can also act as reflectors. White, for example, is a good reflector. You wouldn’t want red or violet reflected on your subject’s eyes or skin, though, right?
- There are round catchlights, as well as square and rectangular ones. But, if you want your photos to come out as natural as they can be, go for round catchlights.
- Avoid catchlights below 9 o’clock, as well as the 3 o’clock position, if you do not want to come out with unnatural images. Naturally, when the sun is down and it’s dark, there are no catchlights. A catchlight is not natural if it is created when the sun is below the horizon.
- Use the magic of Photoshop to remove any extra catchlights. It is sometimes possible to capture more than one catchlight in the eye. But, since natural should be the way to go, only one catchlight should be seen in an eye. Otherwise, how would you explain reflections from different suns when we only have one sun? Anyway, simply choose the catchlight that is
- most natural looking, and
- most flattering. Remove the others.
- Lastly, take note of balance. Be sure that the positions of your catchlights on the left and right eyes are the same. So, if the left eye is at the 2 o’clock position, the right eye should also be at 2 o’clock, not 10 or 12.
It is important to practice capturing catchlights if you really want to effectively incorporate them into your portraits. You need to spend time experimenting. You need to be observant and pay attention to the catchlights. Take some time to do this before scheduling your next shoot.
Once you know what to do, you’ll have fun and this will show in your photos. Your captured images will then speak a thousand beautiful words.
Catchlights are essential for effective portrait photography, especially in portraiture. Without catchlights, your images will appear dull and empty. There will be no life and light in the eyes of your subject. Not everyone will probably notice this, but your fellow photographers will! And the overall feel of your photos will be different; as if there was something missing.
So, why not find time to study, learn, and use catchlights?
About the Author: Michael Gabriel
 Michael Gabriel L. Sumastre is an experienced writer who loves to take pictures of the countryside as well as aerial photographs. He maintains his professional writing portfolio at TheFinestWriter, and you can visit his photography portfolio at Sumastre Photography. Michael was hired by Booking.com to photograph 10 of the most beautiful beaches in Palawan, Philippines.