Photoshop-Free Effects Using Only a Camera

Before all of the advances in photo editing software, there was just a photographer with dreams and a camera. Photoshop gives us the ability to edit our photographs in ways which our cameras just can’t compete. It also raises the question of when does it stop being a photograph and become a piece of digital art.
In some ways photo editing software like Photoshop has made photographers lazy and less creative.
We use Photoshop like a safety net to create the visions we see in our heads instead of finding ways to achieve this with our cameras. In order to grow as photographers, we need to step out of our comfort zones. It’s time to put away the computer and start thinking outside the box.
There are several ways to add some creative touches into the typical photography routine. Every now and then take a day to explore new techniques and try something new. Some of these methods are so easy they can be done with a point and shoot and others require a little more work with a DSLR.
DIY Filters
DIY (Do it yourself) filters are one of my favorite ways to get some creative cheap effects. The sky is the limit on what you can use as a filter. This usually requires quite a bit of experimenting, but can produce some very unique shots. Below are some of the items that have worked well for me in the past.
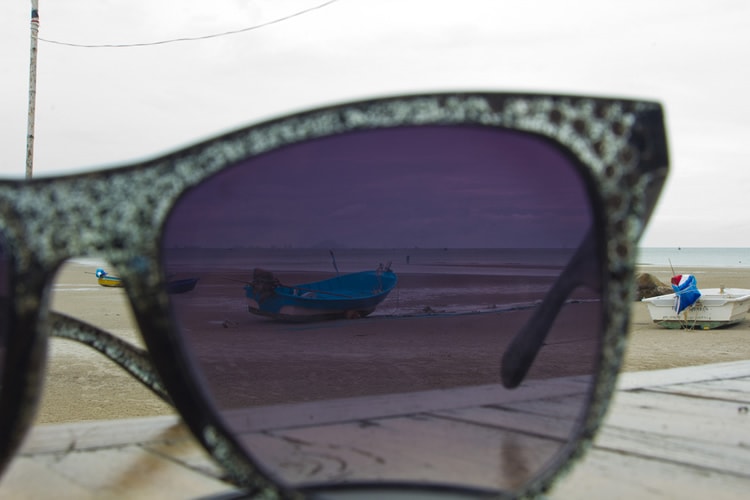
photo by Jannik R
- Sunglasses — are usually something kept on hand and work wonders when photographing sunsets. Additional effects can be created using various tinted sunglasses. Simply hold the sunglass lens over the camera like a typical filter and shoot away.
- Old film — recycle old camera film by holding it over you camera lens to create black and white images. Old film can actually be used to create several different shades depending upon which section you hold over the lens.
- Magnifying Glass — don’t spend money on an expensive set of magnifying filters when a magnifying glass can do the same job. Explore the wonderful textures and details in everyday objects with a magnifying glass.
- Tights or Panty Hose — tights with a few runs for extra light can produce a nice hazy effect. Simply pull the hose tight across your lens and add runs for more light. Use a wide variety of colored hoses to get different effects.
- Sandwich baggies and Markers — the easiest way to add some color to an image is coloring the outside of a sandwich baggy and securing it on the lens with a rubber band. Triple check that the colored side does not touch your lens before attaching.
Dreamy Photo Effect
The dreamy photo effect is a popular style that has been around for a while. Photographs with this style have a hazy appearance, with soft light, and warm color tones. This style is very popular among portrait photographers. There are several presets and actions out there that can create this photo effect with a few clicks of the mouse. It is no surprise that many photographers just add this effect when post-processing, but it can be created with a little planning and a camera.
photo by Lisa Brewster
Like most photographs, this type of effect is all about controlling the lighting. The dreamy effect works best when the sun is low enough in the sky to create a sun drenched atmosphere for the subject being photographed. This time of day is often referred to as the golden hour. Position yourself so that the sun is directly behind the subject matter for the best shot.
A DSLR camera in manual mode is the preferred method for working with backlight. This is not to say that you can’t get this effect to a degree with a point and shoot, it just works much easier when you can fully control all the settings. Set the aperture wide somewhere between f2 to f4 and adjust as needed. The ISO may need to be adjusted to compensate for the light, but watch out for noise in the background.
Metering is a very handy tool for this effect. If your camera has the option for spot metering (Nikon) or partial metering (Canon) you can use it to keep the subject from being overexposed. It’s normal with this type of lighting to overexpose the sky and some of the surrounding details. The goal is to keep the primary subject from being over exposed, but still have a nice sun bathed look. Use the spot metering tool to meter off the edge of the subject, this should help preserve the details needed for this effect.
Infrared Photography
Infrared photography (IR) is a very cool way to breathe new life into the old routine. This style of photography shows colors that we are not capable of seeing with the naked eye. Infrared photography can turn a nice sunny day into a dreamy wonderland. The sky becomes darker, trees display as a snowy white with a slight pink hue, and water is transformed into stunning shades of silky blue.
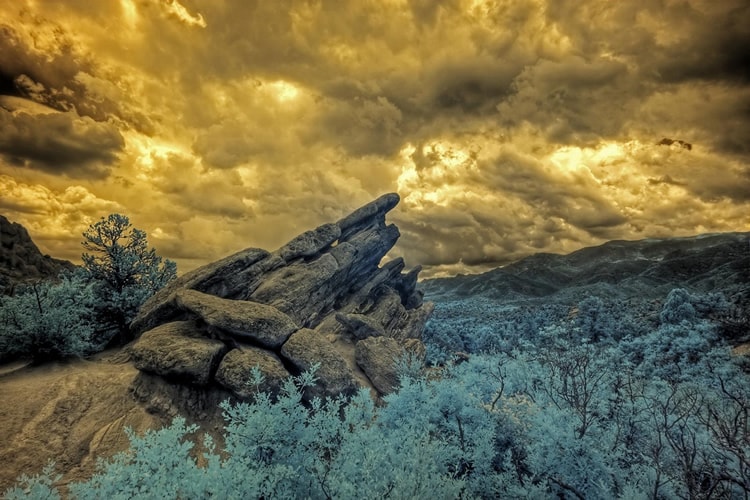
photo by David
This is another style that is commonly created later in Photoshop using layering techniques and filters, but can be created outside of editing software will a little work. This type of photography will require a camera, tripod, and IR filter. Not all cameras can capture infrared, so it’s necessary to test the camera to find out. You can test your camera by pointing a remote at the camera lens and pressing a few buttons. If the camera picks up the red light than IR is not blocked and you are good to go.
The focus will need to be adjusted before adding the IR filter, then switch over to manual mode so the focus doesn’t shift. The white balance has to be adjusted manually and then aimed at something green. A good aperture to start off with for this type of photography is around f11. A slower shutter speed is necessary since the aperture is small. The ISO should be low to reduce noise. Start out with an ISO setting of 100 and increase to 200 if pressed for time.
This effect can be a bit tricky to get the hang of and may require quite a few attempts so don’t get discouraged.
Happy shooting!
About the Author: Sheena Koontz
 Sheena is a jack of all trades freelancer who dabbles in photography, writing, editing, and web design. She specializes in abandoned, landscape, and travel photography. She currently resides in Bristol, VA with her hubby and two kids. You can follow her on Facebook or check out her website here.