Product Photography 101

Have you ever marvelled at how good product photos look? Ever catch yourself wondering how photographers come up with images that stick in consumers’ minds?
Every time you see product shots in magazines, brochures or catalogs, you think about how they are done or even where the shots are taken. You begin to imagine the process involved.
Is it as simple as setting up the scene and clicking away? Or are there more complicated steps to follow? Product photography may look simple, but it’s not really as easy as reciting the ABCs. A lot of hard work, skills and techniques go into every shot. Creativity is also a big factor.
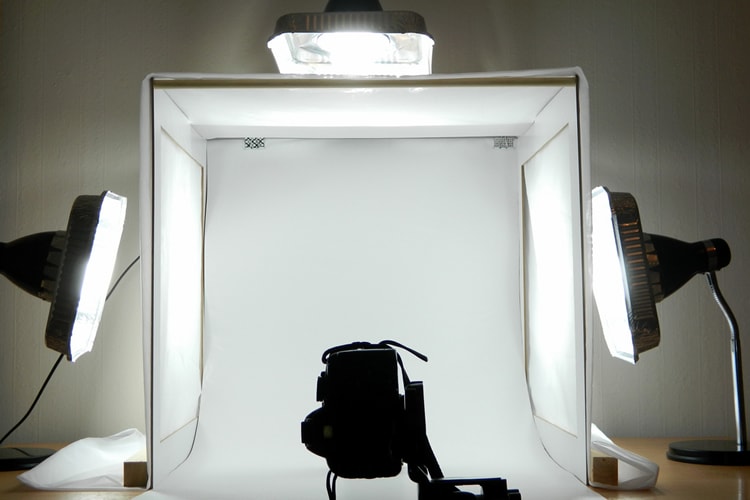
image by Alison Christine
Tips for Taking Product Photos
Whether you are shooting clothes or food — or any other product — it is important to remember three things: equipment, techniques and skills. These three elements will be your guide in creating unique product photos that will have consumers running to the nearest stores.
Equipment
It is important to have the right equipment or gear no matter what it is you are shooting. Here are some points you need to follow for product photography:
- Use a flexible lens. A mid-zoom lens is ideal because it will minimize your need to move around. You can choose to set up in one area and then use the zoom when taking closer shots. Additionally, if you want your background a little blurry or out-of-focus, use lens with maximum aperture of at least f/3.5. This is especially important if you are shooting in a setting with lighting that’s not so good. Remember, fast lenses are recommended for telephoto lenses and for capturing scenes in dim lighting.
- A tripod is essential when taking product photos because it will allow you to avoid shaky shots. However, handheld cameras are also best for exploring creative possibilities. Thus, it is better to be flexible and have a tripod handy in case you decide to use one.
- As for light, some photographers prefer to use a lot of soft light. But do not rely solely on battery-powered flash. Be more creative and go for strobes. It’s going to cost you some, but the benefits are sure to be more worth it in the end. If you want to stick with your budget, you can always make your own studio strobe using incandescent lights.
- If you do not have a dSLR, use a point-and-shoot with good telephoto capacity (or do invest in a good dSLR). A lot of product shots look exceptional when they’re shot from a distance, not up close.
Techniques and Tips
Now that you have the right equipment, it is time to move to the next element: techniques. You don’t have to be an A-grade photographer to come up with unique and creative product photos. Knowing the techniques and following some tips will help you a lot.
- A must-have for product photographers is a white background. Shoot your subjects (the products) against this background in order to prevent distractions. If you do not have a white cloth or sheet, your alternatives are white board, cardboard or illustration board, and a spotlessly clean white wall. If you plan to prop the product on the table or any similar surface, use plain white paper for background. Find something that can make it stand on its own. You’ll need more than one sheet of white paper to make it opaque. A white background is also essential if you want an easier time when editing using Photoshop or any other photo editing software. You can also try using a black background, although the effect might not be the same.
- Set up in a room with ambient lighting from the windows (natural light), enough to make the room bright. If this is not possible, go for a room or area with bright lights. This will help you avoid shadows in your shots. Using a flash will also help. In addition, make sure that the room you are shooting in does not have objects or colors that might blend into the product, making it look like a rainbow of colors. You need to experiment a little by moving around the room and adjusting the lights. Find a spot and lighting that sets off the right mood and gives the effect you want.
- Position your product creatively. Play around with it. Hang or suspend it using a rope, wire or even a hook. Or you can choose to place the product over a reflected surface (such as a mirror, a glass table or flooring or even shallow water). You can also “adjust” the image using a photo editing software to create reflections on water. You can also position the product or products on stands like crates, boxes, shelves and even barrels or bricks. Be as creative as you can be.
- Do not be afraid to experiment with macro shots. Take a couple and see what the effect is like. Some macro shots come out really dramatic, so they’re perfect if you want that outcome for the product. Macro shots are eye catching, too, so you should use them for catalogs and posters. They will draw the attention you want. Be sure to play around with the lighting, though, in order to get the best shots that show important details of your subject.
- You should also try out different backgrounds for every product you shoot — not just the traditional whites. For example, if the product is red velvet cake, get a slice of the cake and place it on a small pink plate. Position it on a wooden table, alongside a glass of strawberry lemonade and some cupcakes in the background. This will make the scene more interesting. The photo will also come out as real; so real that the next time you eat a slice of cake, you’ll want exactly what you saw in the picture!
- Take shots of the product from unique angles: from up above, down below or from the sides. It’s your choice. Experiment with the angles before choosing the final shot to make sure you’ll get the best effect.
- Think of other ways that the product can be used — show this in the photo. For example, nail polish can be used as paint. Show a scene with different nail polish colors being painted on a wall, beside fabulously manicured fingers. Or place a painter’s palette filled with nail polish colors.
- Finally, do not be afraid to use Photoshop or any other photo editing tools. Putting additional creative touches to your product photos will be easier with photo manipulation.
Skills
Your photographic skills also figure prominently in your quest for coming up with exceptional product photos. But this is something that you cannot force or manipulate. The best thing to do is practice, practice and practice. You may be a highly skilled and creative photographer, but if you do not use it and practice, you’ll get stuck and won’t be able to accomplish much.
Product photography is not simple, but it can be practiced, learned and mastered. All you need to have are determination and dedication — along with the tips and advices given above.
About the Author: Michael Gabriel
 Michael Gabriel L. Sumastre is an experienced writer who loves to take pictures of the countryside as well as aerial photographs. He maintains his professional writing portfolio at TheFinestWriter, and you can visit his photography portfolio at Sumastre Photography. Michael was hired by Booking.com to photograph 10 of the most beautiful beaches in Palawan, Philippines.