Rediscovering the Art of Dodging and Burning

Light creates drama in photographs. Darks become darker and the light becomes a character in the image.
Creating dramatic light doesn’t have to mean getting up before dawn or setting up dozens of lights. A few easy post-processing tools can add a sense of drama to any scene. Photos with flat light or exposure problems become dramatic light masterpieces.
In this article, I’ll talk about two powerful, easy-to-use post-processing techniques: Dodging and Burning. I’ll show you how to use these techniques to fix exposure problems and for artistic effect.
Introducing Dodging and Burning
Dodging and burning are post-processing techniques with roots in film photography.
- Dodging selectively lightens parts of the image.
- Burning selectively darkens parts of the image.
In the darkroom, photographers dodged and burned to increase exposure separation. In other words, increasing contrast in an image. Some areas they would expose to more light and some areas, they would block light with a card or some other object. This was a time-consuming process and they would need to replicate it with each print.
The terms from the darkroom days stuck and are used in both Lightroom and Photoshop.
It is easy to change the exposure of the entire image in Lightroom using the Exposure slider. I also have a few of options for adjusting the overall contrast (contrast, clarity, texture). In different ways, these features change the relationship between the lights and the darks in my image.
But sometimes I want to selectively adjust the contrast. I want to decide which areas are light and which are dark in my image. I want to be like the film photographers dodging and burning in their darkrooms.
Luckily, Lightroom includes many easy tools for selectively adjusting exposure and adding contrast. You can find these tools next to the Cropping tool above the Basic panel.
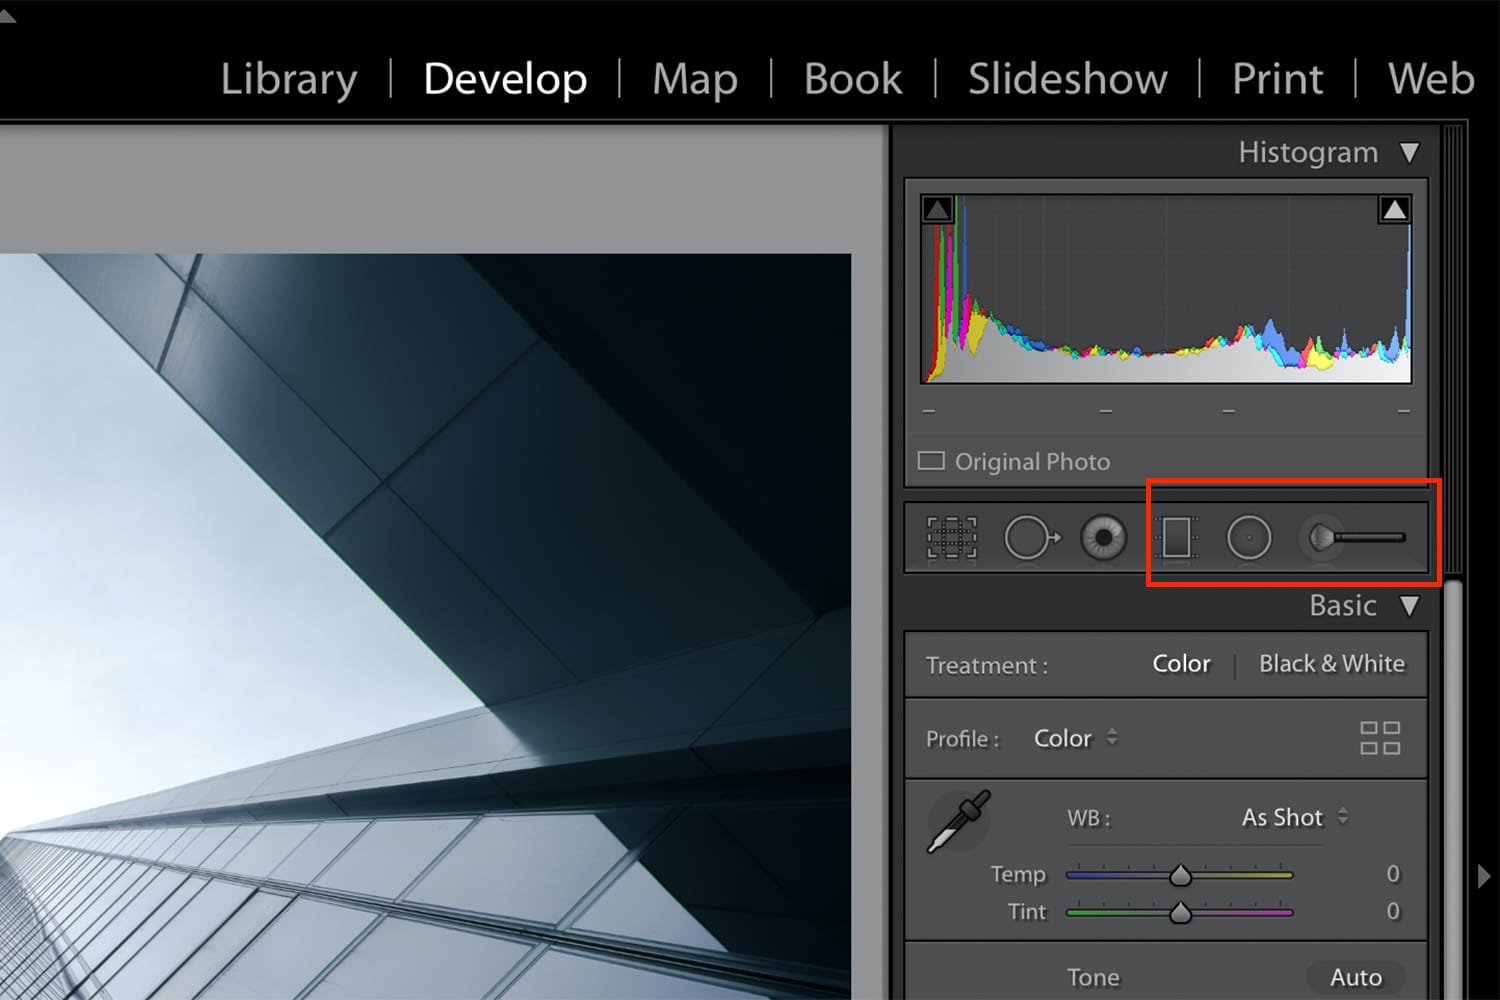
Screenshot of Lightroom Develop Module.
Want to learn more about using Lightroom Classic, how to dodge and burn, and a myriad of other techniques? The Lightroom Mastery ebook has you covered! Grab your copy today and become a master of photo editing.
In the above screenshot, the red rectangle highlights the tools you’ll need for dodging and burning. Tools from left to right are Graduated Filter, Radial, and Brush tool.
- The Graduated Filter tool allows me to lighten or darken the edges of the frame. The effect fades out as it gets closer to the center (or closer to the edges).
- The Radial Filter tool allows me to draw a circle around the area I want to lighten or darken.
- The Brush tool allows me to paint in the exposure I want.
Lightroom even has built-in presets called “Dodge (Lighten)” and “Burn (Darken)”.
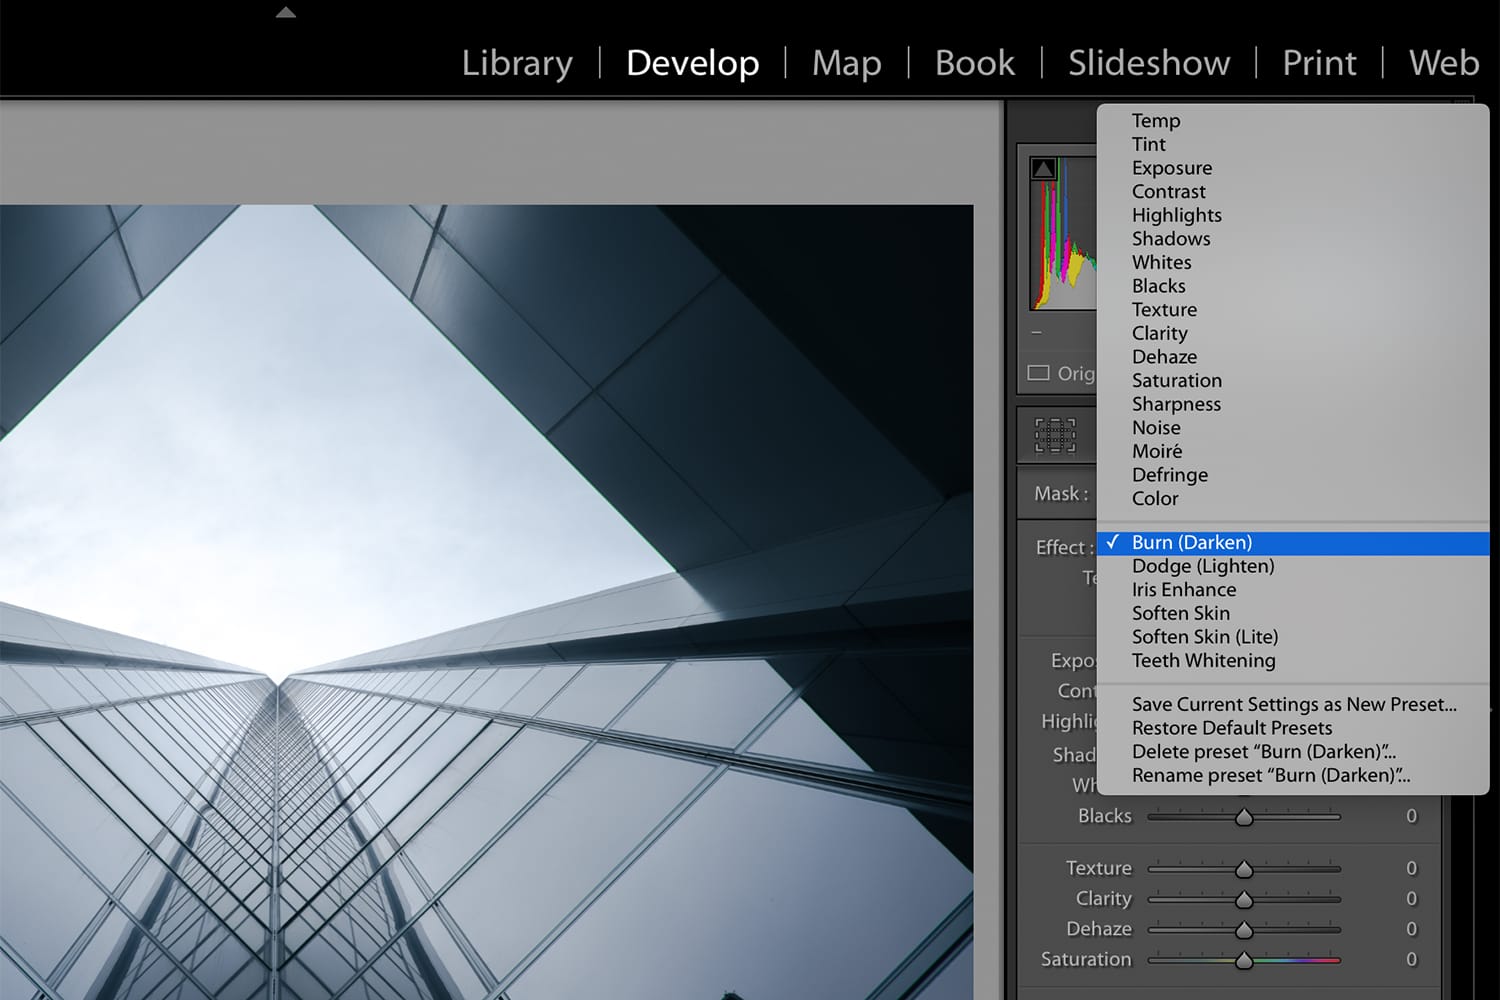
Screenshot of Lightroom Develop Module.
The screenshot above shows the Dodge and Burn presets. By default, the Dodge preset increases the exposure by +0.25, and the Burn preset lowers the exposure by -0.30. But, you can adjust the exposure slider to increase or decrease brightness. I often add a bit of more whites and lighten the highlights as well.
Let me show you how powerful these tools can be. Let’s start by using these tools to fix uneven exposures in my images.
Fixing Exposure Problems
Modern digital cameras capture a large range of exposures, but they may not be balanced. Some areas of the image may be too dark and others too light. For instance, skies may be too bright in a landscape or a person may be obscured by shadows in a street scene.
I can dodge and burn when parts of the scene are too bright or too dark and I want to balance the exposures.
Let me show you an example from a recent sunrise shoot at a local conservation area.
I was extra careful with my exposure so as not to blow out the rising sun. I exposed for the sun, but this made the rest of my photo very dark. Had I exposed for the foreground and the Cypress tree; the sun would have been completely white. Once I lose the information in the sun, I can’t get it back in post-processing.
If you’ve heard the advice, “expose for the highlights”, this is what they are talking about. Make sure the brightest part of your image isn’t completely white.
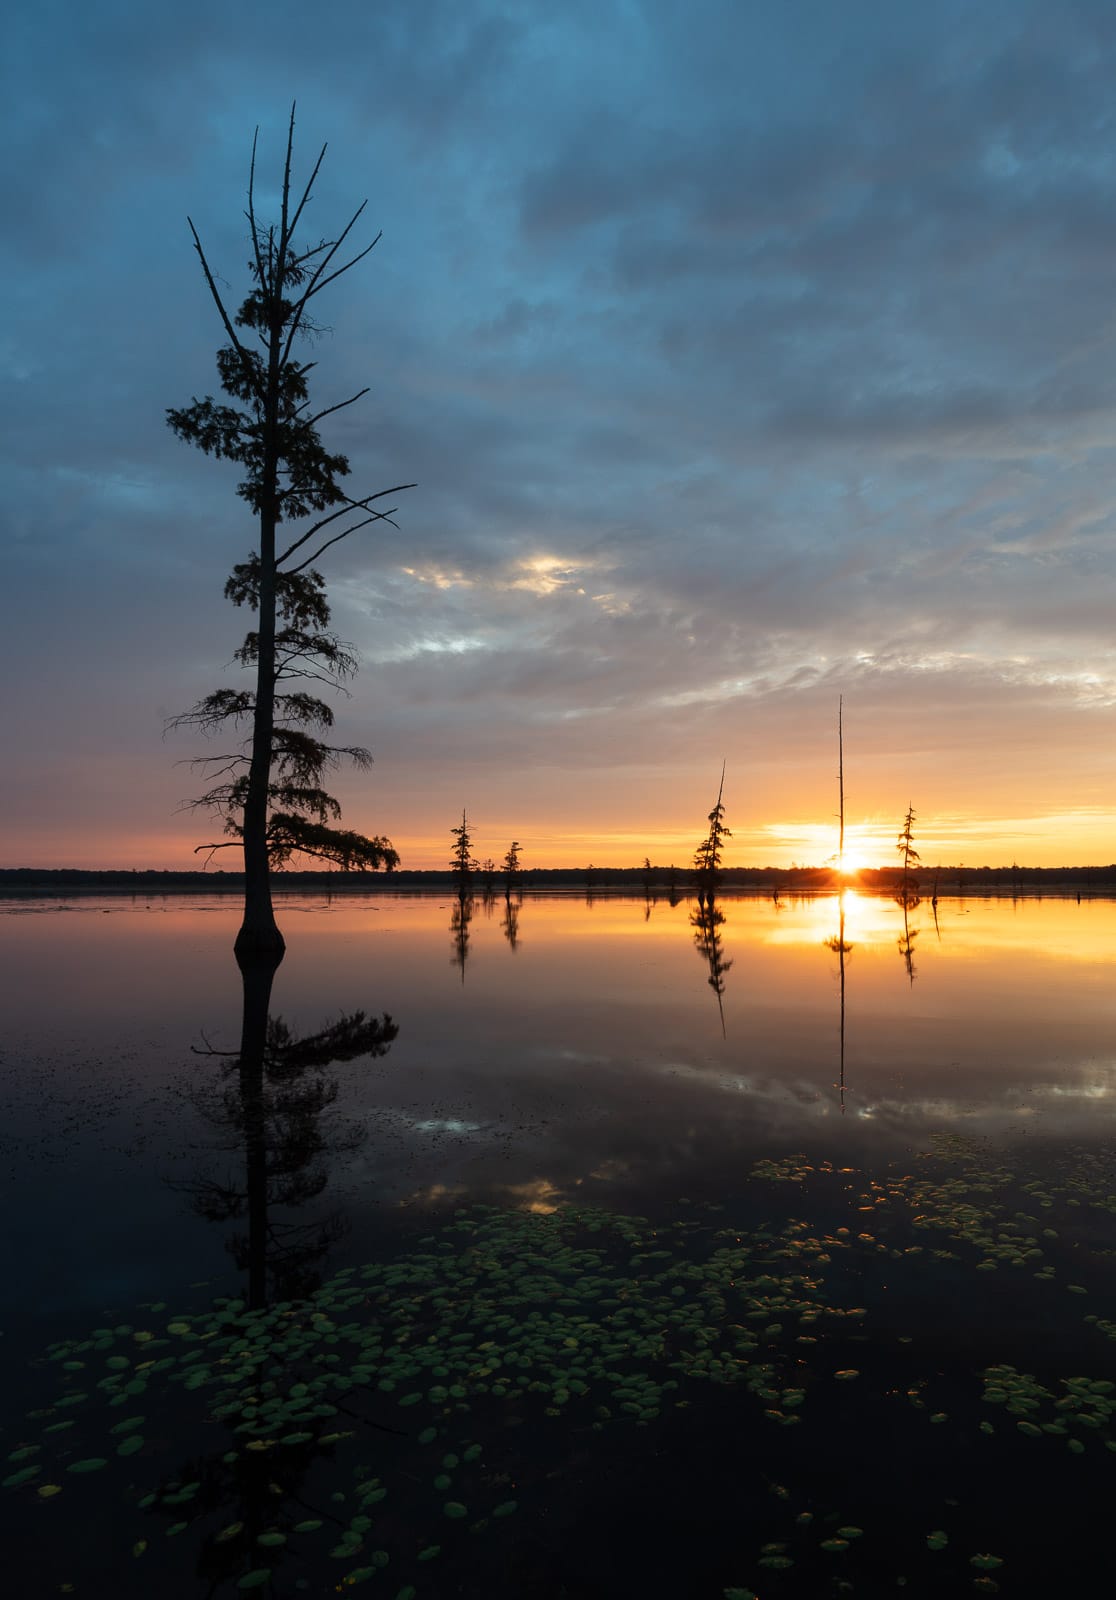
Original raw image from a sunrise at Duck Creek Conservation Area in Missouri. I exposed for the sun, but this made my foreground very dark. My camera settings were ¼ second @ f16 ISO 100.
In post-processing, I can use the exposure slider to increase the exposure of the entire scene. If I do that, I can see the foreground, but the skies get too light and sun goes white.
I adjusted the exposure to lighten the foreground, but this made my sky too light.
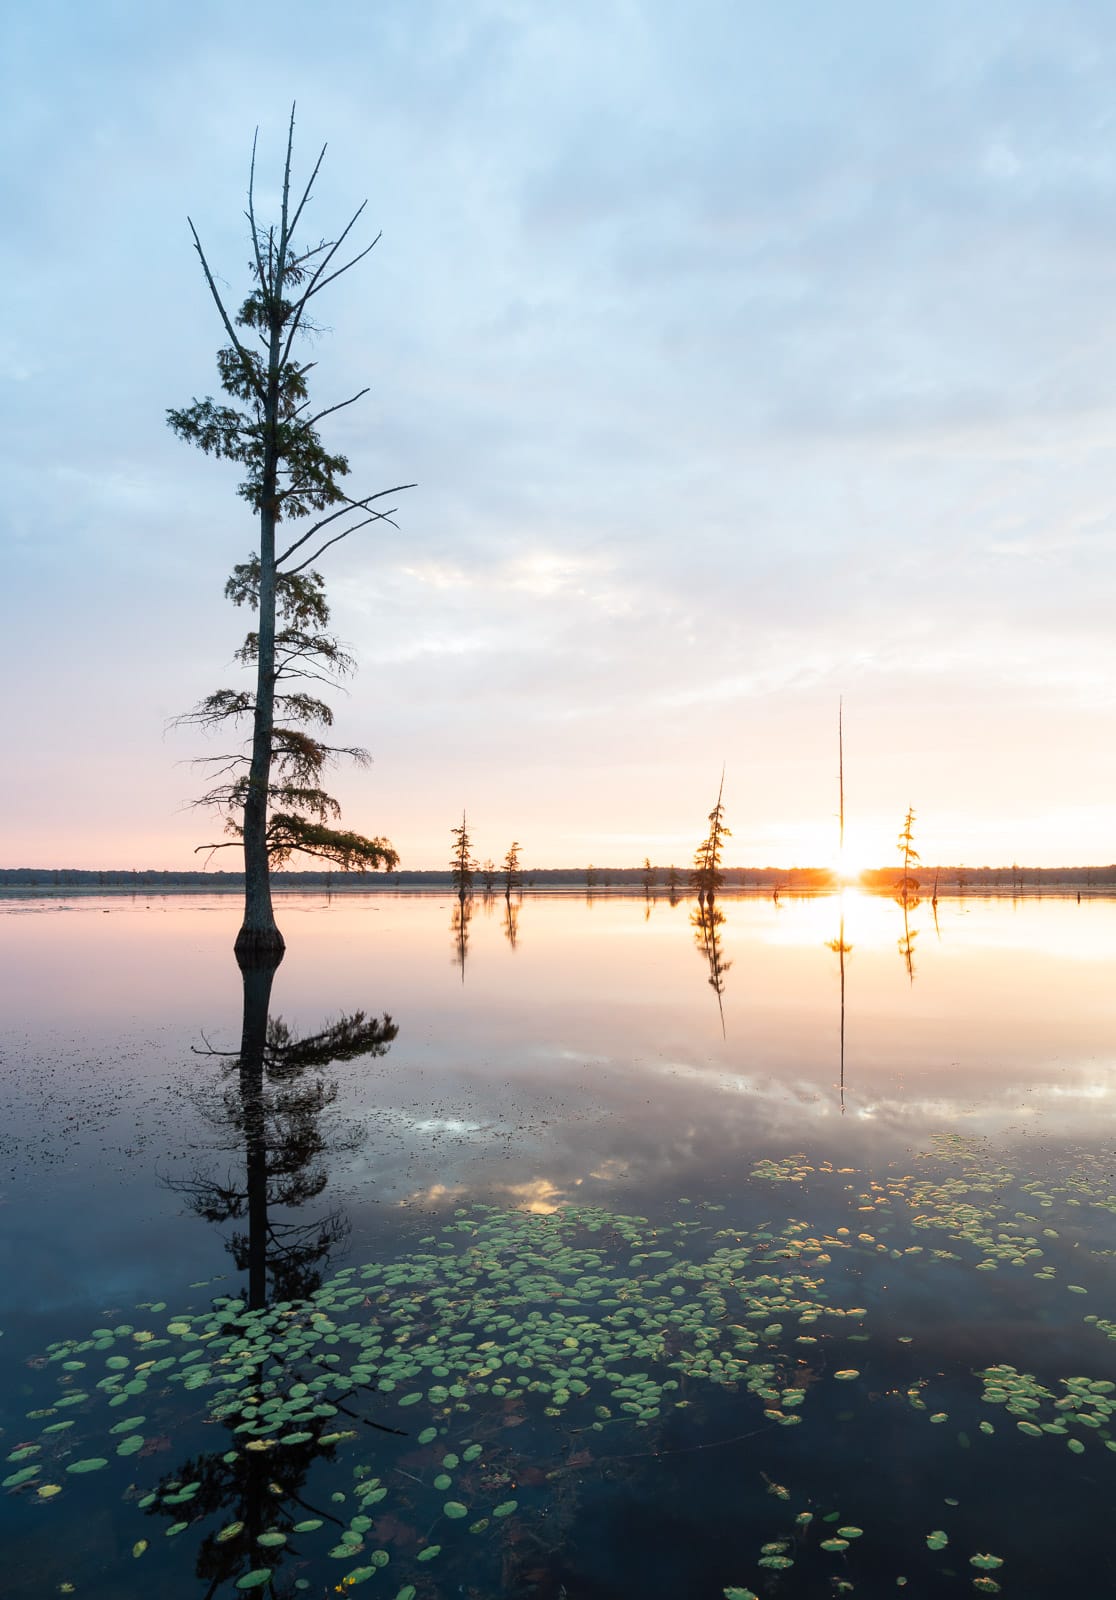
I have to selectively adjust my exposure. I used a Graduated Filter to darken the sky. Then I used the Radial Filter tool to highlight important elements of the scene.
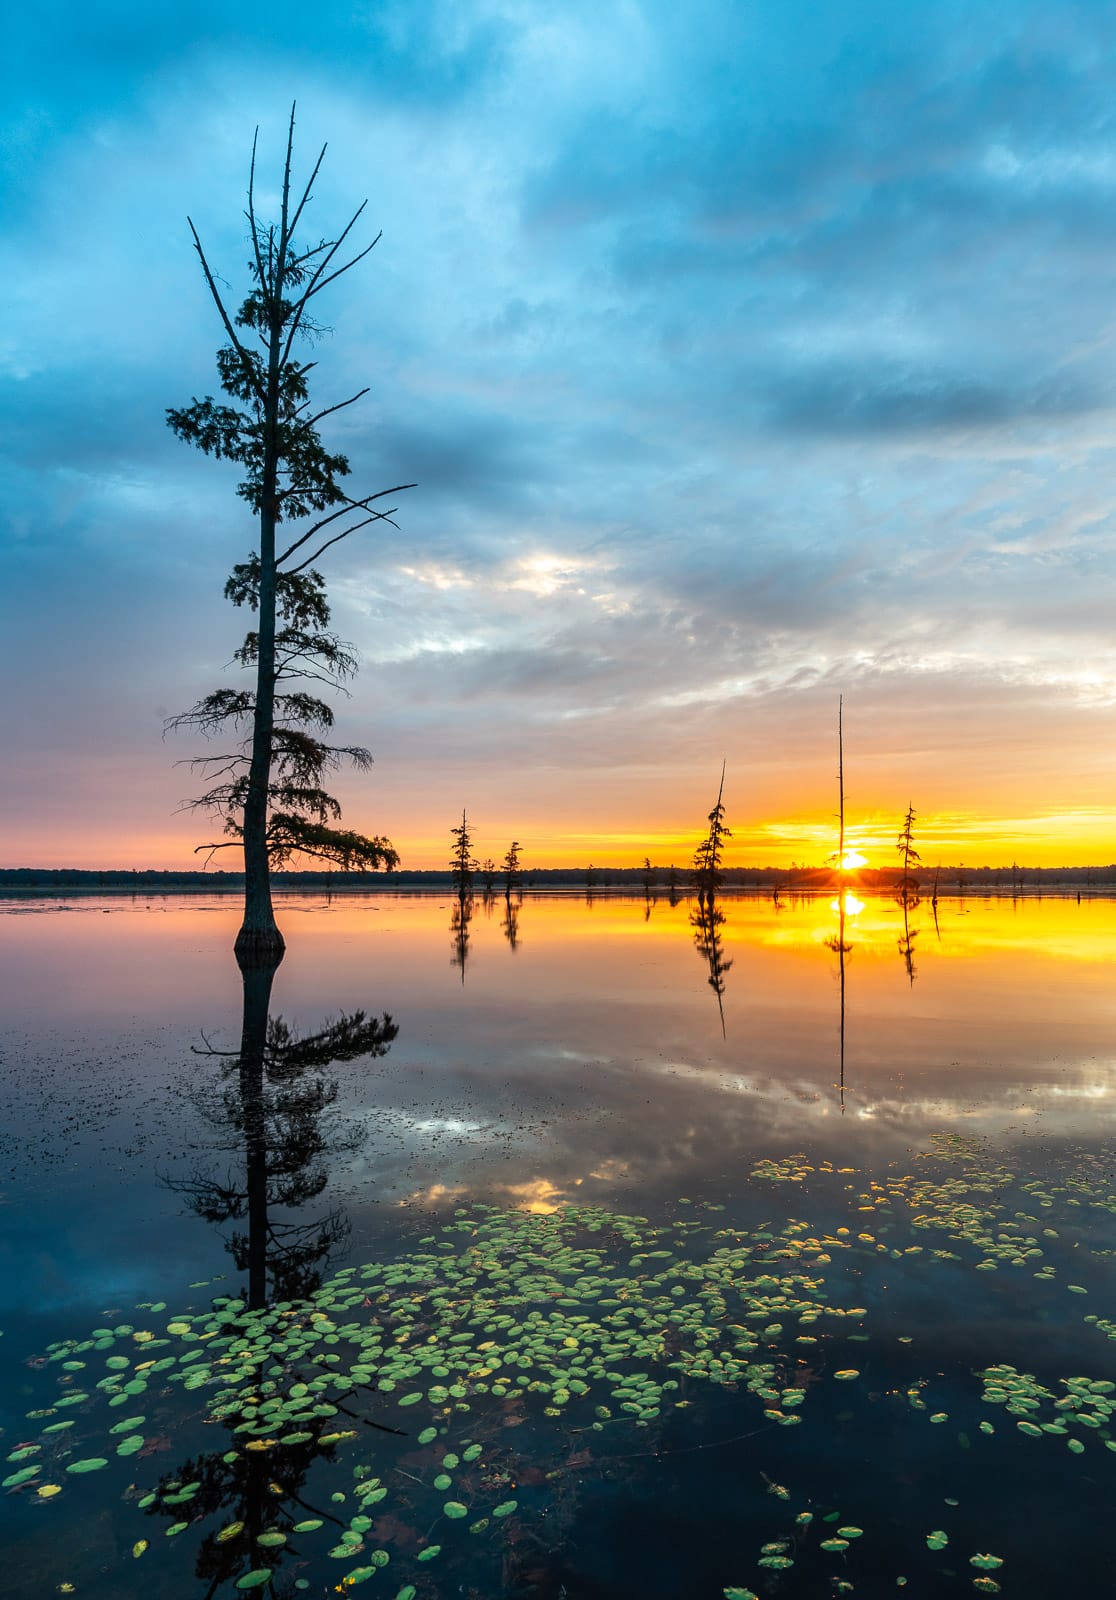
Final image with selective dodging and burning.
Dodging and burning aren’t just for landscapes!
I use similar techniques, although much more subtly, in my street and travel photos. The image below is of a Punjabi woman during the Panchkosi Parikrama festival in Varanasi, India.
I exposed the best that I could, but the final exposure is opposite from what I’d like. I’d like the woman in the red shawl to be brighter than her background. Making her brighter and the background darker will help her be the focal point of the image.

Original raw file showing street scene in Varanasi, India.
The subject is much darker than the background. My camera settings were 1/800@, f/5.6, and ISO 200.
I decreased the exposure until I was happy with the brightness of the background. Then I added a couple of Radial Filters to increase the exposure of the woman. Using multiple stacked Radial Filters, rather than just one, allows me to feather the light so it doesn’t look like she’s in a spotlight. I can also add a bit more light just on her face.
Seeing the images side-by-side the difference is clear, but I want the changes to be subtle. I don’t want the viewer to notice the changes.

Final image with the background darkened. Radial Filters brighten the main subject.
Dodging and burning can even out exposure variations in an image, but now let’s talk about the fun stuff. Let’s talk about using dodging and burning to increase the drama in your image.
The Art of Dodging and Burning
Photographers dodge and burn for artistic effect. I even have the power to draw the viewer’s eye to whatever part of the scene I want using these very simple techniques.
In the landscape example above, compare the final image with my original raw file. I’ve made quite a few adjustments to increase the differences between light and dark elements in the scene. Many of these adjustments weren’t necessary if I only wanted to even out the exposure.
You’ll be able to see my changes most clearly in the clouds. I’ve used Radial Filter to darken some of the clouds and lighten other clouds. This makes the contrast between lights and darks more pronounced, more dramatic. This process took me some time. I used quite a few Radial Filters.
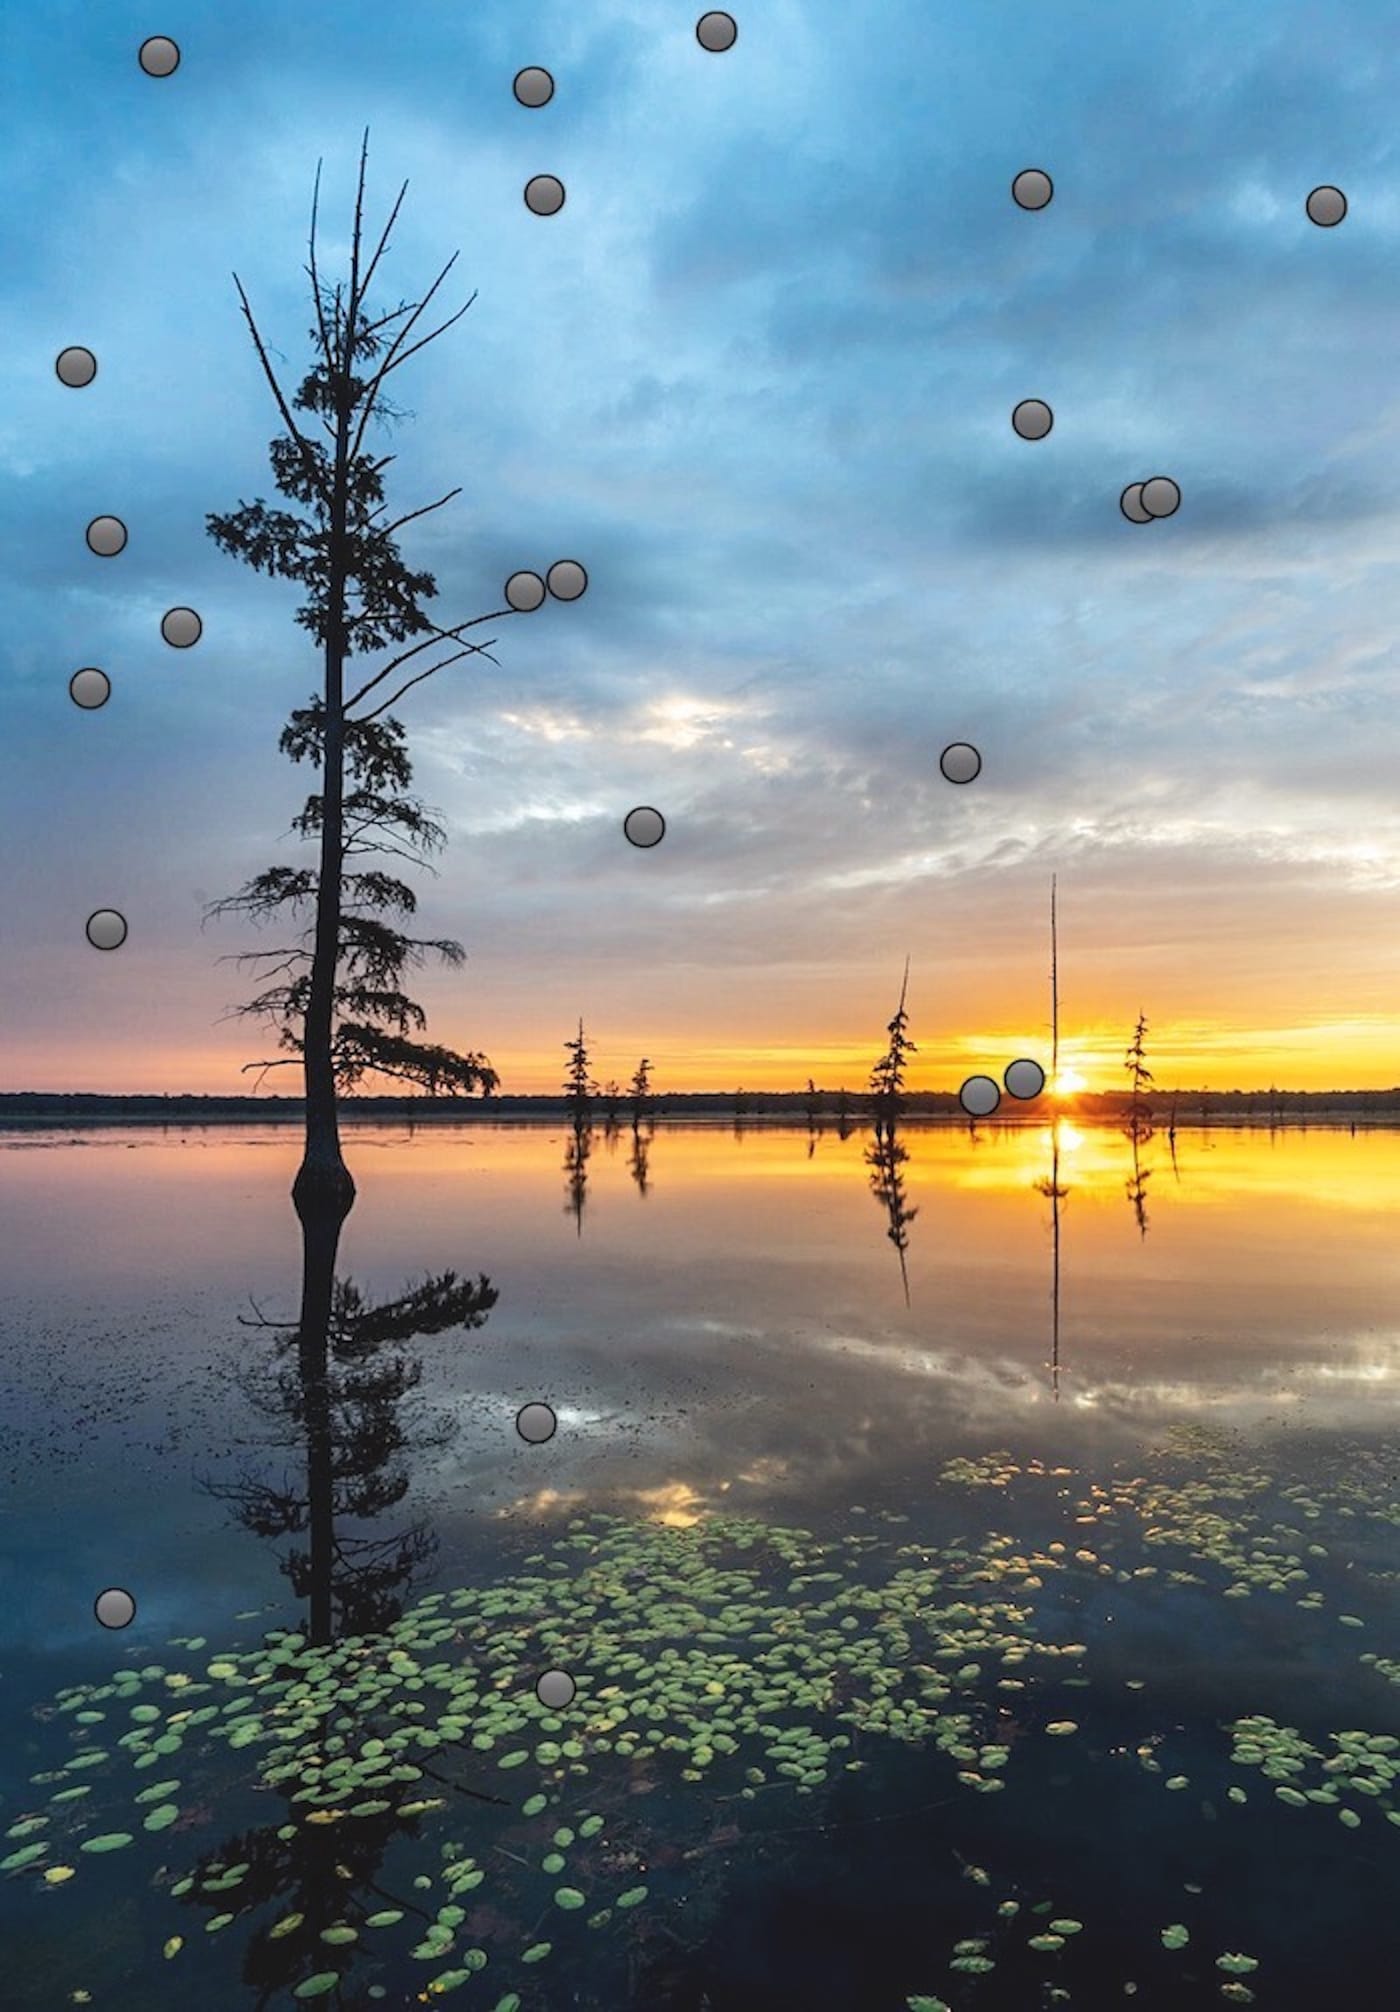
Screen shot of Lightroom image in Develop Module.
Each dot in the screenshot above represents a Radial Filter. I adjusted the exposure of the sun and then added contrast to the clouds by dodging and burning.
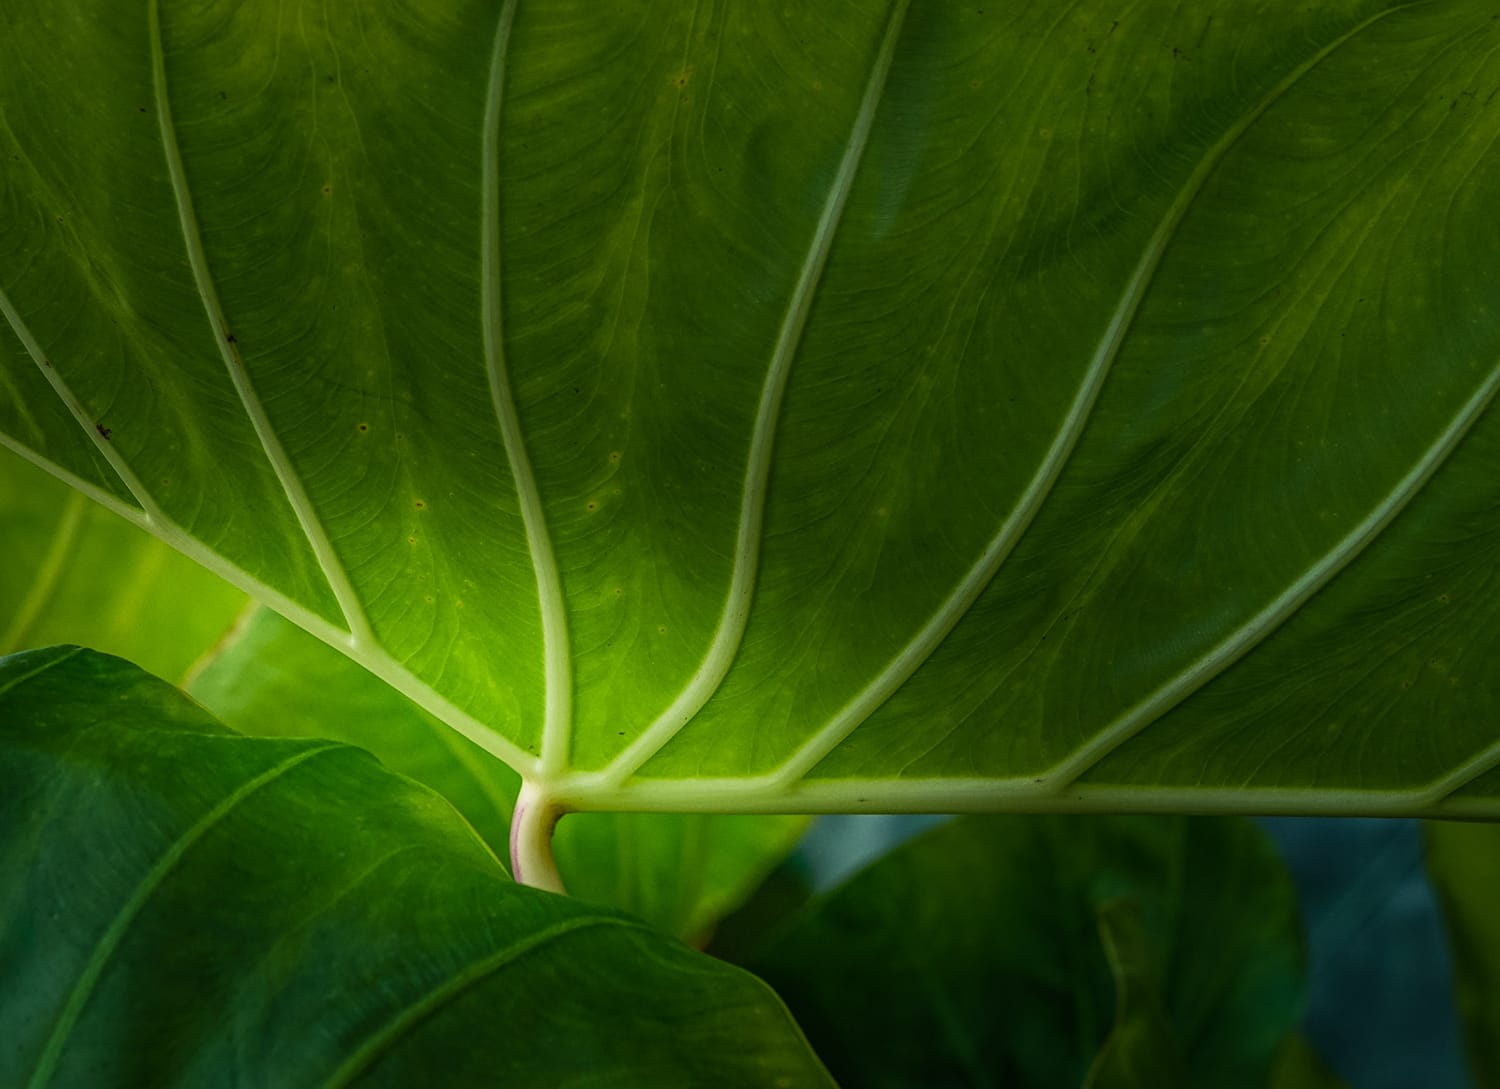
Let me show you another example where I used dodging and burning to create dramatic light. I took this photo on a recent trip to a local botanical garden. The sky was overcast, and I captured very even light.
Photos with even, flat light work great for adding a dramatic lighting effect.
Photographing greens next to greens in nature can be visually boring. This is one reason many of us prefer to photograph in the spring and the fall rather than the summer. But even these greens have shading variations I can work with.
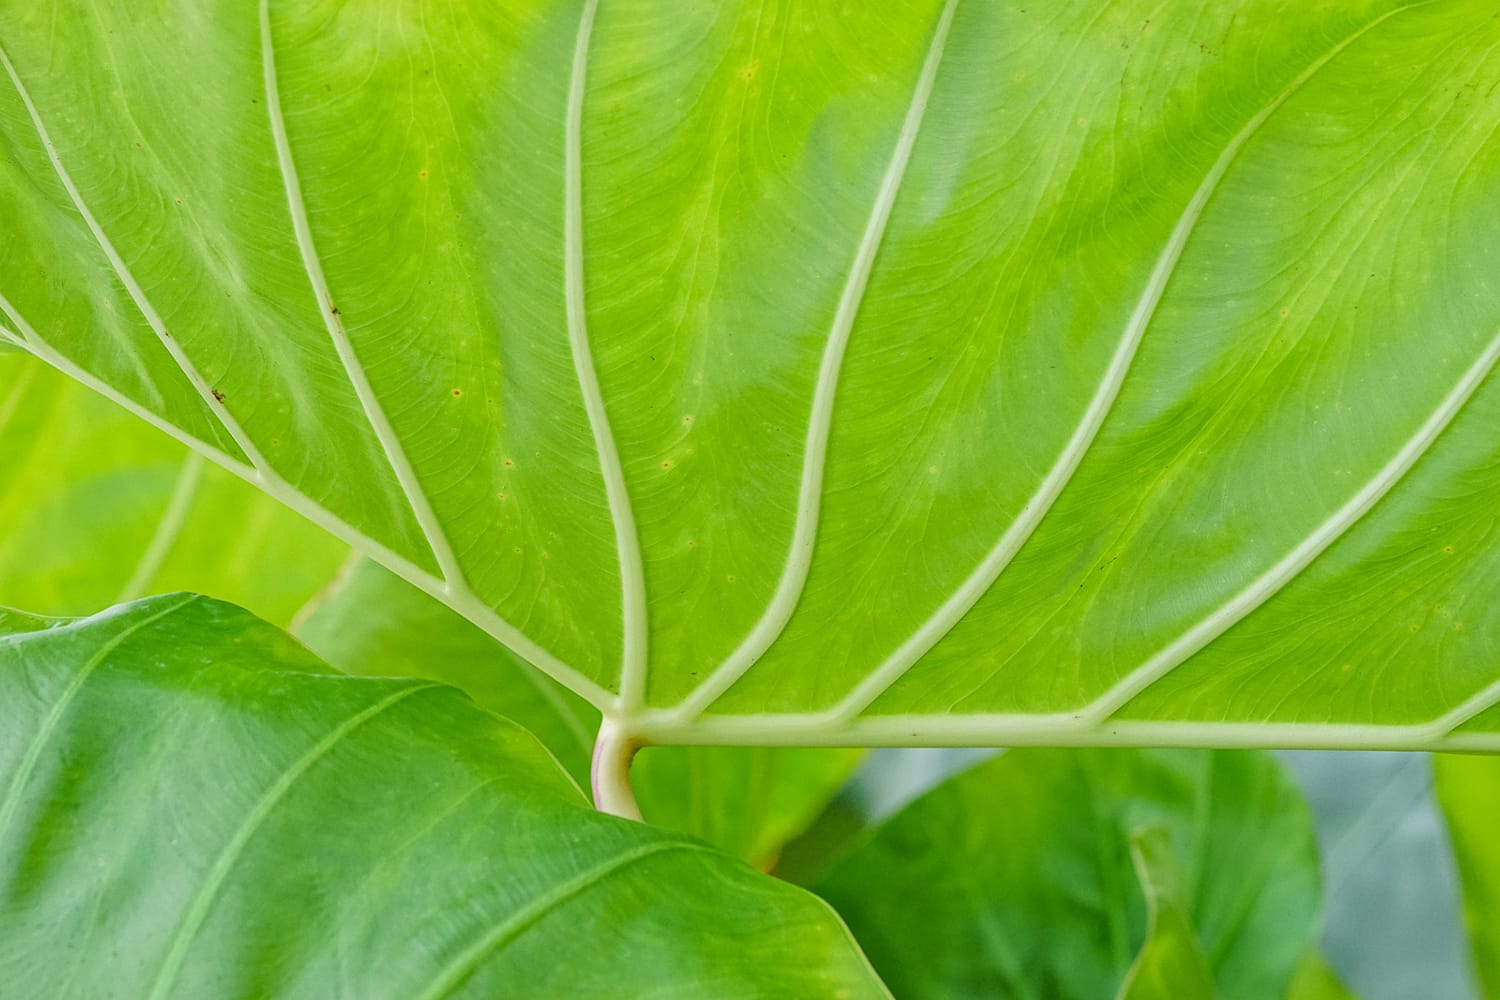
Original jpg image of leaf. My camera settings were 1/320 @ f/11, ISO 1600.
My original file is a jpg image rather than a raw file. This was an oversight on my part. My camera had just come back from cleaning and I didn’t notice that the setting had been changed. This mistake allows me to show you how much post-processing can be done on a jpg image.
If you look closely at the leaf, you’ll see that some green and yellow tones are lighter or darker than others. To see this more clearly, I move my exposure slider to the extreme left and right. I watch to see what parts of the image are the last to disappear. This helps me see the lightest and darkest parts of the image.
I learned this trick from master black and white photographer, Jack Curran. He introduced me to many of these post-processing techniques.
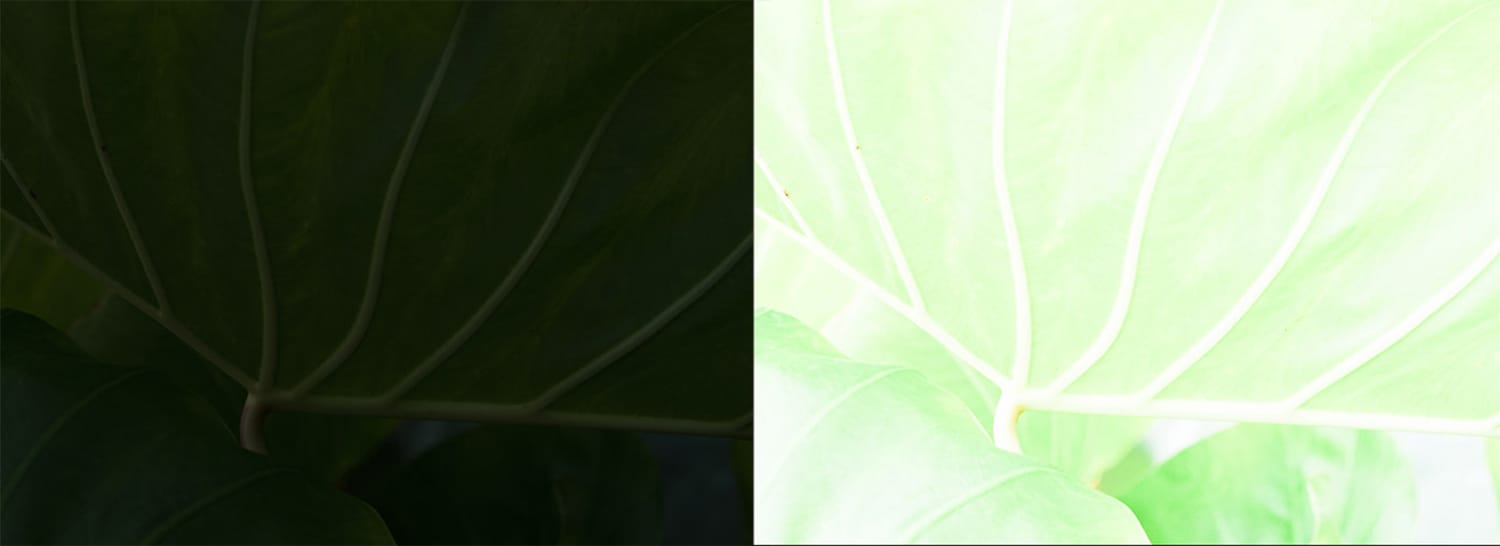
Moving my exposure slider to the extreme left (-4.00) and right (+3.00) lets me to see which parts of the image are lightest and darkest.
This informs my post-processing. I can choose to exaggerate the natural light or invert the light tendencies.
I start my dodging and burning process by deciding where the focal point is going to be. This is going to be the lightest part of the image, the place I want the viewer to look first.
I add a Radial Filter with the exposure set at -2.00 and feathering at 80%. Then I invert the filter so I am adjusting everything outside of the circle. To do this, click the Invert box at the bottom of the Radial Filter panel.
In effect, I’m adding a heavy vignette centered on a point that I’ve chosen.
Leaf image with heavy vignette added using the Radial Filter. The center of the vignette is the focal point of the image.
Once I have this dark foundation, I begin building up the exposure in certain parts of the image. I use Radial Filters to lighten select areas of the leaf. For finer adjustments, I use the brush tool.
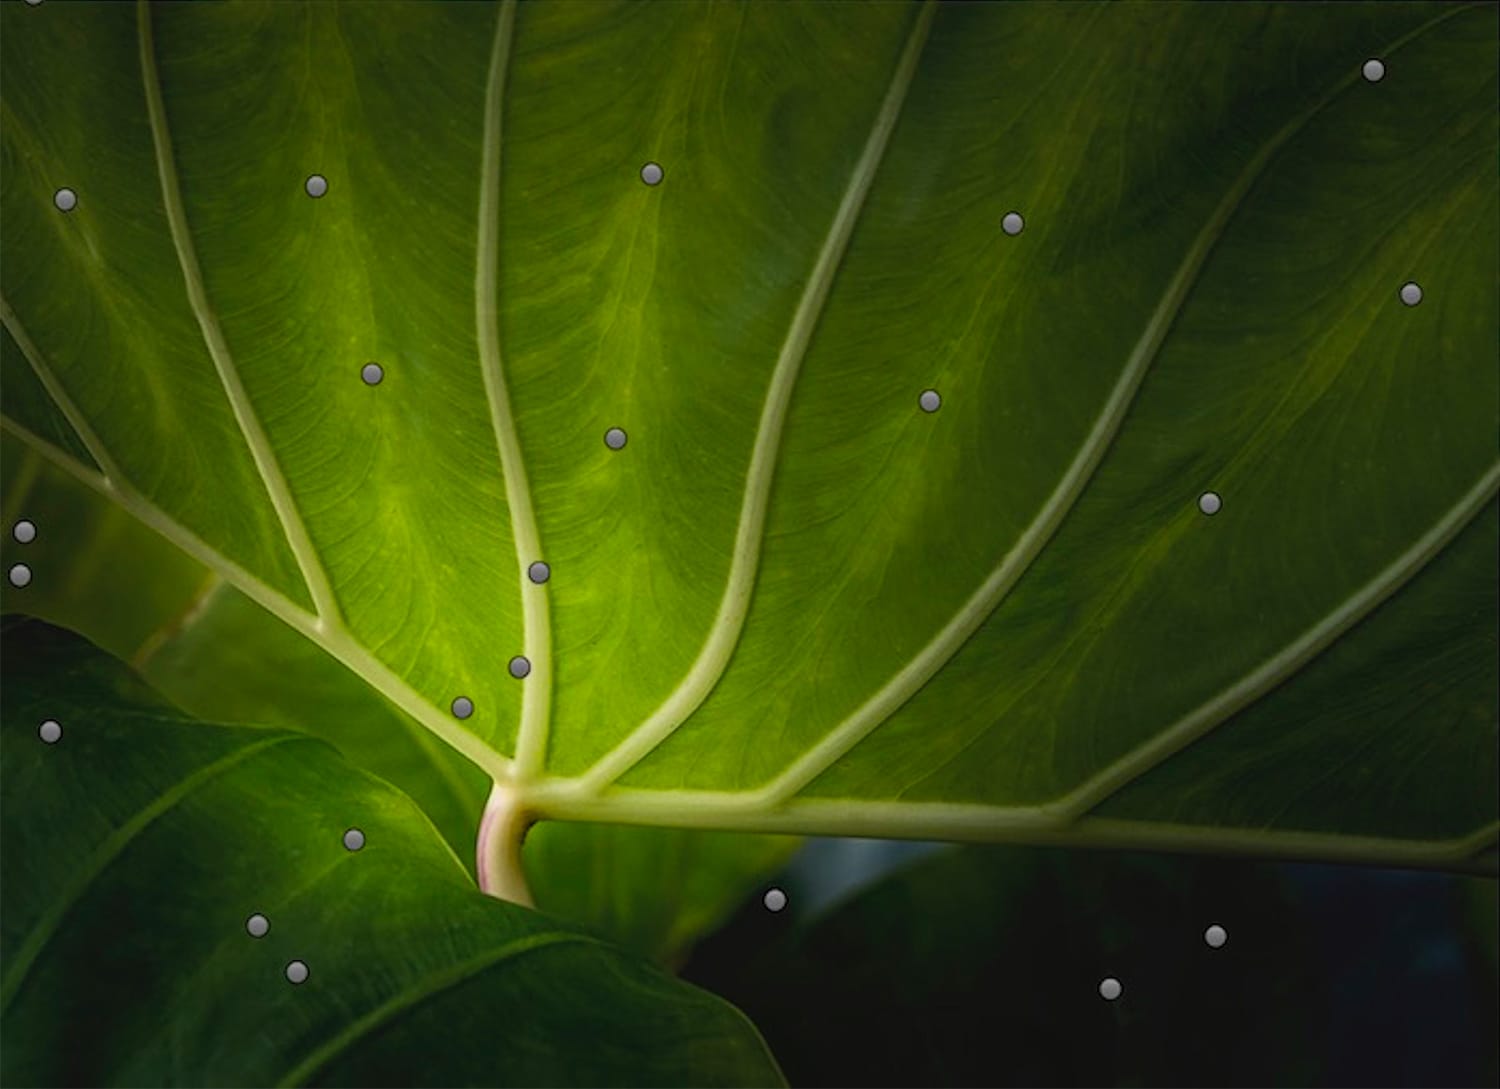
Screen shot of Lightroom image in Develop Module. Each pin represents a Radial Filter.
In general, I lightened the veins of the leaf and brought out the color shadings between the veins. I also add shading to the leaf in the lower left corner. This added dimension and visually separated the two leaves.
I’m painting with light.
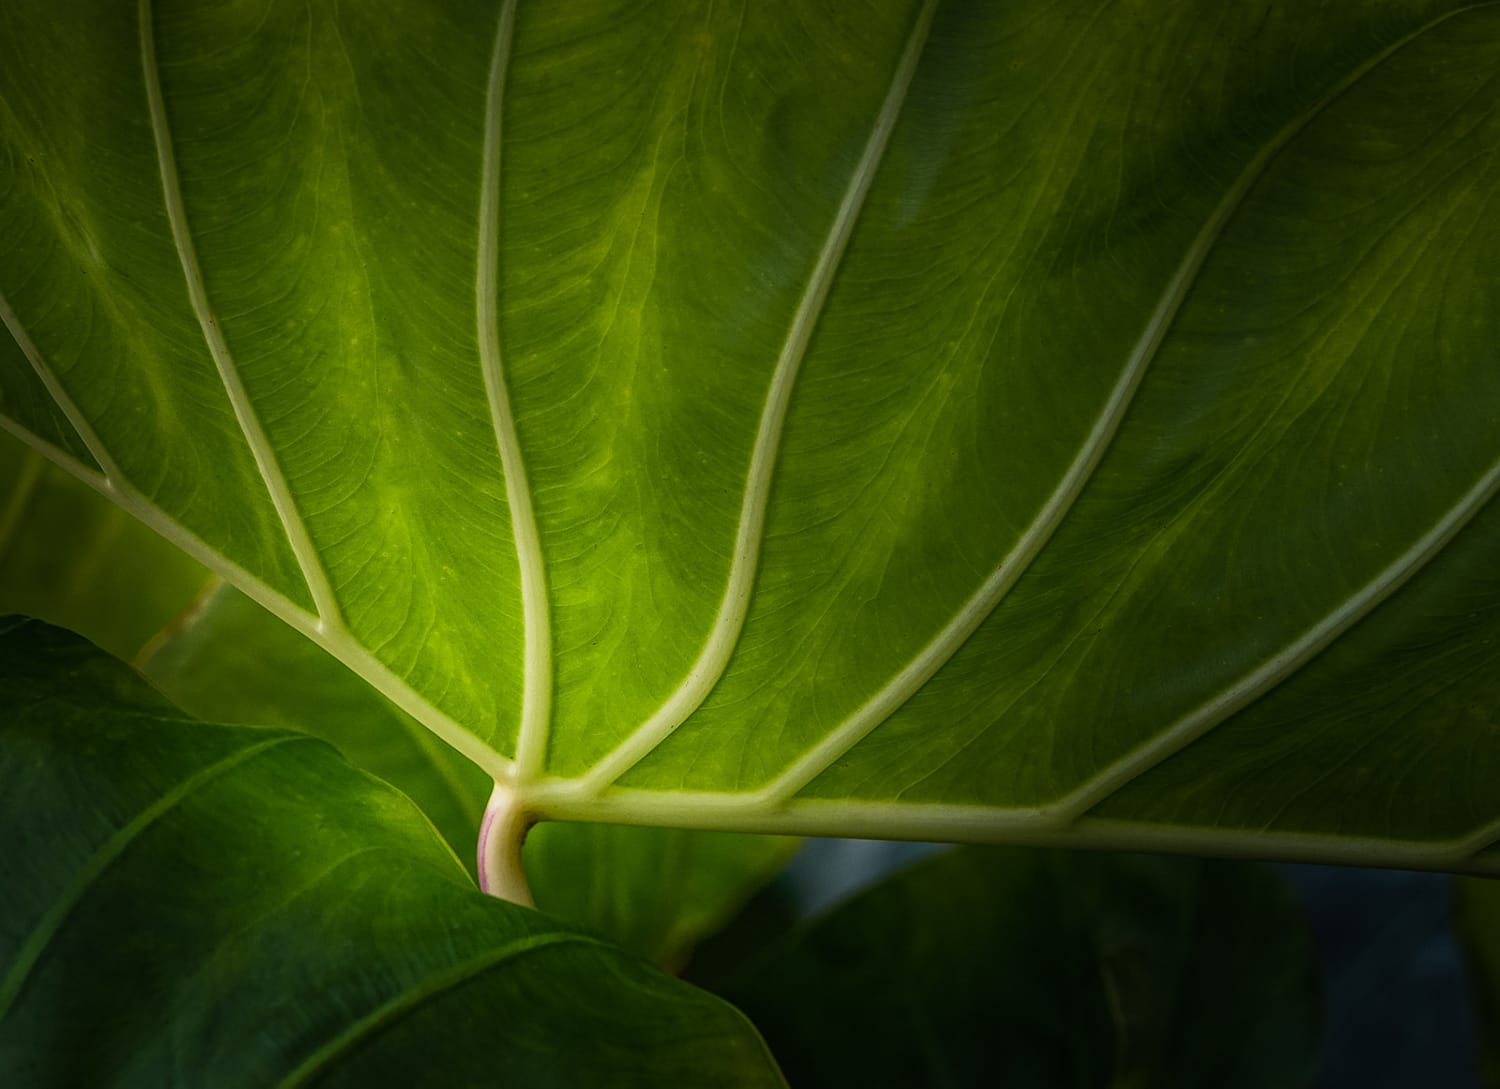
Final image of leaf with dramatic light added in post-processing.
I have even more flexibility when working with black and white images.
In this Tuscan image, I changed the direction of the light coming into the scene using a couple of Radial Filters. I added the light coming in from the upper right in the frame. Adding light like this works as long as I pay attention and brighten where the light might fall on the scene.
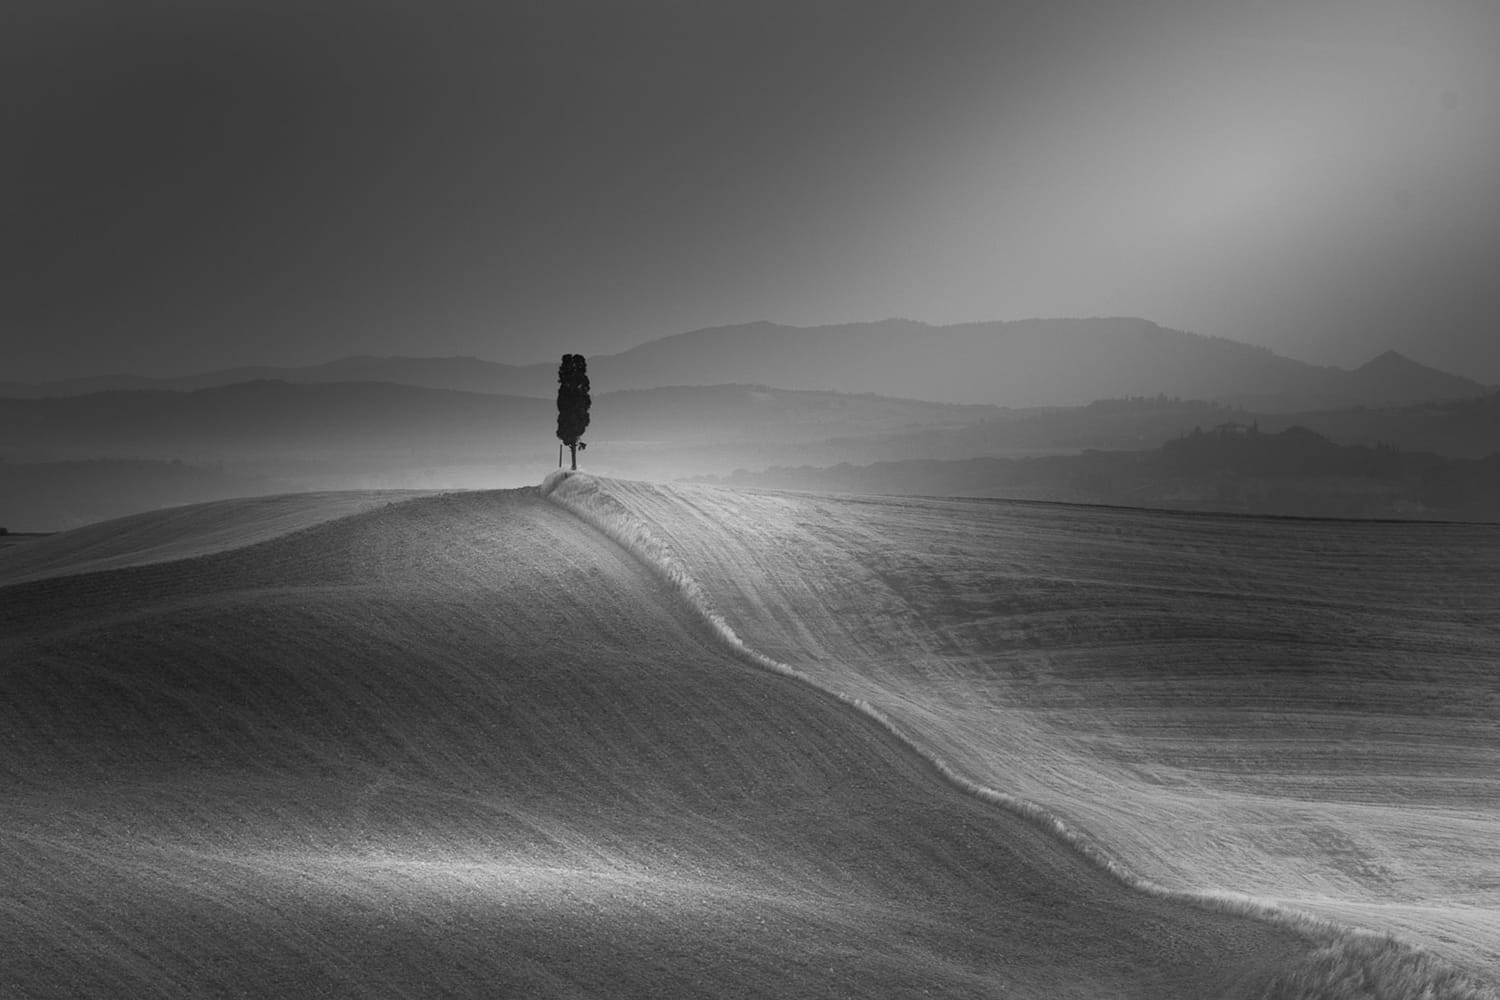
The image “Lone Tuscan Tree” was made in Italy near the town of Asciano. Sony A7II 166mm 1/25@f11 ISO100.
A lone tree stood on a hill reached by a narrow dirt track. Over the hill was a small town, but from where I stood, there was only me and the tree on this foggy morning.
The goal is to be as realistic as possible.
Be Brave! Go Bold!
Initially, I was shy about tweaking my Lightroom sliders more than a few ticks one way or the other. I was comfortable with my histogram peaking in the middle. But my photos, especially my black and white photos, were flat and lifeless.
To get the drama, I had to be brave. If I want a dark, dramatic photo, I have to move my exposure slider – a lot.
Dodging and burning allows me to decide consciously where to put the light.
Now, my histogram peaks more on to the left. I turn on the highlight and shadow warnings to let me know if I’ve gone too far. To do this, click the triangles located in the upper left and right of your histogram. But I’m ok if there’s just a touch of full black in my image.
Final Thoughts
For those of us who started photography with a digital camera, we missed the days in the darkroom. But we still can use tools like dodging and burning developed by the early film photographers.
Ansel Adams spent hours in the dark room dodging and burning an image. He took meticulous notes, so that the process could be replicated on future prints. Lightroom has made the process of dodging and burning simpler than ever. Once we decide on our dodging and burning, it becomes part of the image. Replication is not an issue.
Photographers dodge and burn to selectively fix exposure imbalances and for dramatic effect.
You don’t have to settle for the light you’re given. Dodging and burning are simple techniques, but they can have a powerful effect on your images.
Want to learn more about using Lightroom in your post-processing? The Lightroom Mastery ebook has you covered! Grab your copy today and become a master of photo editing.
About the Author: Jennifer Mishra
 Jenn Mishra is a fine art travel and landscape photographer based in the St. Louis metro area. Jenn is an active photographic educator and has been invited to speak at conferences such as Out of Chicago. Her photos have been featured in a number of solo exhibitions. Her studio is Wits End Photography. Follow Jenn on Instagram and Facebook.