How to Successfully Use the Histogram in Lightroom Classic

As one of the most popular photo editing programs available, photographers of all skill levels often find themselves using Lightroom Classic during post-processing.
However, one of Lightroom’s most useful features is often ignored, abandoned as a confusing heap of peaks and troughs. Can you guess what I’m talking about?
That’s right–the histogram!

What is Lightroom’s Histogram?
Because of its initially complex appearance, the histogram scares many Lightroom Classic users away. However, understanding how to best use the histogram on even the most basic level can be one of the most important steps to take as you work to up your post-processing game.
To access the histogram, select a photograph you want to edit in Lightroom Classic, then head to the Develop module. The histogram should display in the top right corner of the screen.
The core concept behind the histogram is actually rather simple. It’s a visual representation of all the pixels present in an image. When a picture is predominantly full of shadow, containing a lot of dark pixels, the histogram will have higher peaks on the left side.
Similarly, a photograph with plenty of highlights will have peaks on the right side. Midtone pixels result in other peaks throughout the middle range of the histogram.
Want to learn more about using the Histogram in Lightroom Classic? The Lightroom Mastery ebook has you covered! Grab your copy today and become a master of photo editing.
Using the Histogram to Improve the Photo Editing Process
Here, I’ve outlined some of the most basic ways to utilize the histogram to create better, more balanced photos.
1. Adjust Contrast
While most photographers will rely on their eyesight alone to evaluate contrast values in their images during post-processing, poor monitor calibration can cause unexpected differences between the appearance of a photograph on-screen and the way it looks once it’s printed. To avoid this common pitfall, use the histogram!
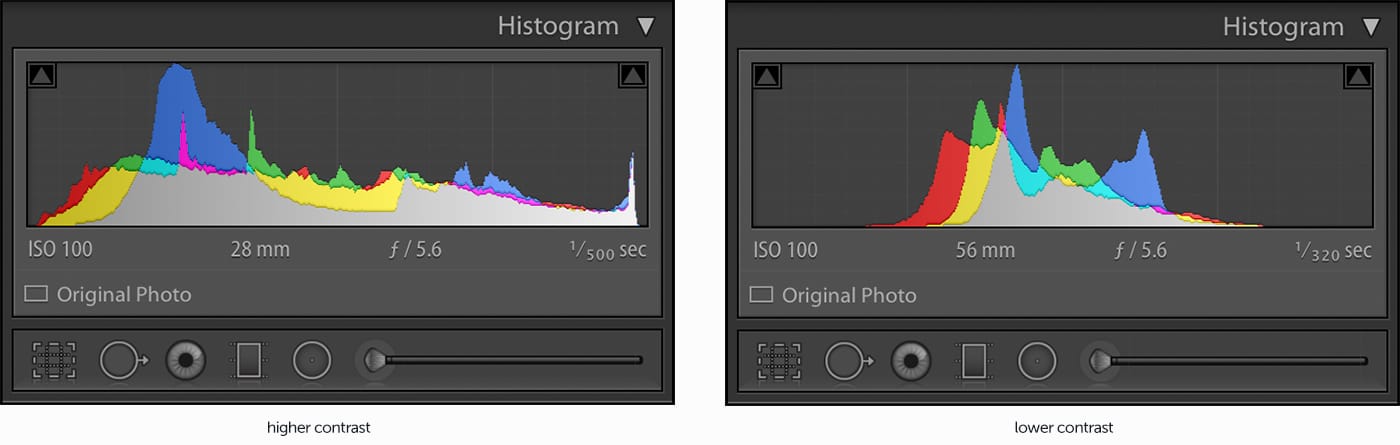
A photo with low contrast will have a histogram where all the peaks are lined up somewhere in the middle – in other words, it’s all midtones.
Higher contrast images will have much broader histograms, representing data across a range of light and dark parts of the scene.
Photos which appear a bit dull might benefit from additional contrast, so the histogram is an invaluable tool to determine which post-processing steps you’ll take after evaluating what the histogram has to say about contrast.
2. Check for Clipping
The histogram is also your one-stop shop to evaluate whether or not clipping is present in your photo. In other words, the histogram can help you determine if you’ve lost details of your photograph in too-dark shadows or overly highlighted areas.
As I mentioned previously, the histogram is a visual evaluation of an image’s tones, with the darkest shadows on the far left and the brightest highlights on the far right.
To quickly check whether or not you’ve sacrificed detail in your shot, take a look at the triangle icons in the upper left and right corners of the histogram.
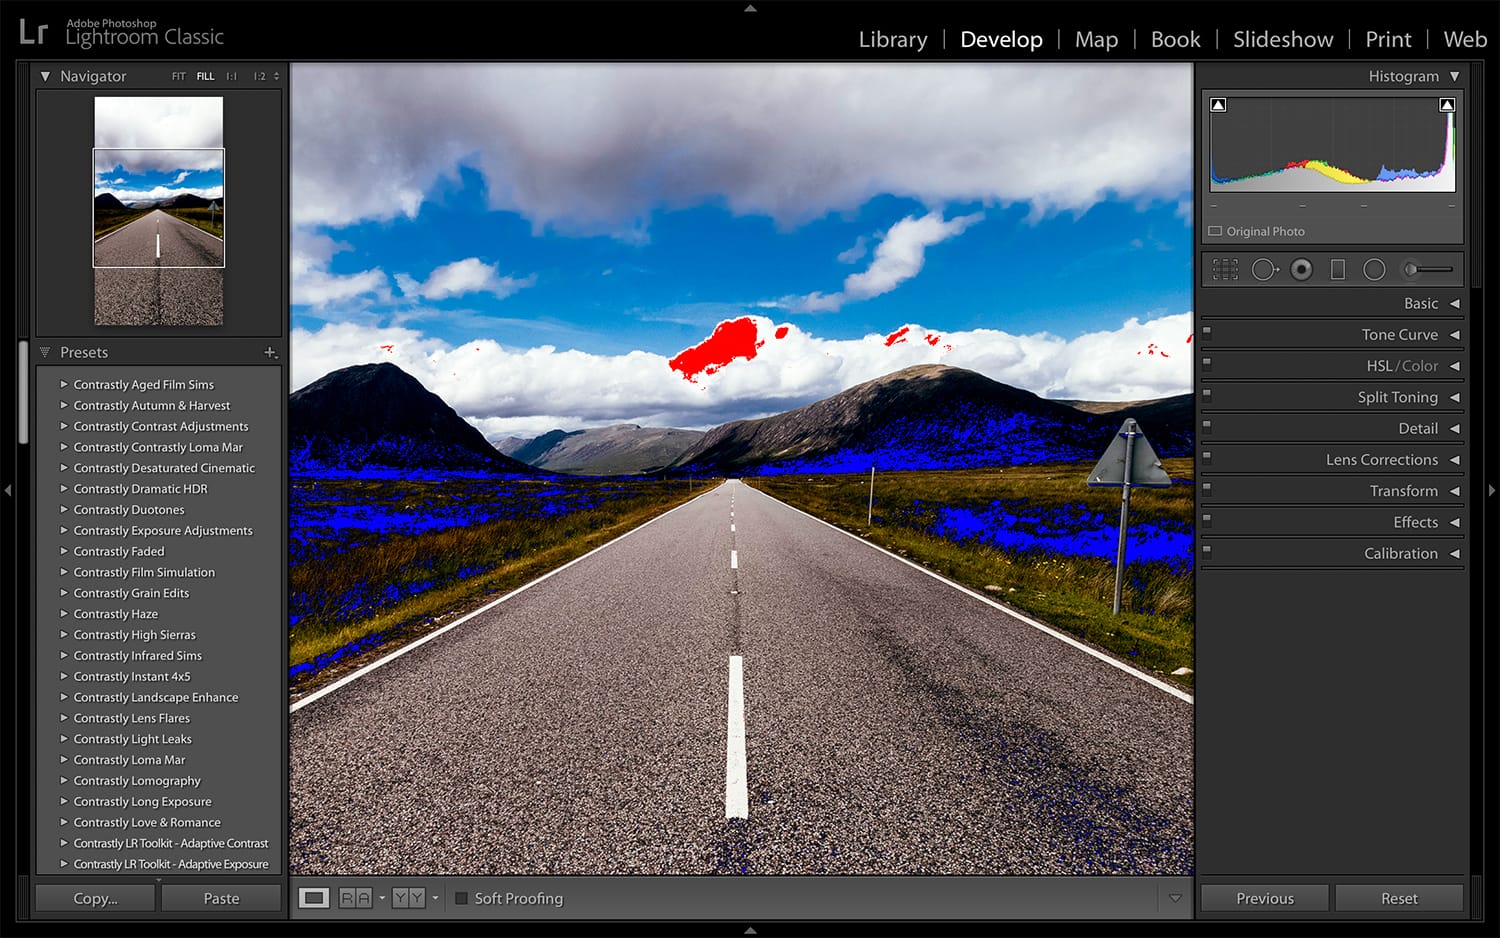
If both triangles are dark, congratulations! Your photo has no clipping. If the triangle icon on the left is highlighted, however, it means that there is shadow clipping present. Similarly, a highlighted triangle on the right means that there is highlight clipping.
To view exactly where clipping is present in the image, you can toggle the shadows and highlights overlays by clicking on the triangle icons or hitting J on your keyboard. Areas where highlight clipping is present will appear in red, while shadow clipping will be in blue.
3. Correct Clipping if Present
Once you’ve used the histogram to determine exactly where clipping is present in your photograph, you can use the histogram to reduce or eliminate the clipping altogether.
By hovering the cursor over the histogram, you’ll find four sections within the graph which correspond to the controls found within the Basic panel in the Develop module. These sections include:
- Blacks
- Shadows
- Exposure
- Highlights
- Whites
Adjust these controls via the graph itself by clicking inside a section of the histogram and sliding left or right, or using the corresponding sliders until you’ve successfully reduced the clipping. If you use the “click inside the histogram” method, you will notice that the corresponding sliders in the Basic panel move as you slide the histogram left or right.
4. Achieve Balanced Tones
In addition to shadows and highlights on the far edges of the histogram, the histogram also provides visual information about the midtones captured in each photograph. In other words, the histogram can provide information about the dynamic range of a photo – the range of light present in each image.
If you notice isolated peaks within certain parts of the histogram and long, flat valleys in others, then you’ve not captured the even amount of light necessary for a balanced photograph (this is not necessarily a bad thing, every photograph is different.)
Unless you’re specifically aiming for an image with extra shadows or a greater-than-usual proportion of highlights, use the histogram as a guide during photo-editing.
If, for example, you find that you’re lacking midtones or have excess peaks on the left of the histogram, you might consider adding a fill flash to even things out.
Manipulating the histogram in Lightroom Classic may not come naturally at first, but with practice and patience, you can train your eyes to understand how histogram adjustments can improve your photos.
Using the histogram in Lightroom (or any other photo editing application) can also help you while you’re out in the field shooting. After all, your camera also has a histogram! As always, experiment and don’t be afraid to make mistakes.
Want to learn more about using the Histogram in Lightroom Classic? The Lightroom Mastery ebook has you covered! Grab your copy today and become a master of photo editing.
About the Author: Jon C. Phillips
 Jon C. Phillips is a photographer, watch lover, product developer/designer, guitarist & musician, and all-around web nerd. He's the founder of Contrastly which he launched in late-2012. He also co-founded DailyPhotoTips and TheDailyPreset.